Hosting a get-together demands snacks that move from oven to table and invite conversation. We aim for crisp, golden bites that pair well with wine, beer, or a bright dipping sauce.
This roundup covers everything from air-fried cauliflower wings and crispy baked chickpeas to golden polenta bites, quinoa cakes, and tempura-style mushrooms. We also include lighter options like kale chips, crunchy rice-paper rolls, and carrot fries with tahini.
Most recipes use pantry staples and require minimal hands-on time, so we can prep trays ahead and enjoy the room. We add simple serving and make-ahead notes so hosting feels relaxed and manageable.
1. Baked Chickpea Snacks
Crunchy roasted chickpeas make a quick, protein-packed snack that's easy to pull together after dinner or for a party - think about vegetables to serve with baked fish when building a balanced spread.
Why This Recipe Works
These chickpeas crisp up in a hot oven and hold their crunch as they cool. The simple spice mix gives clear, reliable flavor with minimal hands-on time.
- High-heat oven crisping - Roasting at 400°F dries the skins and produces a crunchy exterior.
- Cornstarch crunch coating - A light dusting pulls moisture from the surface so the chickpeas brown and crisp evenly.
- Single-sheet pan method - Baking on one rimmed sheet ensures even heat and simple cleanup.
- Make-ahead friendly - They store well in an airtight container and stay tasty for several days.
Ingredient Swap Ideas
Small swaps help with ingredient availability, dietary needs, or preferred flavors while keeping the same baking method and texture.
If a recipe calls for a hearty protein, check ground beef dinner ideas beyond tacos for inspiration on sturdy, savory mains that pair with similar sides.
- Chickpeas - Use home-cooked chickpeas instead of canned; pat them extra dry since they retain more moisture.
- Olive oil - Swap with avocado oil for a higher smoke point; it coats the beans the same way.
- Cornstarch - Use chickpea flour or arrowroot powder for similar crisping, though browning may vary slightly.
- Smoked paprika - Use regular paprika plus a small pinch of cumin for a mild smoky profile if smoked paprika is unavailable.
Ingredients
- 2 (15-ounce) cans chickpeas - drained and patted dry.
- 1 tablespoon olive oil - for coating.
- 1 teaspoon cornstarch - helps create a crisp shell.
- 1 teaspoon smoked paprika - for smoky flavor.
- ½ teaspoon garlic powder - for savory depth.
- ½ teaspoon kosher salt - adjust to taste.
- ¼ teaspoon ground black pepper - for mild heat.
Instructions
- Preheat the oven to 400°F and place a rack in the center.
- Drain the chickpeas and pat them very dry with paper towels, removing loose skins where possible.
- Toss the chickpeas with cornstarch, olive oil, smoked paprika, garlic powder, salt, and black pepper until evenly coated.
- Spread the coated chickpeas in a single layer on a rimmed baking sheet.
- Bake for 25-35 minutes at 400°F, shaking the pan every 10 minutes, until the chickpeas are golden and crisp.
- Cool on the baking sheet for 10 minutes so they crisp up fully, then serve or store in an airtight container once completely cool.
2. Air-Fried Cauliflower Wings
These crunchy, spicy cauliflower bites are an easy way to serve a satisfying snack or appetizer. The batter gives a crisp exterior while a tangy hot-sauce glaze delivers the main flavor note - ideal for game day or casual gatherings.
Why This Recipe Works
These wings get crisp without deep-frying, and the simple batter sticks well to florets for consistent coverage. The quick glaze keeps the pieces saucy without sogginess.
- Crispy air-fry finish - High heat and a bit of baking powder create a crunch similar to fried wings.
- Wet-to-dry coating - A thin batter then panko ensures even coverage and a sturdy crust.
- Quick spicy glaze - A hot-sauce and butter mix clings to the crust for bright heat.
- Single-basket batches - You can cook in a few quick rounds to keep pieces crisp and evenly browned.
Ingredient Swap Ideas
Swaps help when you need gluten-free, vegan, or pantry-friendly options without changing the method. Each swap keeps the same general flavor direction.
- All-purpose flour - Use chickpea flour for a gluten-free batter that still browns well.
- Panko breadcrumbs - Swap crushed cornflakes or tortilla chips for similar crunch, noting a slightly different texture.
- Hot sauce - Use sriracha or sweet-chili sauce for a different heat profile that still coats well.
- Butter - Replace with melted vegan butter or neutral oil for a dairy-free glaze with the same shine.
Ingredients
- 1 head cauliflower (about 1½-2 lb) - cut into bite-size florets.
- 1 cup all-purpose flour - for the batter.
- 1 cup water - or unsweetened plant milk for the batter.
- 1 teaspoon garlic powder - for savory depth.
- 1 teaspoon smoked paprika - adds smoky warmth.
- 2 teaspoon baking powder - helps the coating crisp.
- 1 teaspoon salt - adjust to taste.
- ½ teaspoon black pepper - freshly ground if possible.
- 1 cup panko breadcrumbs - for a crunchy coating.
- 2 tablespoon neutral oil - plus extra for spraying.
- ⅓ cup hot sauce - your preferred brand or style.
- 2 tablespoon butter - melted; use vegan butter to make dairy-free.
Instructions
- Preheat the air fryer to 400°F (200°C). While it warms, spray the basket lightly with oil and set up a batter bowl and a shallow plate with panko.
- Whisk the flour, water, garlic powder, smoked paprika, baking powder, salt, and pepper until smooth, about 30 seconds. The batter should be slightly thick but pourable.
- Dip each cauliflower floret into the batter, let excess drip off, then press into panko to coat. Arrange in a single layer in the air fryer basket, leaving space between pieces.
- Air fry at 400°F for 12-15 minutes, shaking or flipping halfway through, until edges are golden and crisp. Cook in additional batches if needed so pieces do not crowd.
- Whisk the hot sauce and melted butter, toss the cooked cauliflower in the glaze to coat evenly, and return to the air fryer for 1-2 minutes if you want the sauce to set slightly. Serve immediately.
3. Golden Lentil Fritters
These lentil fritters are an easy, satisfying way to get protein and crunch on the table.
They feature warm cumin and bright lemon, and they work well for a weeknight main or party snack.
Why This Recipe Works
You get crisp, savory patties with a tender, protein-rich interior.
The method keeps prep fast and reliable.
- Quick-cooking red lentils - Red lentils soften fast so the base cooks in about 20 minutes.
- Crisp pan-fry finish - Shallow frying creates a crunchy exterior without deep-frying.
- Warm citrus-spice balance - Cumin and lemon add depth and freshness that pair with many dips.
- Make-ahead firming step - Chilling the shaped patties makes them easier to fry and prevents breakage.
Ingredient Swap Ideas
Swapping lets you adapt for allergies, diet needs, or what's in the pantry.
Use these options without changing the basic frying method.
- Red lentils - Use yellow split peas for a similar soft texture; they may need 5-10 extra minutes of cooking.
- Egg - Replace with ¼ cup mashed cooked chickpeas for vegan binding; add 1-2 tablespoons flour if the mix is loose.
- Panko breadcrumbs - Swap with fine gluten-free breadcrumbs or crushed cornflakes for comparable crispness.
- All-purpose flour - Use chickpea flour for a nuttier flavor and similar binding; expect a slightly denser fritter.
Ingredients
- 1 cup red lentils - rinsed and drained.
- 2 cups water - for cooking lentils.
- 1 small yellow onion - finely chopped.
- 2 garlic cloves - minced.
- 1 large egg - lightly beaten.
- ½ cup panko breadcrumbs - packed.
- ¼ cup all-purpose flour - for binding.
- 1 teaspoon ground cumin - for warmth.
- 1 teaspoon salt - adjust to taste.
- ¼ teaspoon black pepper - freshly ground.
- ¼ cup fresh cilantro - chopped.
- 2 tablespoons lemon juice - fresh.
- ¼ cup vegetable oil - for pan-frying.
Instructions
- Simmer the lentils: Bring lentils and water to a boil, then reduce heat and simmer 12-15 minutes until very soft and most water is absorbed.
- Drain and mash the lentils: Drain any excess liquid, then mash the warm lentils with a fork or potato masher until mostly smooth; cool 10 minutes.
- Stir the mixture: Add onion, garlic, egg, panko, flour, cumin, salt, pepper, cilantro, and lemon juice, and mix until the mixture holds together; add 1-2 tablespoons more panko if too wet.
- Shape the patties: Form about 12 patties (2 inches each) and place them on a tray; chill 10 minutes to firm.
- Fry until golden: Heat oil in a skillet over medium heat and fry patties 3-4 minutes per side until golden and crisp; transfer to paper towels and serve warm.
4. Vegan Potato Wedges
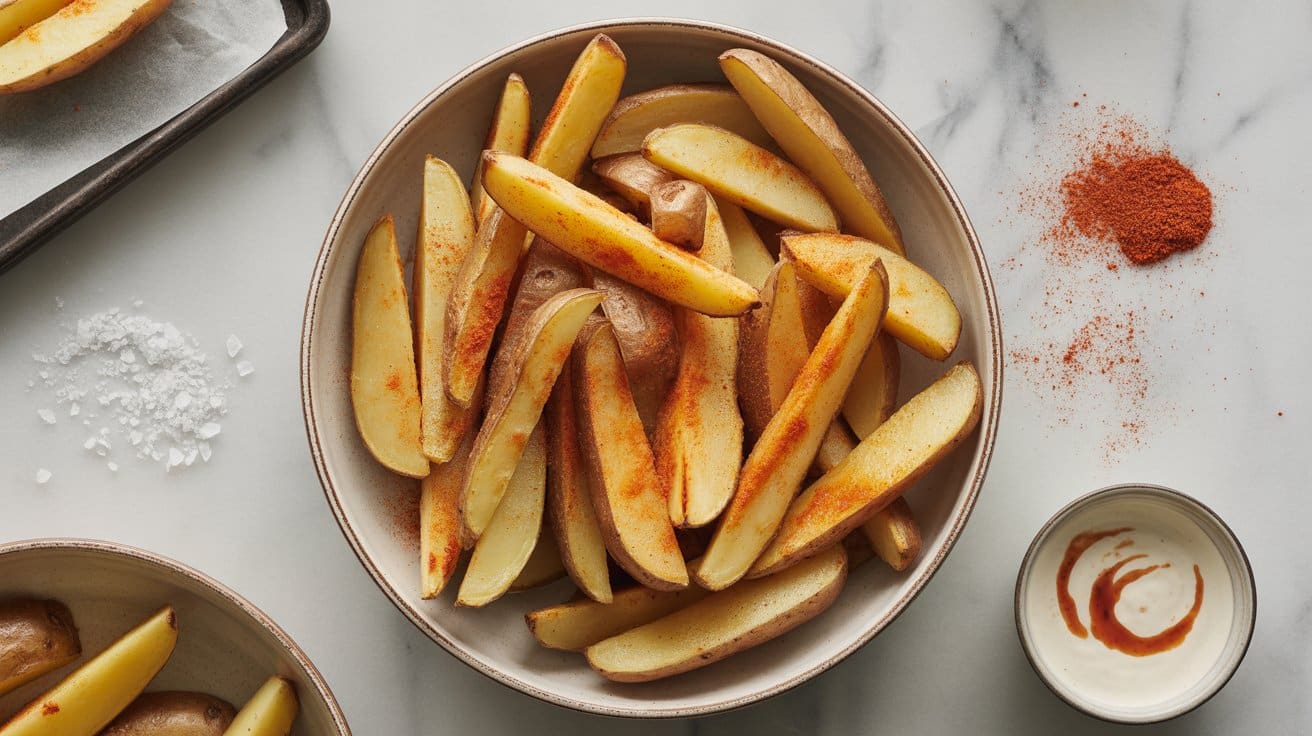
They're easy to pull together for a weeknight dinner, snack, or casual party plate and stay great for meal prep - pair them with vegan pasta creamy sauces for dinners.
Why This Recipe Works
The wedges come out crisp on the outside and fluffy inside, while a short soak and light coating help with reliable browning. The high oven temperature and single-layer roasting finish them quickly without extra fuss.
- Starch removal for crisp - Soaking the cut wedges reduces surface starch so edges brown and crisp in the oven.
- Thin cornstarch coating - A light dusting of cornstarch forms a crunchy exterior while keeping the interior tender.
- High-heat roasting - Baking at 425°F quickly browns the edges and cooks wedges through without drying them.
- Single-layer baking - Spacing wedges on the sheet prevents steaming and ensures even color and texture.
Ingredient Swap Ideas
Swaps make the recipe adaptable for what you have or dietary preference. Each suggestion keeps the same roasting method and overall flavor.
- Russet potatoes - Use Yukon Gold for a creamier interior; they may roast a few minutes faster.
- Cornstarch - Swap with rice flour for crisping if you need a gluten-free option; texture will be slightly different.
- Olive oil - Use avocado oil for a higher smoke point and a more neutral taste.
- Smoked paprika - Replace with regular paprika plus ¼ teaspoon ground cumin for a milder smoky note.
Ingredients
- 2 lb russet potatoes - scrubbed and cut into 8 wedges each.
- 2 tablespoons cornstarch - for a light crisp coating.
- 2 tablespoons olive oil - room temperature.
- 1 teaspoon smoked paprika - for smoky flavor.
- 1 teaspoon garlic powder - for savory depth.
- ½ teaspoon onion powder - to round the seasoning.
- 1 teaspoon kosher salt - adjust to taste.
- ½ teaspoon black pepper - freshly ground.
- 1 tablespoon chopped parsley - optional, for garnish.
Instructions
- Preheat the oven to 425°F and position the rack in the upper-middle.
- Cut the potatoes into wedges, about 8 per potato, for even cooking.
- Soak the wedges in cold water for 20 minutes, then drain and pat very dry with towels.
- Toss the dry wedges with cornstarch, olive oil, smoked paprika, garlic powder, onion powder, salt, and pepper until evenly coated.
- Spread the wedges skin-side down in a single layer on a baking sheet and bake at 425°F for 30-35 minutes, flipping once halfway, until edges are golden and crisp.
- Serve warm sprinkled with chopped parsley and your preferred dipping sauce.
5. Herbed Roasted Vegetable Skewers
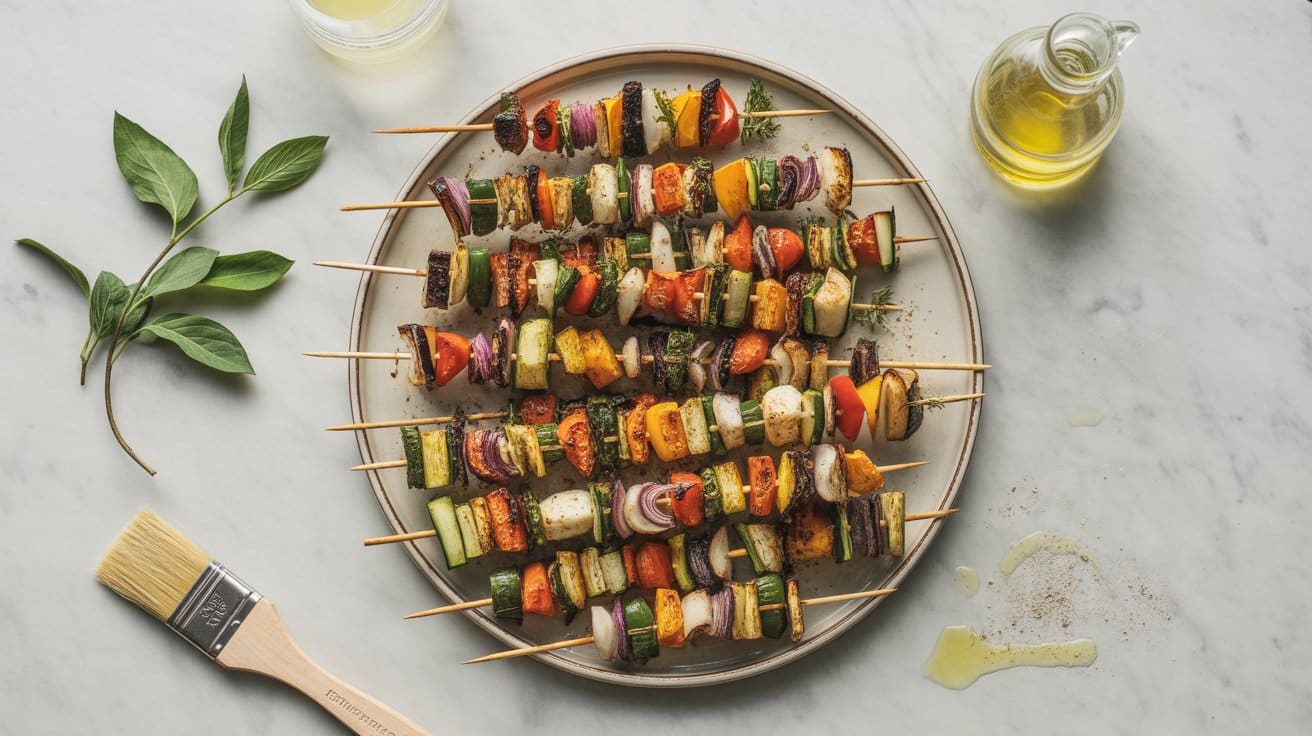
These skewers are an easy, satisfying way to bring colorful, herby vegetables to the table - and they're a good example when reading about egg as fruit or vegetable explanation for curious cooks.
Why This Recipe Works
Roasting concentrates natural sugars and builds light char for texture. Skewering keeps pieces even and makes serving straightforward.
- High-heat oven roasting - that quick, hot roast caramelizes edges for deeper taste and better texture.
- Herb oil coating - a simple oil, garlic, and herb toss helps seasoning cling and penetrate each piece.
- Uniform bite-size pieces - cutting vegetables the same size ensures even cooking across all skewers.
- Easy serving skewers - threaded vegetables roast and plate together, which speeds serving and cleanup.
Ingredient Swap Ideas
Swaps let you use what's in your fridge or meet diet needs without changing the method. Pick items that roast at similar temperatures so cooking time stays predictable.
- Bell peppers - use poblano or long sweet peppers; they roast similarly and keep a bright color.
- Zucchini - swap with eggplant cubes; eggplant chars like zucchini but soaks more oil, so reduce oil slightly.
- Cremini mushrooms - use firm tofu cubes (pressed) for a vegetarian protein option that browns similarly.
- Fresh herbs - use 1 teaspoon dried mixed herbs in place of 1 tablespoon fresh; dried are concentrated so use less.
Ingredients
- 2 medium bell peppers - seeded and cut into 1-inch pieces.
- 1 medium zucchini - cut into ½-inch slices.
- 1 small red onion - cut into wedges.
- 8 oz cherry tomatoes - left whole or halved.
- 8 oz cremini mushrooms - stems trimmed.
- 3 tablespoon olive oil - for tossing.
- 2 cloves garlic - minced.
- 2 tablespoon fresh mixed herbs - chopped (parsley, thyme, or rosemary).
- 1 teaspoon kosher salt - adjust to taste.
- ½ teaspoon black pepper - freshly ground.
- 1 lemon - cut into wedges for serving.
- 8 metal or soaked wooden skewers - if using wood, soak 30 minutes.
Instructions
- Preheat the oven to 425°F (220°C). Place a rimmed baking sheet in the oven while it heats.
- Toss the cut vegetables with olive oil, minced garlic, chopped herbs, salt, and pepper. Make sure each piece is evenly coated.
- Thread the vegetables onto skewers, alternating colors and textures so pieces cook evenly.
- Roast the skewers on the hot baking sheet for 12-15 minutes at 425°F, turning once halfway, until edges are lightly charred and vegetables are tender.
- Finish by squeezing lemon over the skewers and serve warm.
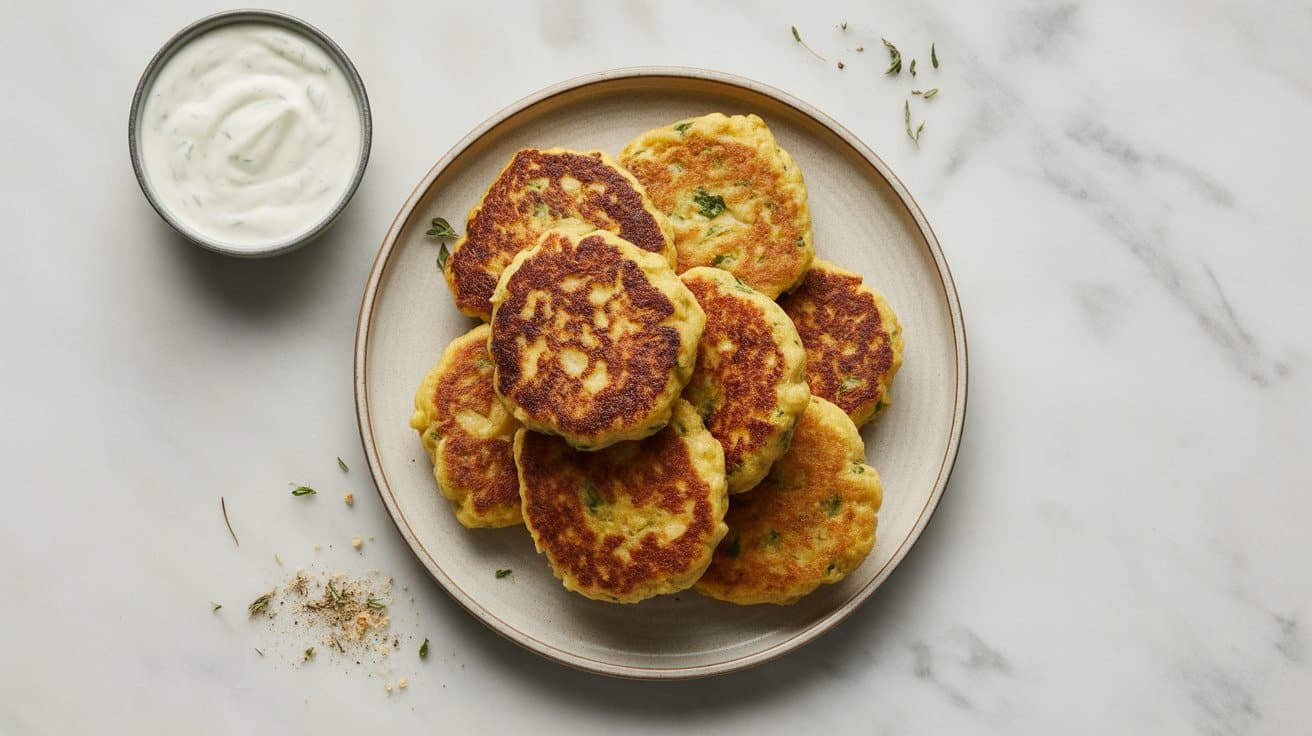
6. Quinoa Cakes
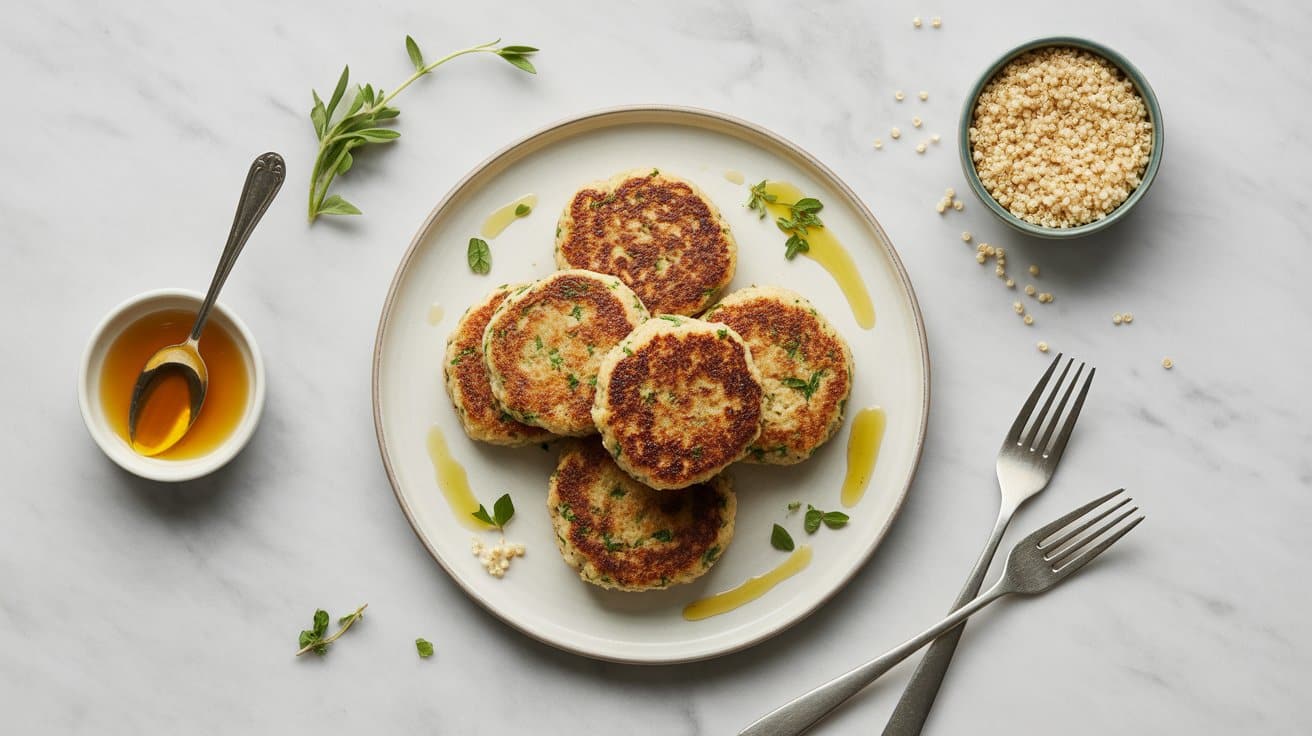
Light, golden cakes made from cooked quinoa and grated vegetables are simple to prepare and very satisfying. They have a bright lemon-herb note and a crisp exterior, making them great for weeknight dinners, brunch, or meal prep.
Why This Recipe Works
You get a crisp outside with a tender, chewy center. The recipe uses few steps and straightforward ingredients.
- Cooked quinoa base - Using fully cooked, cooled quinoa gives a light, chewy interior that holds the cakes without becoming dense.
- Binder plus breadcrumbs - Egg and panko create structure so the cakes keep their shape while frying.
- Grated vegetables inside - Carrot and green onion add moisture and mild sweetness, which keeps the cakes tender.
- Pan-fry for crust - Shallow frying in oil produces a golden, crisp crust that contrasts the soft center.
Ingredient Swap Ideas
Swaps make the recipe work with what you have or suit dietary needs without changing the method.
- Quinoa - Use cooked couscous or bulgur for a similar texture and quicker prep; couscous yields a softer crumb.
- Egg - Use 2 tablespoons flaxseed meal mixed with 6 tablespoons water as a vegan binder; expect a slightly softer texture.
- Panko breadcrumbs - Use fine cornmeal or rolled oats to absorb moisture and help crisp the exterior; browning may vary.
- Olive oil - Use a neutral oil (canola or vegetable) for higher-heat browning and a crisper crust.
Ingredients
- 1 cup quinoa - rinsed.
- 2 cups water - for cooking quinoa.
- 1 large egg - beaten.
- ½ cup panko breadcrumbs - or fine breadcrumbs.
- ½ cup grated carrot - finely grated.
- ¼ cup green onions - thinly sliced.
- ¼ cup fresh parsley - chopped.
- 1 clove garlic - minced.
- 1 teaspoon lemon zest - from 1 lemon.
- ½ teaspoon salt - adjust to taste.
- ¼ teaspoon black pepper - freshly ground.
- 3 tablespoon olive oil - for frying.
Instructions
- Cook the quinoa for 12-15 minutes over medium-low heat with 2 cups water, until water is absorbed and grains are tender. Fluff with a fork and let cool 10 minutes.
- Mix the cooled quinoa with the beaten egg, panko, grated carrot, green onions, parsley, garlic, lemon zest, salt, and pepper in a large bowl until evenly combined.
- Chill the mixture in the refrigerator for 10 minutes so it firms slightly and is easier to shape.
- Form the mixture into 8-10 cakes about 2½ inches wide, pressing each gently to compact.
- Heat 1 tablespoon olive oil in a nonstick skillet over medium and fry the cakes 3-4 minutes per side, until golden and crisp. Drain briefly on paper towels and serve warm.
7. Zucchini and Chickpea Bites
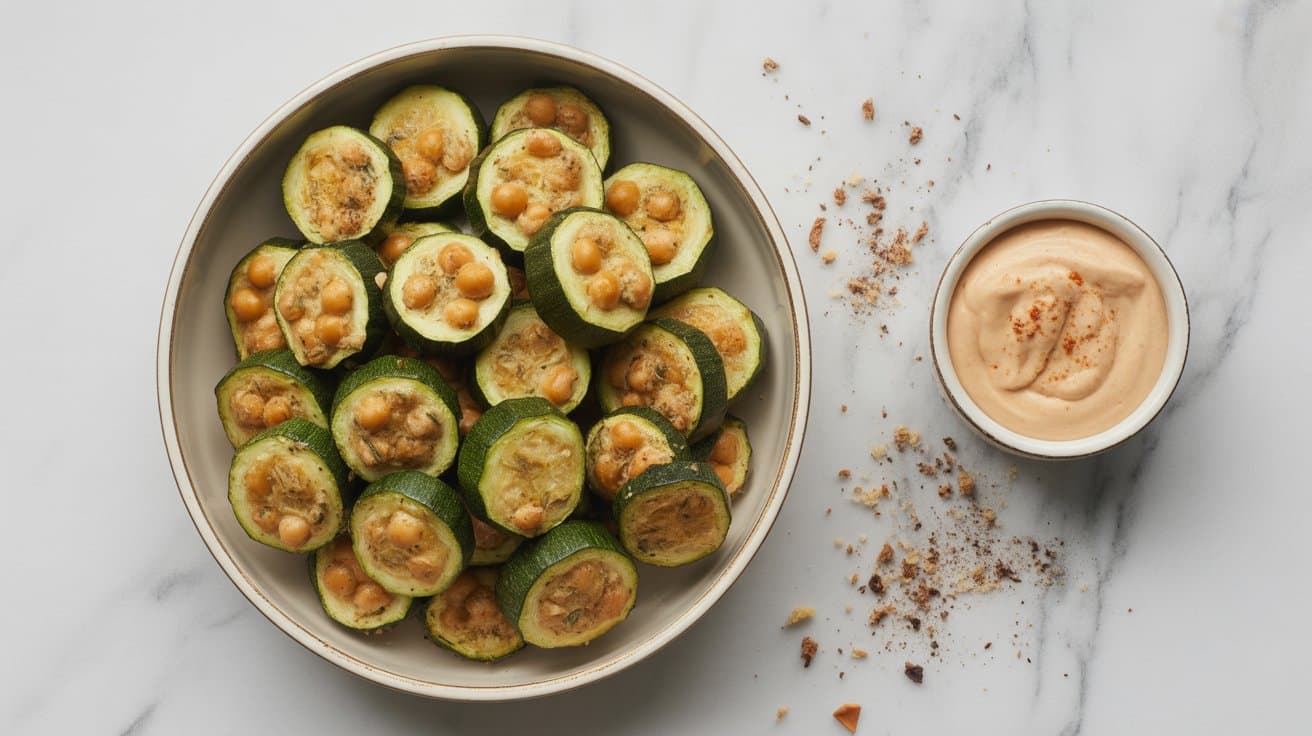
These light bites are easy to make and very satisfying for snacks, lunch, or a simple weeknight meal - they share the same small-plate spirit as vegan bao soft fluffy bites.
Why This Recipe Works
These bites hold together well and roast quickly for a crisp exterior with a tender center. The method keeps prep short and scales easily for batches.
- Crisp golden edges - High-heat baking produces a lightly crisp exterior while keeping the inside moist.
- Chickpeas add bulk - Mashed chickpeas provide protein and structure so the bites do not fall apart.
- Zucchini moisture control - Squeezing grated zucchini removes excess liquid and prevents sogginess.
- Single-sheet baking - You cook a whole batch on one tray for easy serving and cleanup.
Ingredient Swap Ideas
Swaps help adapt to allergies, pantry items, or personal taste while keeping the same method and overall flavor. Use swaps that maintain the binding and texture so the bites hold their shape.
- Panko breadcrumbs - Swap for fine gluten-free breadcrumbs or ⅓ cup oat flour; texture may be slightly denser.
- Egg - Swap for 1 tablespoon ground flaxseed mixed with 3 tablespoons water (let sit 5 minutes); it will bind but be a touch softer.
- Parmesan cheese - Swap for 2 tablespoons nutritional yeast for a savory, dairy-free option.
- Zucchini - Swap for yellow summer squash, grated and squeezed; cook time and method are the same.
Ingredients
- 2 medium zucchini - grated and squeezed to remove excess moisture.
- 1 (15 oz) can chickpeas - drained and roughly mashed.
- 1 large egg - beaten.
- ½ cup panko breadcrumbs - or fine breadcrumbs.
- ¼ cup grated Parmesan cheese - packed.
- 2 cloves garlic - minced.
- 2 tablespoons fresh parsley - chopped.
- 1 teaspoon ground cumin - for warmth.
- ½ teaspoon smoked paprika - for mild smokiness.
- ¾ teaspoon salt - adjust to taste.
- ¼ teaspoon black pepper - freshly ground.
- 1 tablespoon olive oil - for brushing.
- 1 lemon - cut into wedges for serving.
Instructions
- Preheat the oven to 425°F (220°C). Line a baking sheet with parchment paper.
- Grate the zucchini and squeeze out excess moisture using a clean towel or cheesecloth for about 1-2 minutes, until mostly dry.
- Mash the chickpeas with a fork in a large bowl, then add the beaten egg, panko, Parmesan, garlic, parsley, cumin, paprika, salt, and pepper; mix until combined and the mixture holds when pressed, about 1 minute.
- Form the mixture into 18-20 small patties or 1-inch balls and place them on the prepared baking sheet; brush the tops with olive oil.
- Bake for 18-20 minutes, flipping once halfway through, until golden and set; let cool 3 minutes before serving with lemon wedges, as they will firm slightly as they cool.
8. Vegan Mushroom Tempura
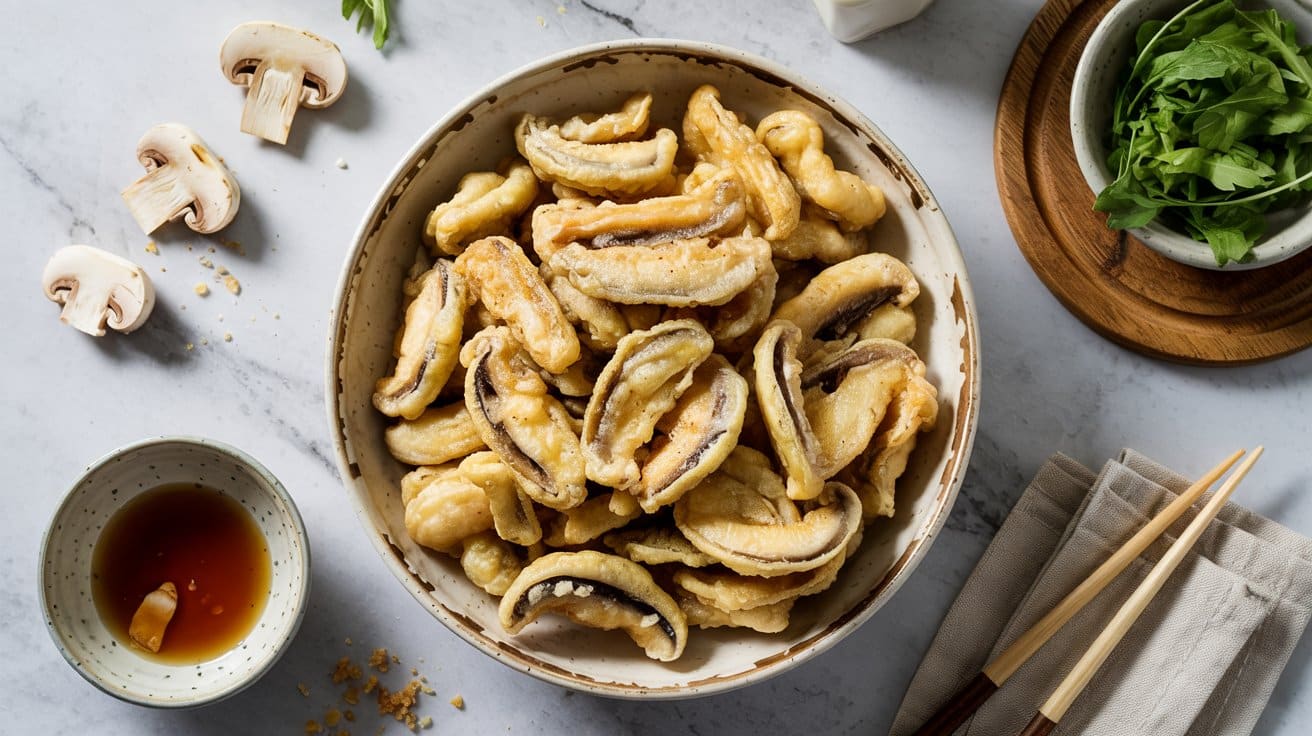
Lightly battered mushrooms turn crisp on the outside and stay juicy inside, making a satisfying snack or starter that's quick to prepare - pair with vegan risotto creamy dinner ideas for a heartier meal.
Why This Recipe Works
This method gives a thin, crunchy coating with minimal fuss. It keeps prep and frying straightforward so you can serve fresh, hot pieces quickly.
- Light, crisp batter - Using ice-cold sparkling water keeps the coating thin and extra crunchy.
- Crisp-support from cornstarch - Cornstarch mixed with flour helps the batter fry up snappy and light.
- Maintain oil temperature - Frying a few pieces at a time keeps the oil steady for even browning.
- Quick soy-ginger sauce - A tangy dipping sauce brightens the mushrooms and balances richness.
Ingredient Swap Ideas
Simple swaps help when you're adapting to dietary needs or what's in your pantry. Each option keeps the same frying method and overall flavor.
- All-purpose flour - Use rice flour for gluten-free crispness; it browns faster, so watch the fry time.
- Cornstarch - Use tapioca starch for similar crispness; it may give a slightly chewier crust.
- Sparkling water - Use very cold club soda for lift; batter may be a touch less airy.
- Soy sauce - Use tamari or coconut aminos for gluten-free or lower-sodium option; flavor stays savory.
Ingredients
- 12 ounces cremini or button mushrooms - trimmed; larger ones halved or thickly sliced.
- 1 cup all-purpose flour - sifted.
- ⅓ cup cornstarch - for extra crispness.
- ¾ teaspoon fine salt - divided.
- 1 cup ice-cold sparkling water - chilled.
- Vegetable oil - 2-3 inches in a deep pot for frying.
- ¼ cup soy sauce - for dipping.
- 2 tablespoons rice vinegar - for dipping.
- 1 tablespoon mirin - for dipping.
- 1 teaspoon toasted sesame oil - for dipping.
- 1 teaspoon sugar - for dipping.
- 1 teaspoon grated fresh ginger - for dipping.
- 1 scallion - thinly sliced for garnish.
Instructions
- Trim and dry the mushrooms, then halve or slice larger pieces so sizes are even.
- Whisk the flour, cornstarch, and ¼ teaspoon salt in a bowl, then add ice-cold sparkling water and stir until just combined; batter should be slightly lumpy.
- Heat the oil in a deep pot to 350°F (175°C), using a thermometer or testing with a small drop of batter that should sizzle and float.
- Dip the mushrooms in batter and fry in small batches for 2-3 minutes, until golden and crisp; remove to a paper towel-lined plate and sprinkle with the remaining salt.
- Whisk the soy sauce, rice vinegar, mirin, sesame oil, sugar, and grated ginger in a small bowl until the sugar dissolves; stir in sliced scallion.
- Serve the tempura hot with the dipping sauce on the side and garnish with extra scallion if desired.
9. Sweet Potato and Black Bean Taquitos
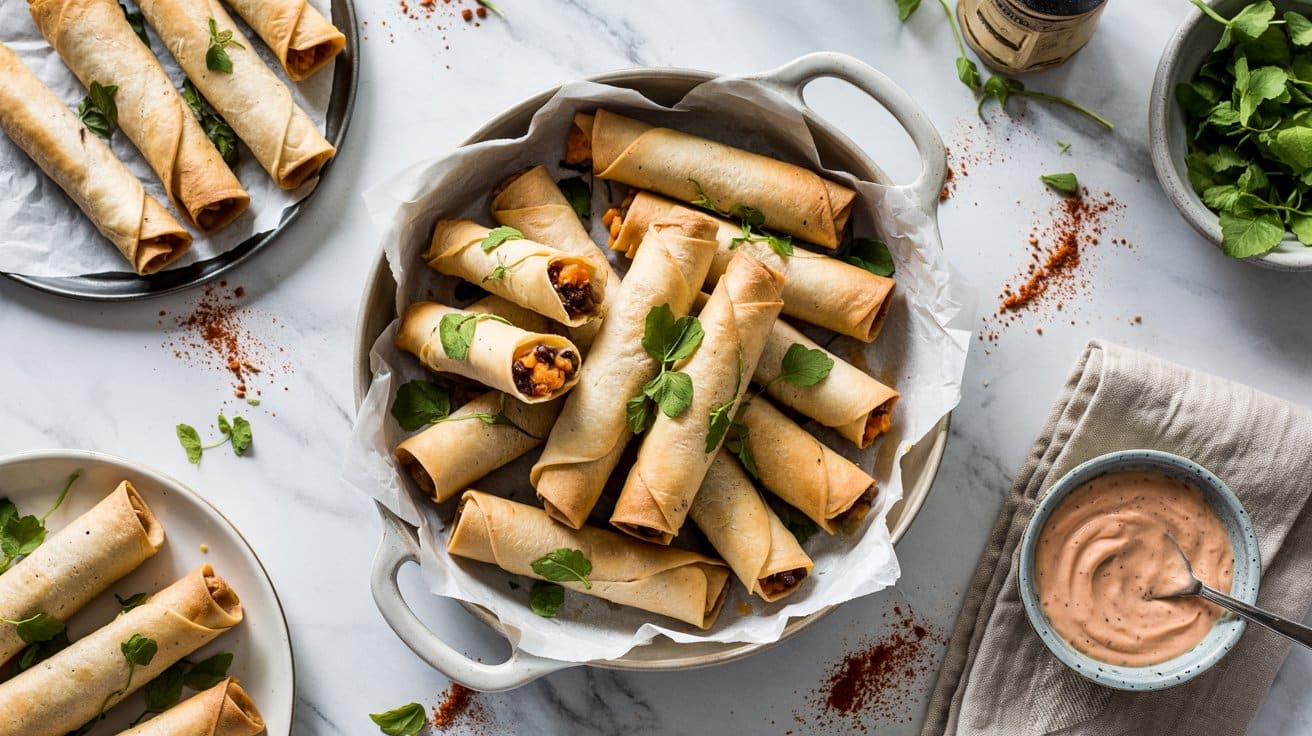
They work well for a weeknight dinner, casual party platter, or make-ahead meal prep - serve alongside potato salad recipes beyond mayo for a cool contrast.
Why This Recipe Works
Crispy shells hold a creamy, seasoned filling that's simple to make. One roast step concentrates flavor while saving active prep time.
- Roasted sweet potato filling - Roasting brings out sweetness and gives a soft texture that mashes easily for rolling.
- Sautéed aromatics - Briefly cooking onion and garlic builds savory depth without long hands-on time.
- Pantry-friendly binders - Black beans and a touch of cheese help the filling stick together so taquitos roll neatly.
- High-heat crisping - Baking at 425°F makes the tortillas golden and crunchy without deep-frying.
Ingredient Swap Ideas
Swaps let you use what's on hand or meet dietary needs while keeping the same method and flavor direction.
- Black beans - Use pinto beans for a milder, creamier filling; cook time stays the same.
- Corn tortillas - Use small flour tortillas if your corn ones crack; they roll more easily and crisp similarly.
- Shredded cheese - Omit or use a plant-based cheese for a dairy-free version; texture will be slightly less creamy.
- Olive oil - Substitute avocado oil for a higher smoke point if you plan to pan-fry or want a neutral flavor.
Ingredients
- 2 medium sweet potatoes (about 1 ½ lb) - peeled and cubed.
- 1 (15 oz) can black beans - drained and rinsed.
- 1 small yellow onion - finely chopped.
- 2 cloves garlic - minced.
- 1 teaspoon ground cumin -.
- 1 teaspoon chili powder -.
- ½ teaspoon smoked paprika -.
- ½ teaspoon kosher salt - adjust to taste.
- 2 tablespoons olive oil - divided.
- ½ cup shredded cheddar or Monterey Jack - optional.
- 12 small corn tortillas - warmed so they bend without cracking.
- 1 tablespoon vegetable oil - for brushing tortillas.
- 1 lime - cut into wedges for serving.
- 2 tablespoons fresh cilantro - chopped for garnish.
Instructions
- Preheat the oven to 425°F. Roast the sweet potatoes on a sheet pan tossed with 1 tablespoon olive oil for 20-25 minutes, until tender and lightly caramelized.
- Sauté the onion and garlic in the remaining 1 tablespoon olive oil over medium heat for 3-4 minutes, until translucent.
- Add the cumin, chili powder, smoked paprika, black beans, and roasted sweet potatoes; cook 2-3 minutes, then mash gently until the mixture holds together and is evenly seasoned. Stir in the shredded cheese and a squeeze of lime juice.
- Warm the tortillas in a damp towel in the microwave for 30 seconds, or heat briefly in a skillet so they're pliable. Place about 2 tablespoons filling on each tortilla and roll tightly; arrange seam-side down on a baking sheet.
- Brush the rolled taquitos with vegetable oil and bake at 425°F for 12-15 minutes, flipping once at about 8 minutes, until golden and crisp. Serve with lime wedges and chopped cilantro.
10. Rice Paper Spring Rolls
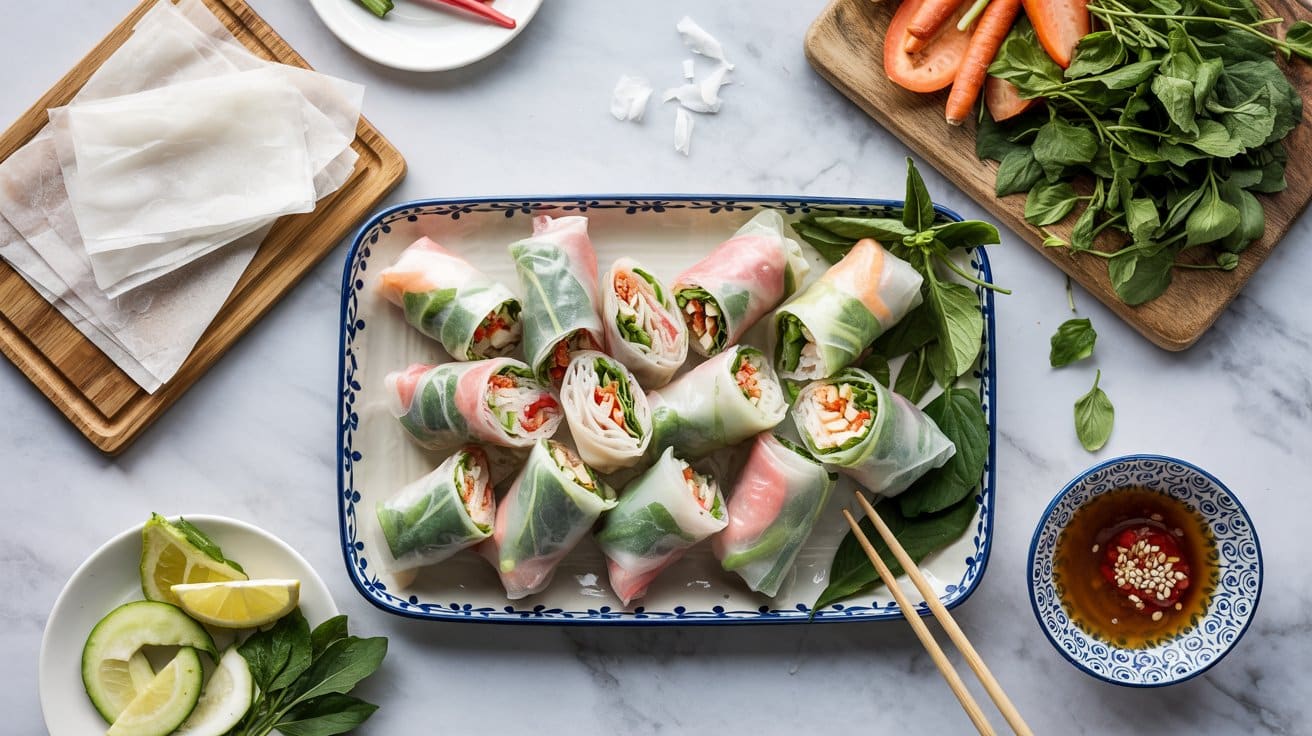
They're quick to assemble and work well for weeknight dinners, meal prep, or party platters; expect bright herb notes and a savory peanut dip - for more ideas, see vegan spring roll recipes with dips.
Why This Recipe Works
These rolls balance fresh crunch and a crisp finish while staying fast to make. You can prep components ahead for quick assembly later.
- Crisp, seared exterior - A brief pan-sear turns the hydrated wrapper golden and adds a pleasant crunch that contrasts the fresh filling.
- Fresh herb pockets - Whole mint and cilantro leaves add aromatic brightness that lifts each bite.
- One-wrapper-at-a-time method - Soaking and rolling wrappers individually prevents sticking and keeps assembly moving smoothly.
- Make-ahead components - Cooked noodles and prepped vegetables store separately for up to 24 hours to speed final prep.
Ingredient Swap Ideas
Swaps help with availability, dietary needs, or flavor preference while keeping the same rolling and searing method. Choose swaps that hold shape when seared or pair well with the dipping sauce.
- Cooked shrimp - Swap with firm tofu or shredded cooked chicken; both hold up during rolling and crisp slightly when seared.
- Rice vermicelli - Substitute thin glass noodles or omit for a lighter roll; glass noodles soak similarly though timing may vary.
- Fresh mint - Swap with Thai basil for a peppery, aromatic note that pairs well with the sauce.
- Peanut dipping sauce - Swap with a hoisin-lime sauce for a savory-sweet alternative that still clings to the roll for dipping.
Ingredients
- 8 rice paper wrappers - 8-inch rounds.
- 4 oz rice vermicelli - cooked according to package.
- 1 medium carrot - peeled and julienned.
- 1 medium cucumber - julienned; seeded if preferred.
- 1 red bell pepper - thinly sliced.
- 8 large lettuce leaves - butter or romaine; torn to fit wrappers.
- ½ cup fresh mint - whole leaves.
- ½ cup fresh cilantro - whole leaves.
- 8 oz cooked shrimp - peeled and halved (or use firm tofu).
- 2 tablespoon vegetable oil - for pan-frying.
- ⅓ cup creamy peanut butter - smooth.
- 2 tablespoon hoisin sauce - for the dipping sauce.
- 1 tablespoon soy sauce - low-sodium preferred.
- 1 lime - juiced (about 2 tbsp).
- 2-4 tablespoon warm water - to thin the sauce.
Instructions
- Cook the rice vermicelli for 3-4 minutes in boiling water, until tender, then drain and rinse under cold water.
- Prep the vegetables, herbs, and protein: julienne the carrot and cucumber, slice the bell pepper, separate lettuce leaves, pat herbs dry, and halve the shrimp or cube the tofu.
- Make the peanut dipping sauce by whisking peanut butter, hoisin, soy sauce, and lime juice with 2 tablespoon warm water until smooth; add 1 tablespoon more water at a time to reach a dip-ready consistency.
- Soak one rice paper wrapper in a shallow dish of warm water for 8-10 seconds, until pliable, then lay it flat on a damp board or towel.
- Assemble the roll by placing a lettuce leaf on the lower third of the wrapper, then a small handful of noodles, a few carrot and cucumber sticks, bell pepper, herbs, and shrimp or tofu; fold the sides over and roll tightly up to the top.
- Pan-fry the rolls in 2 tablespoon oil over medium heat, seam-side down first, for 1-2 minutes per side until lightly golden and crisp; drain on paper towels and serve warm with the peanut sauce.
11. Golden Polenta Bites
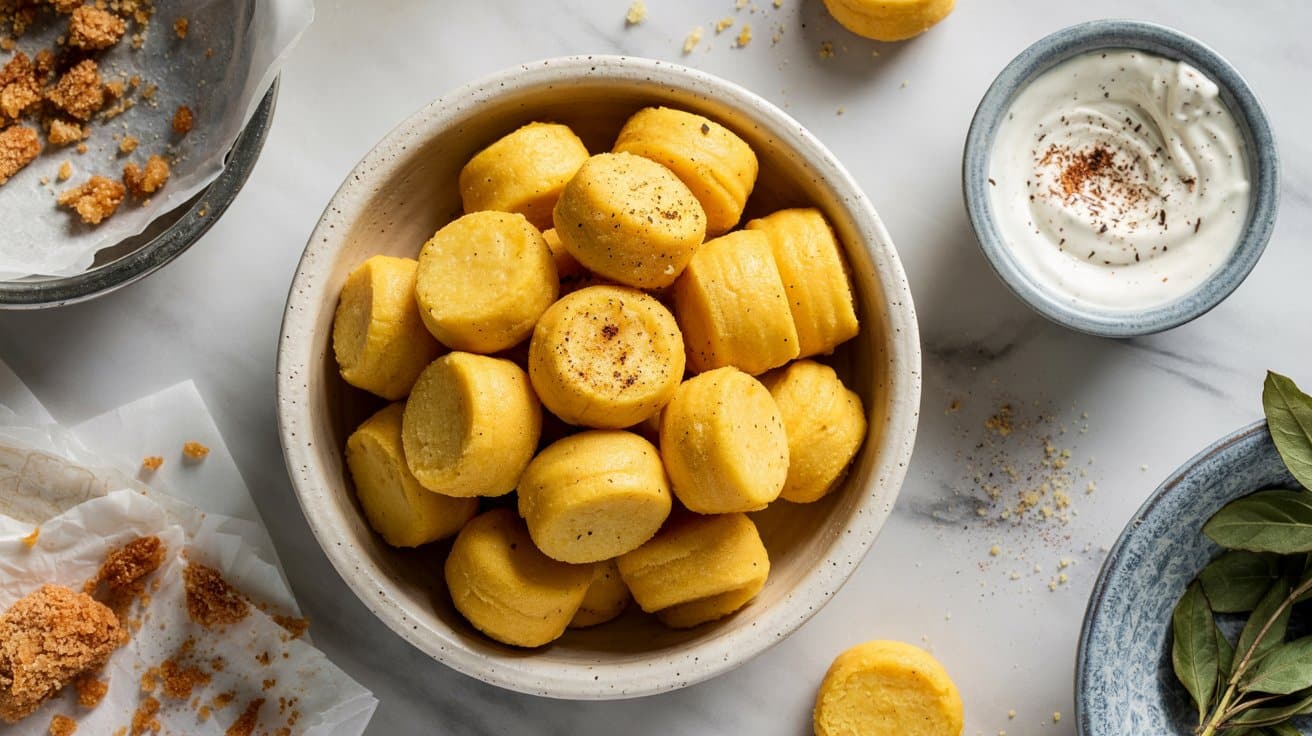
Crisp-edged polenta squares with a creamy center make a simple, satisfying snack or side you can prep ahead. They have a lightly cheesy, herby flavor and work well for parties, brunch, or a quick weeknight side.
Why This Recipe Works
These bites give a contrast of crunchy exterior and soft interior while staying straightforward to make. The set-and-fry method keeps active time short and results consistent.
- Creamy set polenta - Cooking polenta in broth and stirring in butter and cheese produces a silky interior that firms for slicing.
- Crispy pan-fry finish - Frying the set squares in oil creates golden edges that hold up for dipping or topping.
- Make-ahead friendly - Chilling the polenta ahead saves active time and makes assembly faster.
- Minimal topping needs - A sprinkle of extra cheese and fresh herbs brightens the bites without extra cooking.
Ingredient Swap Ideas
Swaps help match what you have or fit dietary needs while keeping the same method. Pick one change at a time so texture and timing stay predictable.
- Broth - Use water plus 1 teaspoon bouillon for similar savory depth.
- Quick polenta - Use medium-grind cornmeal and simmer 4-6 minutes longer until thick.
- Parmesan - Use Pecorino Romano for a sharper, saltier finish; reduce added salt slightly.
- Olive oil - Use avocado or canola oil for higher-heat frying and a crisper crust.
Ingredients
- 1 cup quick-cooking polenta - for set, sliceable polenta.
- 4 cups vegetable or chicken broth - for cooking the polenta.
- 1 teaspoon salt - divided.
- 2 tablespoons unsalted butter - for richness.
- ½ cup Parmesan cheese - grated; divided.
- 2 tablespoons olive oil - for frying.
- 2 tablespoons fresh parsley - chopped.
- Freshly ground black pepper - to taste.
Instructions
- Cook the polenta in a medium saucepan: bring broth and ½ teaspoon salt to a boil, whisk in polenta, reduce to low and simmer 2-3 minutes until thick.
- Stir in butter and ¼ cup Parmesan until smooth, then pour into an 8x8-inch pan lined with parchment and smooth the top; chill at least 30 minutes until firm.
- Turn the set polenta onto a board and cut into 1-inch squares.
- Heat olive oil in a large skillet over medium heat, add polenta squares in a single layer and pan-fry 3-4 minutes per side until golden and crisp.
- Transfer to a platter, sprinkle with remaining Parmesan, parsley, and pepper to taste, and serve warm.
12. Spicy Roasted Chickpeas
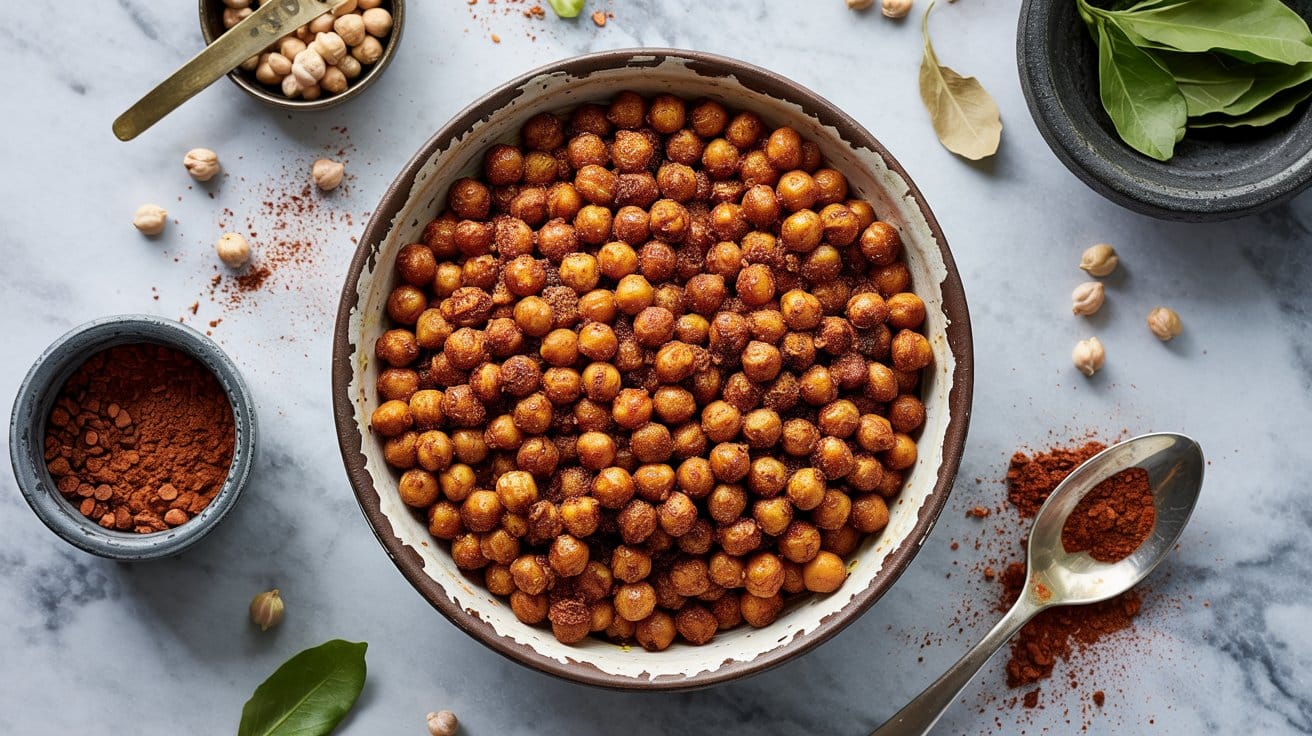
Crunchy roasted chickpeas make a quick, satisfying snack you can pull together in under an hour. The smoky paprika and cayenne give a warm, spicy kick that's great for parties, lunchboxes, or meal prep.
Why This Recipe Works
This method yields reliably crisp chickpeas with bold spice and simple pantry ingredients. The steps are straightforward and repeatable for consistent results.
- High-heat oven roasting - Roasting at 425°F creates blistered, crunchy exteriors without drying out the centers.
- Single-layer sheet baking - Laying chickpeas in one layer ensures even browning and prevents steaming.
- Light cornstarch coating - A small dusting soaks up surface moisture and helps the spices cling for extra crisp.
- Regular pan shaking - Tossing every 8-10 minutes promotes uniform color and prevents hot spots.
Ingredient Swap Ideas
Swaps help you adapt to what you have on hand or to dietary needs while keeping the same method and flavor direction.
- Canned chickpeas - Use 3 cups cooked dried chickpeas; pat very dry and roast the same way, adding 5-10 minutes if they still feel moist.
- Olive oil - Use avocado or grapeseed oil for a more neutral flavor and high-heat stability.
- Cayenne pepper - Swap with crushed red pepper flakes for a similar heat and a bit of visual texture.
- Cornstarch - Substitute arrowroot powder or 1 tablespoon chickpea flour; arrowroot gives similar crispness while chickpea flour browns more quickly.
Ingredients
- 2 (15-ounce) cans chickpeas - drained, rinsed, and patted dry.
- 2 tablespoons olive oil - or another neutral, high-heat oil.
- 1 teaspoon smoked paprika - for smoky depth.
- ½ teaspoon cayenne pepper - adjust for desired heat.
- 1 teaspoon ground cumin - warm, earthy note.
- 1 teaspoon garlic powder - savory lift.
- ¾ teaspoon kosher salt - or to taste.
- ¼ teaspoon black pepper - freshly ground.
- 1 tablespoon cornstarch - for extra crunch.
Instructions
- Preheat the oven to 425°F and line a rimmed baking sheet with parchment or foil.
- Dry the chickpeas thoroughly with paper towels, removing any loose skins as you go; the drier they are, the crisper they'll become.
- Combine the oil, cornstarch, smoked paprika, cayenne, cumin, garlic powder, salt, and pepper in a bowl, then add the chickpeas and toss until evenly coated.
- Spread the chickpeas in a single layer on the prepared sheet and roast for 25-30 minutes at 425°F, stirring or shaking the pan every 8-10 minutes, until golden and crisp.
- Cool on the baking sheet for 5 minutes; they will crisp further as they cool. Serve warm or store completely cooled in an airtight container for up to 4 days.
13. Baked Stuffed Avocados
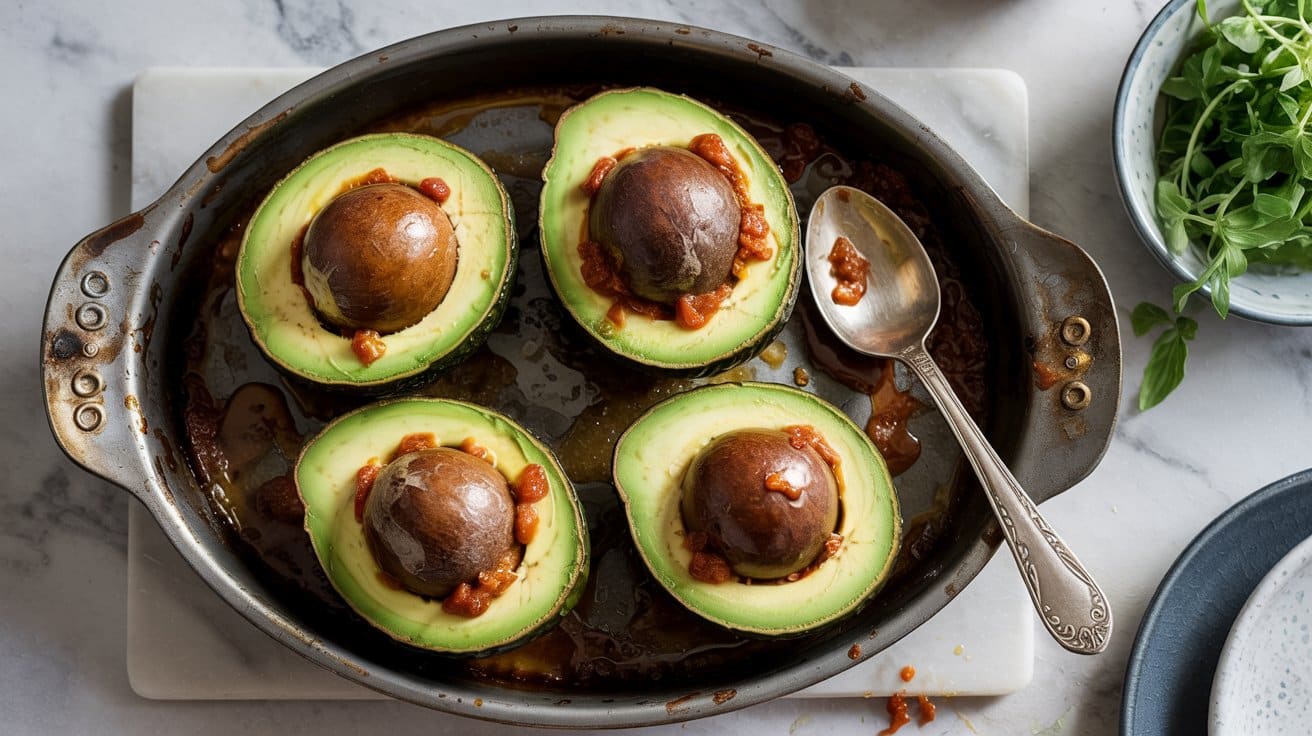
These baked stuffed avocados come together quickly and offer a satisfying contrast of warm, crispy topping and a cool, creamy avocado center. They're bright and slightly tangy from lime, and work well for brunch, a light weeknight meal, or an appetizer for guests.
Why This Recipe Works
The result is warm and crunchy on top with a soft, silky avocado base. The recipe uses simple mixing and a short bake so it's fast to prepare.
- Baked crisp topping - Panko and a little oil brown in the oven to create a crunchy contrast you can bite into.
- Creamy avocado center - Ripe halves stay soft and creamy, balancing the warm filling without overcooking.
- One-bowl filling - Everything for the filling mixes in one bowl so prep is fast and tidy.
- Short hands-off bake - A 10-12 minute roast melts cheese and crisps crumbs without extra attention.
Ingredient Swap Ideas
Swaps help you adapt based on what's in your fridge or dietary needs. Use these to keep the same method and overall flavor.
- Panko breadcrumbs - Swap with crushed tortilla chips - keeps the crunch and adds a toasty corn flavor.
- Shredded cheddar cheese - Swap with Monterey Jack or shredded mozzarella - melts the same way and stays mild.
- Black beans - Swap with cooked shredded chicken - keeps substance and protein; warm the chicken before filling if desired.
- Corn kernels - Swap with diced bell pepper - keeps brightness and crunch; raw peppers shorten overall prep.
Ingredients
- 4 ripe avocados - halved and pitted.
- 1 cup canned black beans - drained and rinsed.
- 1 cup corn kernels - fresh, canned, or thawed frozen.
- 1 cup cherry tomatoes - halved.
- ¼ cup red onion - finely chopped.
- 2 tablespoons fresh cilantro - chopped.
- 1 lime - juiced.
- ½ teaspoon ground cumin -.
- ¼ teaspoon chili powder -.
- Salt and pepper - to taste.
- ½ cup shredded cheddar cheese -.
- ⅓ cup panko breadcrumbs -.
- 1 tablespoon olive oil - plus extra for brushing.
Instructions
- Preheat the oven to 425°F (220°C).
- Mix the black beans, corn, cherry tomatoes, red onion, cilantro, lime juice, cumin, chili powder, salt, and pepper in a bowl for about 1 minute until combined.
- Scoop out 1 to 2 tablespoons of avocado from each half to enlarge the cavity, and place the halves cut-side up on a baking sheet.
- Fill each avocado half with about ¼ to ⅓ cup of the bean-corn mixture, pressing slightly so the filling stays in place.
- Top each filled avocado with shredded cheddar, then sprinkle panko mixed with 1 tablespoon olive oil over the cheese. Bake for 10-12 minutes at 425°F, until the panko is golden and the cheese is melted.
- Garnish with extra cilantro and a squeeze of lime, and serve warm.
14. Tempeh Bacon Bites
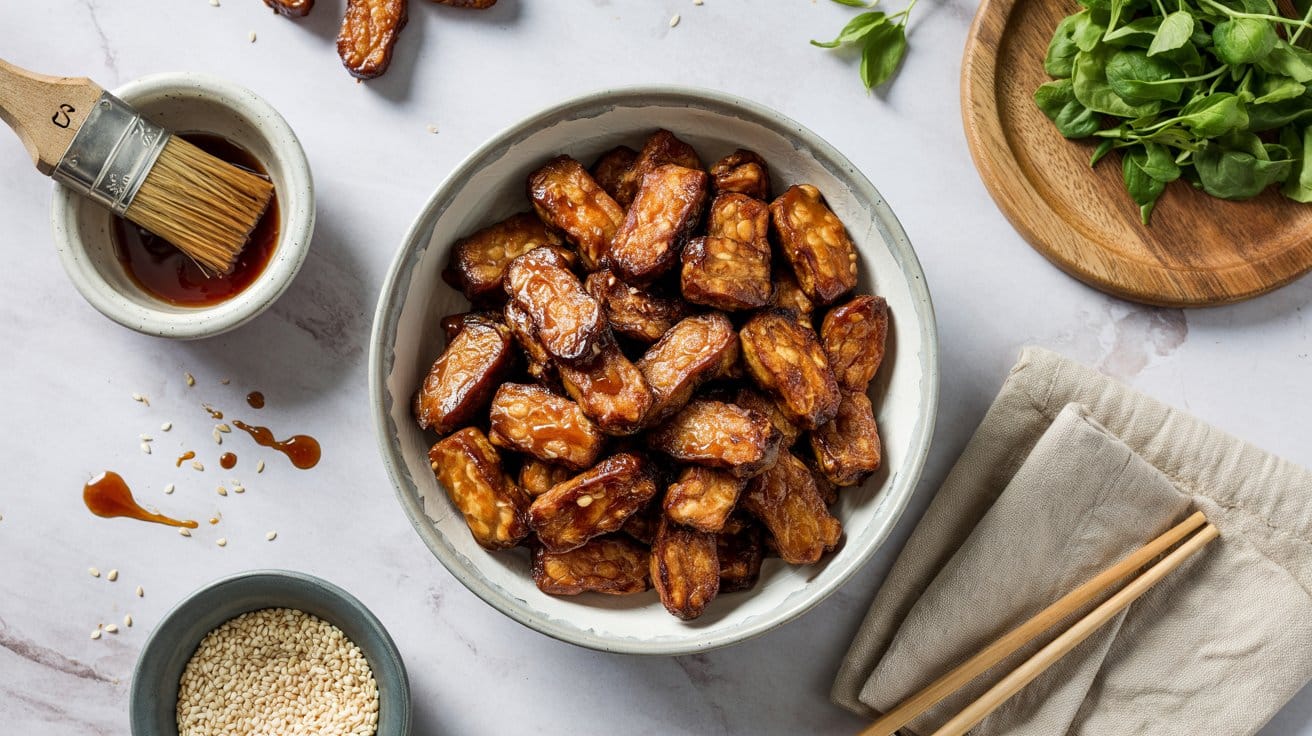
These smoky, savory bites are quick to make and satisfy a craving for something filling and crunchy. They work well as a party appetizer, a protein-packed snack, or a salty-sweet addition to breakfast or meal prep.
Why This Recipe Works
These bites deliver crisp, caramelized edges with a deeply smoky, maple-glazed flavor while staying simple to prepare. The method focuses on building texture and maximizing marinade absorption.
- Quick steaming step - Steaming softens tempeh so it soaks up the smoky maple marinade.
- Sticky maple glaze - Reducing the marinade creates a syrupy coating that clings to each piece for strong flavor.
- Cornstarch crisping layer - A light starch coat browns evenly and gives a crunchy exterior.
- Even bite sizing - Cutting tempeh into uniform cubes ensures consistent browning and easy serving.
Ingredient Swap Ideas
Swaps help when you need an ingredient substitute for allergy, availability, or preference. Each swap keeps the same cooking method and smoky-sweet profile.
- Tempeh - Use firm tofu, pressed and cubed; it soaks up marinade similarly though the texture is softer.
- Soy sauce - Use tamari or coconut aminos; tamari is gluten-free and coconut aminos are lower in sodium.
- Maple syrup - Use brown sugar or agave; brown sugar gives similar caramel notes though it may need a splash of water to dissolve.
- Cornstarch - Use arrowroot or all-purpose flour; arrowroot gives similar crisping while flour browns more slowly.
Ingredients
- 8 oz tempeh - cut into ½-inch cubes.
- 2 tablespoons soy sauce - or tamari for gluten-free.
- 1 tablespoon maple syrup - for sweetness and glaze.
- ½ teaspoon liquid smoke - for concentrated smoky flavor.
- 1 teaspoon smoked paprika - for color and extra smoke.
- ½ teaspoon garlic powder - dry seasoning.
- ¼ teaspoon black pepper - ground.
- 1 tablespoon cornstarch - for a light crisp coating.
- 2 tablespoons neutral oil - for frying.
Instructions
- Steam the tempeh for 10 minutes to mellow any bitterness, then let it cool and cut it into ½-inch cubes.
- Whisk the soy sauce, maple syrup, liquid smoke, smoked paprika, garlic powder, and black pepper for 30 seconds until combined, then set the marinade aside.
- Toss the tempeh with the cornstarch in a shallow bowl until each piece is lightly coated.
- Heat the oil in a large skillet over medium-high heat until shimmering.
- Fry the tempeh in the hot skillet for 8-10 minutes, turning occasionally, until pieces are golden and crisp on all sides.
- Pour the reserved marinade into the skillet and simmer 1-2 minutes until thick and sticky; toss the tempeh to coat, then remove and serve warm.
15. Savory Kale Chips
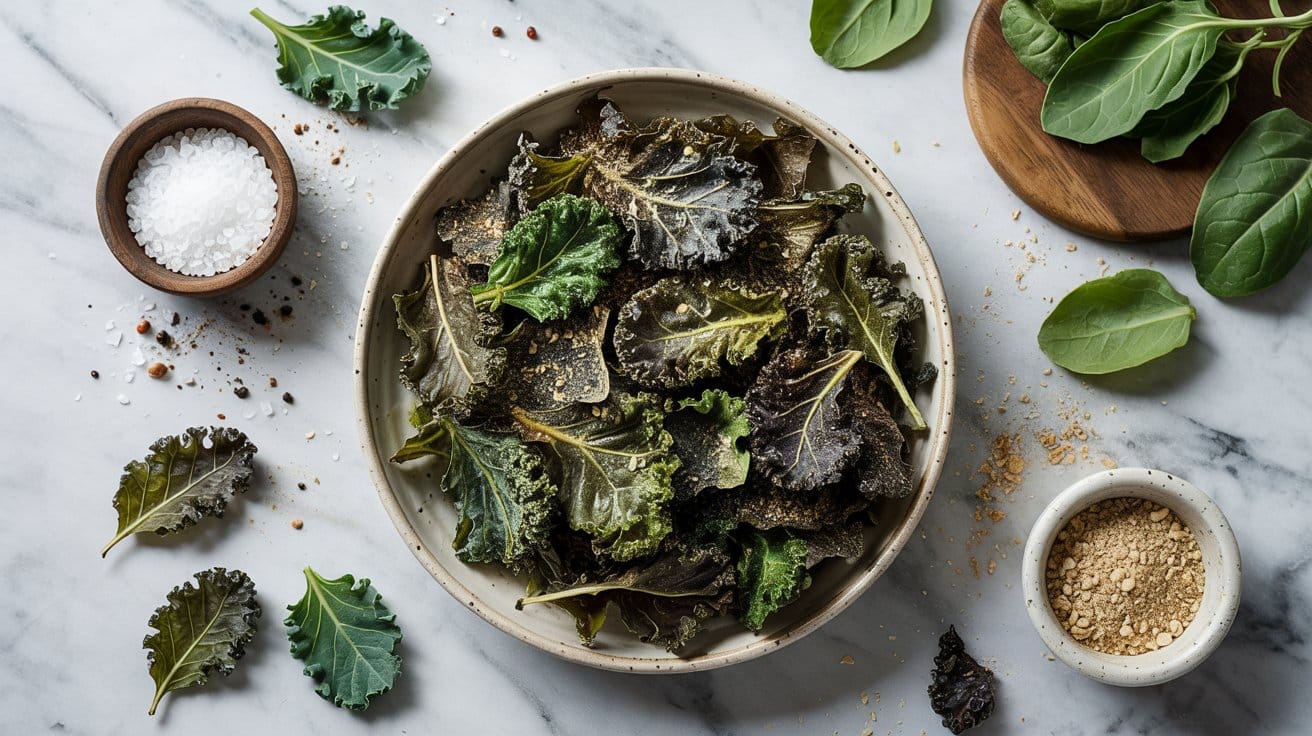
These crispy green chips are easy to make and satisfying as a healthy snack. The savory, slightly cheesy note from nutritional yeast makes them ideal for parties, lunchboxes, or quick meal-prep snacks.
Why This Recipe Works
This method yields light, crunchy chips without frying. The prep takes minutes and baking requires little hands-on time.
- High-heat oven crisping - Baking at a low, steady temperature dries the leaves evenly for a crisp texture.
- Single-bowl seasoning - Tossing kale with oil and spices guarantees even coating and consistent flavor.
- Nutritional yeast boost - Adds savory, cheesy notes while keeping the snack plant-based.
- Thin single layer - Spreading leaves without overlap prevents steaming and ensures crisping.
Ingredient Swap Ideas
Swaps help you use what's on hand or adapt to dietary needs without changing the method. Each suggestion keeps the same bake-and-crisp approach.
- Kale - Use Swiss chard or collard greens if preferred; chard may be slightly softer and may crisp a minute or two sooner.
- Olive oil - Swap avocado oil or sunflower oil for a neutral flavor that still promotes browning.
- Nutritional yeast - Use finely grated Parmesan for a non-vegan option; it gives a similar savory note but may brown faster.
- Garlic powder - Swap onion powder or a pinch of granulated garlic for a different aromatic while keeping the same seasoning profile.
Ingredients
- 1 large bunch curly kale - tough stems removed and leaves torn into bite-size pieces.
- 1½ tablespoons olive oil - for coating leaves.
- 2 tablespoons nutritional yeast - for savory, cheesy flavor.
- 1 teaspoon garlic powder - for seasoning.
- ½ teaspoon smoked paprika - for a mild smoky note.
- 1 teaspoon kosher salt - adjust to taste.
Instructions
- Preheat the oven to 275°F (135°C).
- Wash and dry the kale thoroughly, strip out thick stems, and tear the leaves into bite-size pieces.
- Toss the kale with olive oil, nutritional yeast, garlic powder, smoked paprika, and salt in a large bowl until evenly coated.
- Arrange the leaves in a single layer on one or two baking sheets, avoiding overlap.
- Bake for 12-18 minutes, checking at 12 minutes; chips should be dry and crisp with slightly browned edges.
- Cool the chips on a wire rack for 5 minutes to crisp further, then serve.
16. Carrot Fries with Tahini Dip
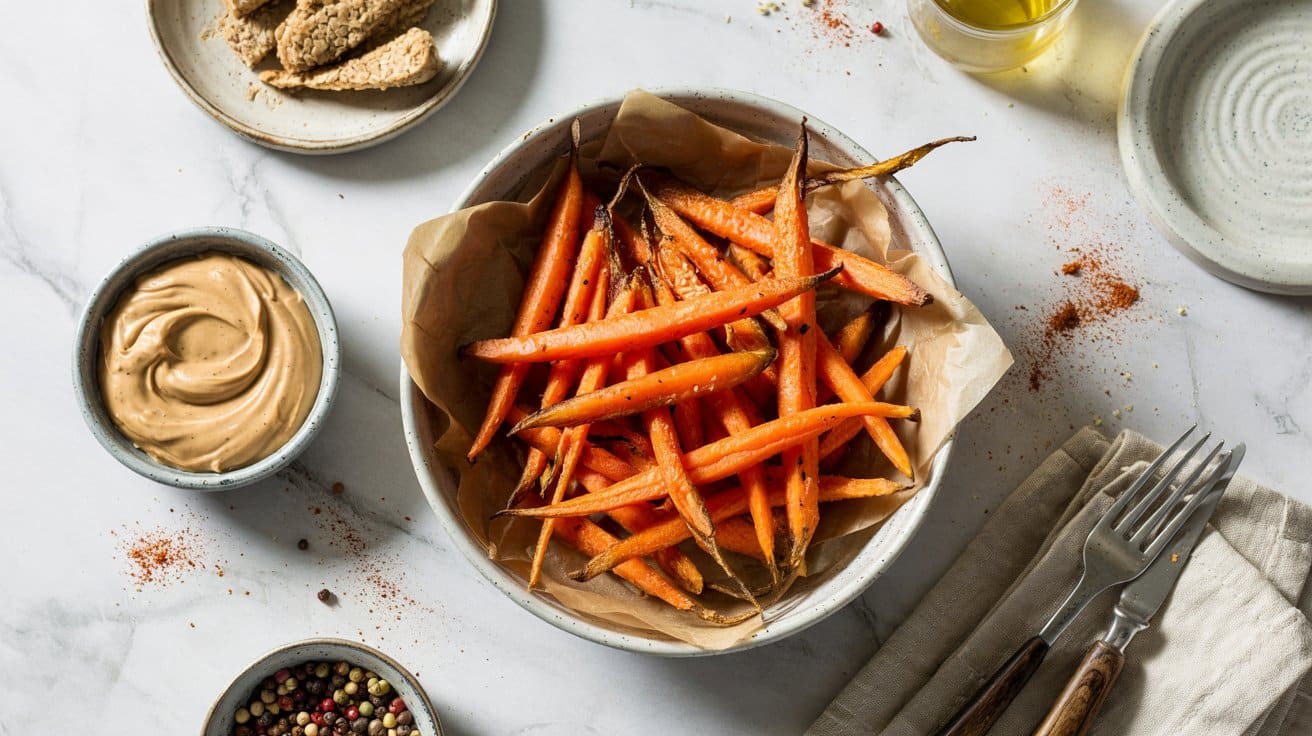
These carrot fries turn everyday carrots into a crunchy, slightly sweet snack that goes well with a nutty, lemony tahini sauce. They're easy to make for weeknight sides, snacks, or casual gatherings and work well for meal prep.
Why This Recipe Works
These fries come out crisp on the outside and tender inside while the tahini dip adds bright, savory balance. The method keeps prep short and results reliable.
- Crispy cornstarch coating - A light starch layer helps the carrots brown and form a crisp exterior instead of steaming.
- High-heat roasting - 425°F concentrates the carrots' natural sugars so edges caramelize in 20-25 minutes.
- Single-sheet roasting - Spreading in one layer promotes even browning and reduces active work.
- Make-ahead tahini - The dip holds in the fridge and stays smooth after a quick whisk.
Ingredient Swap Ideas
Small swaps keep the recipe practical for pantry limits or dietary needs without changing the baking method.
- Cornstarch - Use arrowroot starch in the same amount; it crisps similarly but may brown a bit faster.
- Olive oil - Swap for avocado oil for a higher smoke point and similar flavor.
- Tahini - Use natural almond butter in equal measure; the dip will be milder but still thicken with water.
- Lemon juice - Use 1 tablespoon apple cider vinegar plus 1 tablespoon water if out of fresh lemons; the acidity keeps the sauce bright.
Ingredients
- 1.5 pounds carrots - peeled and cut into 3-inch sticks.
- 2 tablespoons cornstarch - for a light crisping coat.
- 2 tablespoons olive oil - extra-virgin or regular.
- 1 teaspoon kosher salt - divided.
- ½ teaspoon black pepper - freshly ground.
- 1 teaspoon smoked paprika - for warmth and color.
- ⅓ cup tahini - well stirred.
- 2 tablespoons lemon juice - fresh.
- 1 garlic clove - minced.
- 2 to 4 tablespoons warm water - to thin the dip.
- ½ teaspoon salt - for the dip.
Instructions
- Preheat the oven to 425°F (220°C) and line a baking sheet with parchment paper.
- Toss the carrot sticks with cornstarch in a bowl until lightly coated, shaking off any excess.
- Drizzle the carrots with olive oil and season with ¾ teaspoon salt, black pepper, and smoked paprika; spread in a single layer on the prepared sheet.
- Roast for 20-25 minutes, flipping once at 10-12 minutes, until edges are lightly caramelized and carrots are tender.
- Whisk the tahini, lemon juice, minced garlic, 2 tablespoons warm water, and ½ teaspoon salt until smooth, adding more water to reach a drizzling consistency. Stop whisking once the sauce is silky.
- Serve the fries hot with the tahini dip on the side for dipping.
Frequently Asked Questions
Many Crispy Vegan Appetizers recipes work well for meal prep because they hold up in the refrigerator for several days. Choose options that reheat without losing texture or flavor.
Many work well made ahead. Prepare the components in advance and store them separately.
Combine just before serving to maintain the best texture and freshness.
Most cooked dishes keep well in the refrigerator for 3 to 4 days in airtight containers. Separate components that soften when stored together - such as crispy toppings or fresh herbs - for best results.
Are there quick versions that take under 30 minutes?
Yes.
Many variations in this category can be adapted to under 30 minutes by using pre-cut vegetables, rotisserie protein, or canned ingredients that skip long cooking steps.
14 vegan bruschetta recipes: tomato, basil, and crunch pairs well with many small bites. 18 vegan tapas recipes for bold, bite-size flavor offers more ideas for a shared-plate menu.

Andrew Gray is a passionate food writer and recipe creator who built Gusto Meadow to celebrate delicious, approachable cooking. With years of experience in restaurants and catering, he brings a grounded, real-world understanding of flavors, technique, and what truly works in a home kitchen.
At Gusto Meadow, Andrew focuses on fresh, seasonal ingredients and simple methods that anyone can follow. His goal is to make cooking feel fun, doable, and rewarding — whether you’re preparing a quick weeknight dinner or exploring something new.