Cravings often steer our dinner choices more than the clock. These recipes lean into bold, comforting flavors-charred vegetables, tangy sauces, and sweet-salty finishes that make plates disappear.
We prefer meals that feel indulgent and doable in the same evening.
Inside the roundup we have skillet dinners, saucy pastas, bright salads, roasted sheet-pan mains, and a couple of sweet-savory sides. Each dish highlights a strong flavor idea-spicy garlic, citrus herb, smoky paprika-paired with straightforward techniques.
We kept prep short so the flavors can take center stage.
These recipes work when we want satisfying food with minimal fuss. Many use pantry staples and reheat well, so they fit busy weeknights and relaxed weekend meals.
We can swap proteins or add extra vegetables without losing the main flavor.
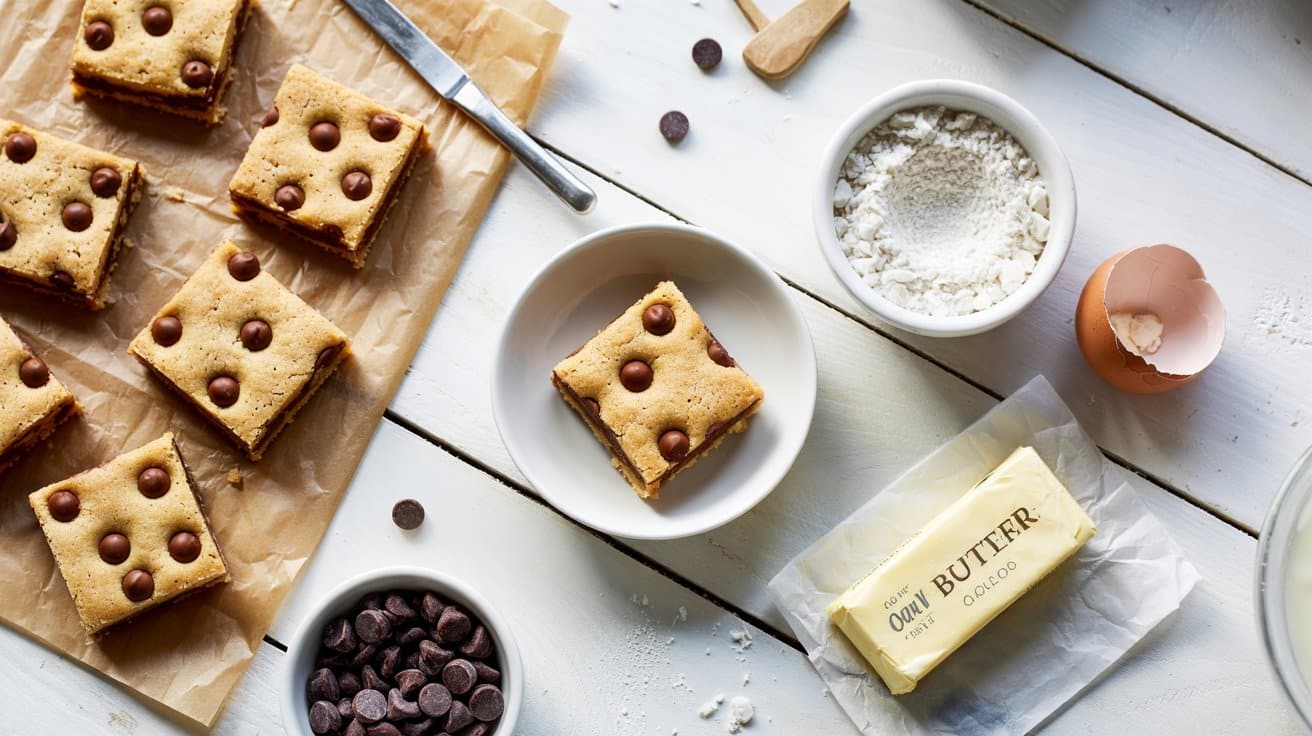
1. Soft Cookie Dough Bars

These soft cookie dough squares give you the nostalgic, sweet chew of raw cookie dough without raw eggs. They come together with pantry staples, chill in the fridge, and are great for after-school snacks or casual dessert plates.
Expect a tender, buttery base studded with melty chocolate chips and a short chill before serving.
If a pillowy, tender texture appeals, explore steamed bun recipes for soft bites for similar soft-and-fluffy technique ideas.
Why This Recipe Works
These bars deliver safe, edible cookie dough flavor with a soft, sliceable texture. They stay chewy after chilling and are simple to make with no baking of the final bars.
- No raw eggs used - The recipe omits eggs so you can eat the dough safely after heat-treating the flour.
- Heat-treated flour step - Baking the flour removes bacteria while keeping the dough's classic texture.
- Chill-and-serve method - Refrigeration firms the bars so you can slice clean pieces without baking.
- Mini chips for even melting - Small chocolate chips disperse evenly and stay tender after chilling.
Ingredient Swap Ideas
Swaps help you adjust for diet, texture, or what's in your pantry without changing the method. Use these that keep the soft, sliceable result.
If menu planning includes a taco night, consider how these bars pair with mains and sides from taco night ideas featuring beef that balance sweet and savory.
For savory swaps and weeknight inspiration beyond desserts, look at ground beef dinner ideas that aren't just tacos to adapt pantry-forward approaches to other meals.
- All-purpose flour - Substitute with rolled-oat flour for a nuttier taste and similar binding; omit if you want gluten-free and check texture before pressing.
- Unsalted butter - Use firm coconut oil or vegan butter to make the bars dairy-free while keeping richness.
- Mini chocolate chips - Swap for chopped chocolate or butterscotch chips for a different sweetness and melt pattern.
- Milk - Replace with almond or oat milk to reduce dairy while maintaining moisture and spreadability.
Ingredients
- 1 cup unsalted butter - softened.
- 1 cup light brown sugar - packed.
- ¼ cup granulated sugar -.
- 2 teaspoons vanilla extract -.
- ¼ teaspoon fine salt -.
- 2 cups all-purpose flour - heat-treated.
- 2 tablespoons milk - any variety.
- 1 ½ cups mini chocolate chips -.
Instructions
- Heat-treat the flour by preheating the oven to 350°F, spreading the flour on a baking sheet, and baking 5 minutes; cool completely.
- Cream the softened butter with both sugars in a large bowl until light and smooth, about 2 minutes.
- Stir in the cooled, heat-treated flour, vanilla, salt, and milk until a soft dough forms and no dry streaks remain.
- Fold in the mini chocolate chips until evenly distributed.
- Press the dough evenly into an 8x8-inch pan lined with parchment, chill at least 1 hour until firm, then slice into bars.
2. Lemon Cream Cheese Bars
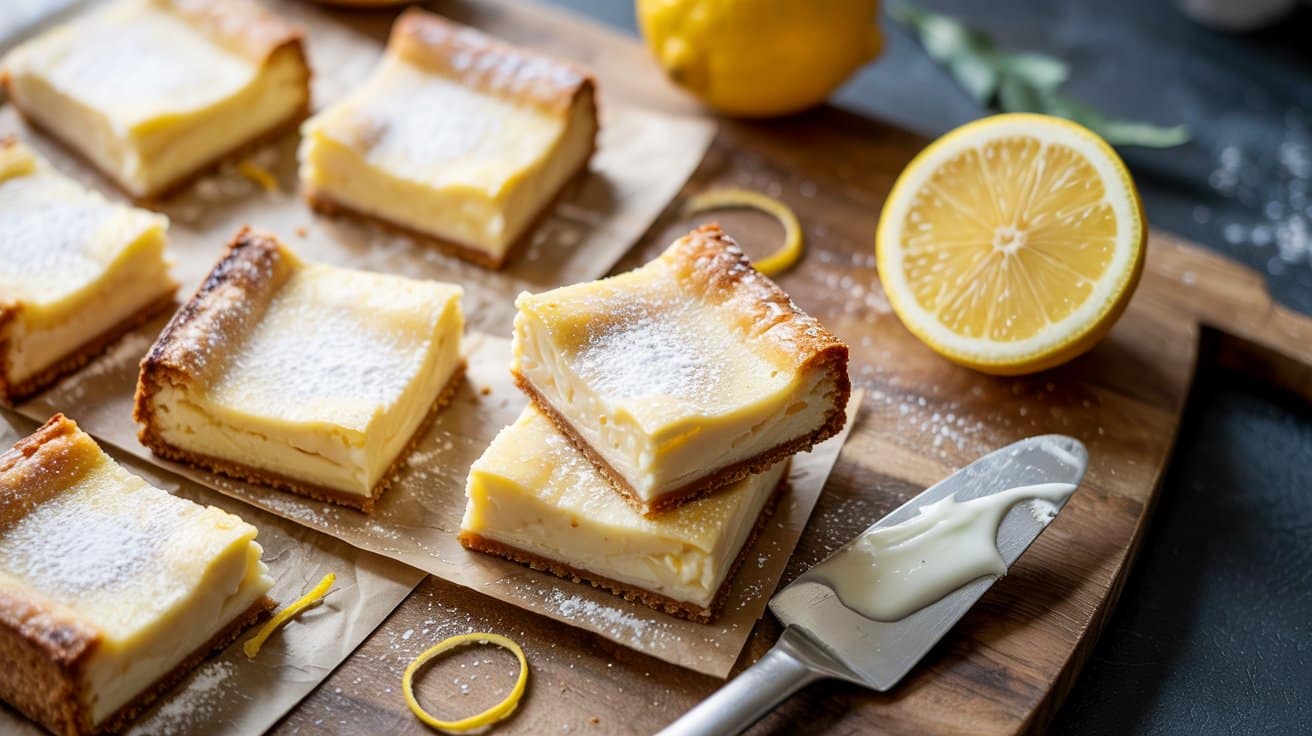
They hold up well for parties, potlucks, or a weekend treat and taste best chilled so the filling sets and the boiling lemon peel benefits explained that boost lemon flavor shines.
Why This Recipe Works
These bars balance bright lemon with rich cream cheese for a fresh yet indulgent finish. The method is straightforward, so you can bake and chill them with predictable results.
- Buttery graham crust - The crushed crackers and melted butter create a firm base that holds slices neatly.
- Creamy cheesecake-style filling - Cream cheese, eggs, and a touch of sour cream give a smooth, stable texture that slices cleanly.
- Bright lemon lift - Fresh lemon juice and zest cut the richness and keep the bars refreshing.
- Chill-and-serve finish - Cooling in the refrigerator firms the filling and brings out the lemon notes for easy slicing.
Ingredient Swap Ideas
Swaps help you adapt to what's on hand or match dietary needs without changing the method. Choose swaps that keep the filling's texture and the crust's binding ability.
- Graham cracker crumbs - Use crushed vanilla wafers or digestive biscuits for a slightly sweeter crust that still binds with melted butter.
- Sour cream - Swap with plain Greek yogurt for similar tang and a slightly firmer set.
- Granulated sugar - Use superfine sugar for faster dissolving and a smoother filling texture.
- Cream cheese - Substitute Neufchâtel or reduced-fat cream cheese for a lighter result while keeping the creamy structure.
Ingredients
- 1 ½ cups graham cracker crumbs - finely crushed.
- 2 tablespoons granulated sugar - for the crust.
- 6 tablespoons unsalted butter - melted.
- 16 ounces cream cheese - softened to room temperature.
- 1 cup granulated sugar - for the filling.
- 2 large eggs - room temperature.
- ¼ cup sour cream - or plain Greek yogurt.
- ⅓ cup fresh lemon juice - about 2 lemons.
- 1 tablespoon lemon zest - packed.
- 1 teaspoon vanilla extract - for depth.
- ⅛ teaspoon salt - a pinch.
- 1 cup powdered sugar - for glaze or dusting.
Instructions
- Preheat the oven to 350°F and press the graham crumbs mixed with 2 tablespoons sugar and melted butter into an 8x8-inch pan, forming an even layer.
- Bake the crust 8-10 minutes until set and lightly golden, then remove from the oven and lower the oven temperature to 325°F.
- Beat the softened cream cheese with 1 cup sugar until smooth, then add eggs one at a time, mixing until combined.
- Stir in sour cream, lemon juice, lemon zest, vanilla, and salt until the batter is smooth, then pour over the warm crust.
- Bake 22-28 minutes at 325°F until the edges are set and the center is slightly jiggly, then cool to room temperature and refrigerate at least 2 hours.
- Dust with powdered sugar or whisk powdered sugar with 1-2 teaspoons lemon juice for a thin glaze, slice into bars, and serve chilled.
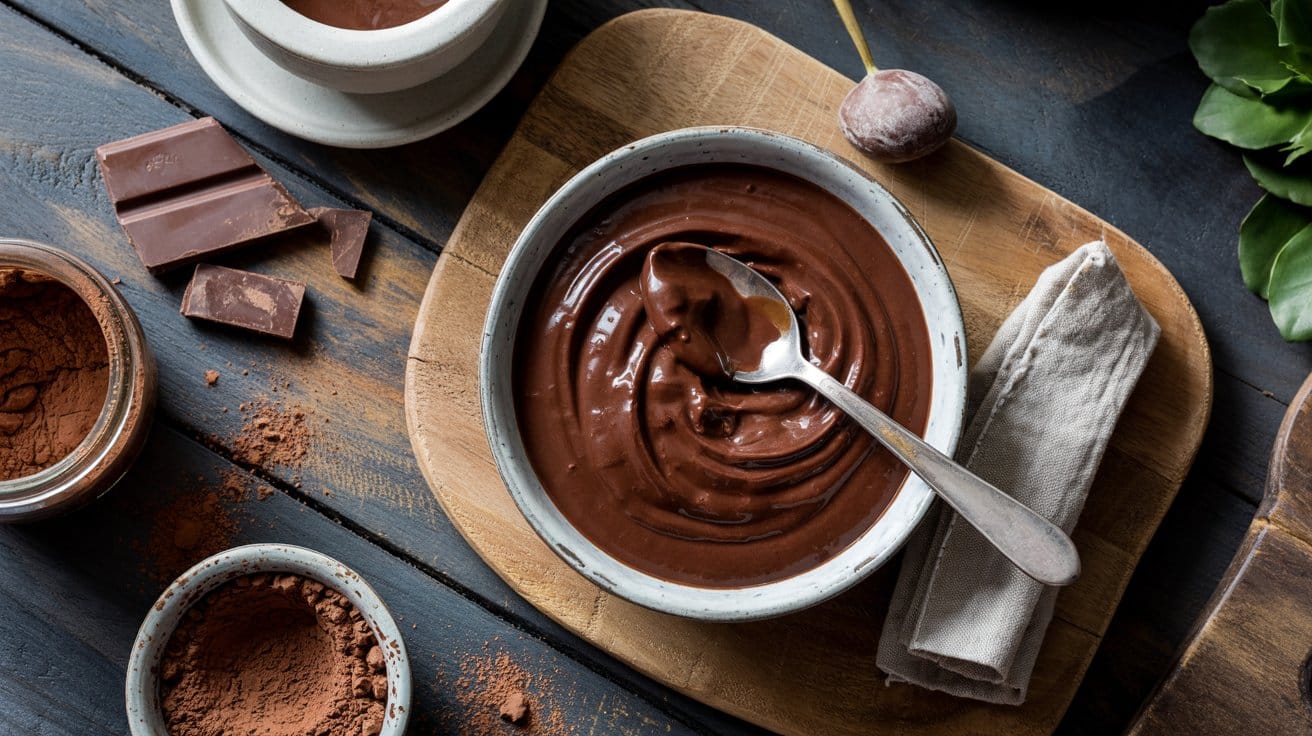
3. Chocolate Pudding Bars
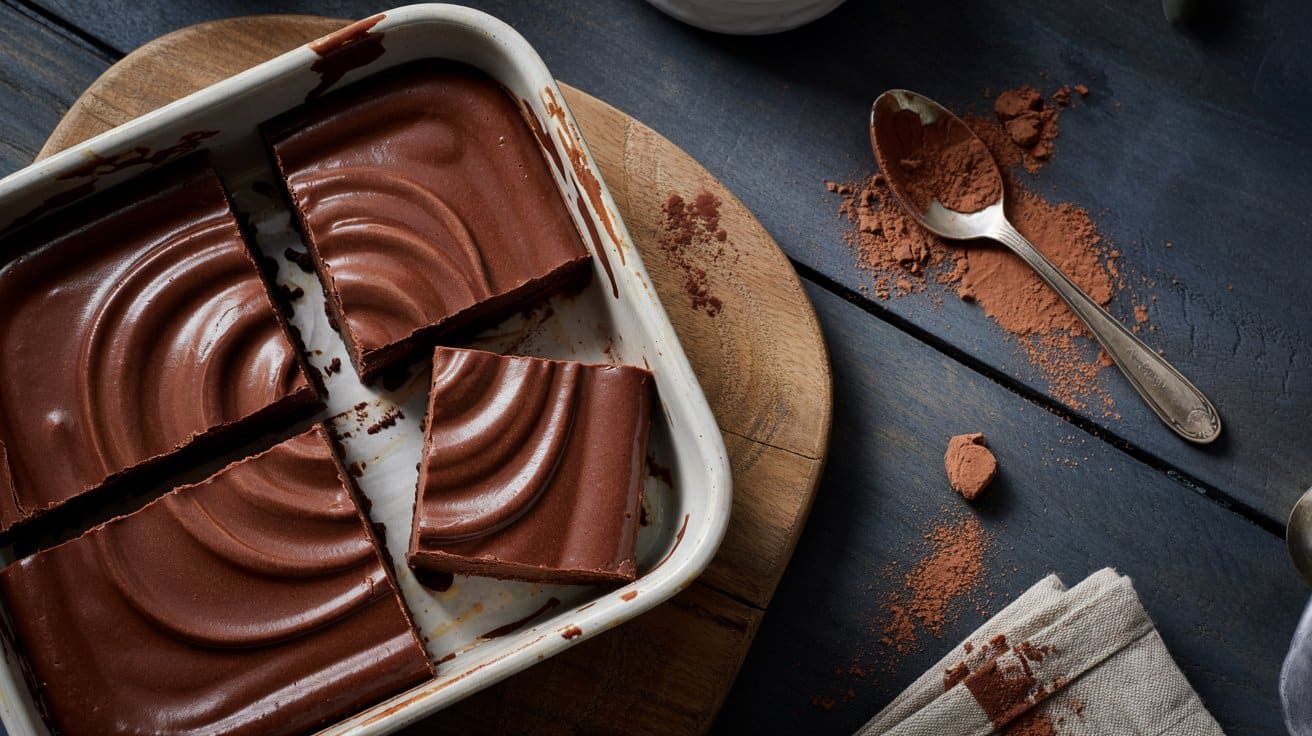
This layered bar brings a crisp chocolate cookie base under a thick, silky chocolate pudding and a cloud of whipped cream. You can make the pudding on the stove in one pan, chill until firm, and slice into squares for dessert or a potluck.
The bars have deep chocolate flavor and a smooth texture that works well after a meal or at an afternoon gathering.
For more ways to pair chocolate with crunchy richness, see nut-and-chocolate dessert ideas for indulgence that complement pudding textures.
Why This Recipe Works
These bars pair a crunchy base with a rich, silky filling for satisfying contrast. The chilled layers hold together well for easy slicing and transport.
- Chocolate cookie crisp base - A dense, dark crumb crust holds the pudding and adds textural contrast.
- Stovetop silky pudding - Cooking the pudding gives a glossy, thick layer that sets firm enough to cut into bars.
- Light whipped topping - Freshly whipped cream adds brightness and keeps the dessert from feeling too heavy.
- Quick chill finish - A couple hours in the fridge firms everything so you can slice neat squares for serving.
Ingredient Swap Ideas
Swaps let you adapt to dietary needs or what you have on hand without changing the method. Use the suggestions below to keep texture and structure similar.
- Chocolate sandwich cookies - Use graham crackers or chocolate wafer cookies for a lighter or slightly less sweet crust.
- Whole milk - Swap with 2% milk for a slightly lighter pudding, or use a full-fat plant milk for lactose-free results if you add a little extra cornstarch.
- Unsweetened cocoa powder - Replace with Dutch-process cocoa for a deeper flavor; increase sugar slightly if the cocoa is very dark.
- Heavy cream - Use chilled coconut cream or a stabilized whipped topping for a dairy-free or longer-holding finish.
Ingredients
- 2 cups chocolate sandwich cookie crumbs - finely crushed.
- 6 tablespoons unsalted butter - melted.
- ¼ cup granulated sugar - for crust.
- 4 cups whole milk - divided.
- ¾ cup granulated sugar - for pudding.
- ½ cup unsweetened cocoa powder - sifted.
- ⅓ cup cornstarch - for thickening.
- ⅛ teaspoon salt - to enhance chocolate.
- 4 tablespoons unsalted butter - room temperature, for pudding.
- 2 teaspoons vanilla extract - for pudding.
- 1 ½ cups heavy cream - cold.
- 2 tablespoons powdered sugar - for whipping.
- 2 ounces bittersweet chocolate - shaved for garnish.
Instructions
- Preheat the oven to 350°F and line a 9x13-inch pan with parchment, leaving an overhang for easy removal.
- Mix the cookie crumbs, melted butter, and ¼ cup sugar, then press the mixture firmly into the pan and bake for 8 minutes; cool to room temperature.
- Make the pudding by whisking the sugar, cocoa, cornstarch, and salt with 1 cup of the milk until smooth, then whisk in the remaining 3 cups milk and cook over medium heat, stirring, until the mixture boils and thickens, about 3-4 minutes.
- Remove the pudding from the heat and stir in the 4 tablespoons butter and vanilla until smooth, then pour the hot pudding over the cooled crust, smooth the top, and press plastic wrap directly onto the surface; chill at least 2 hours until set.
- Whip the heavy cream with the powdered sugar until soft peaks form, then spread the whipped cream over the chilled pudding and smooth.
- Garnish with chocolate shavings, chill 15 minutes more, then use the parchment overhang to lift from the pan and cut into bars before serving.
4. Peanut Butter Marshmallow Bars
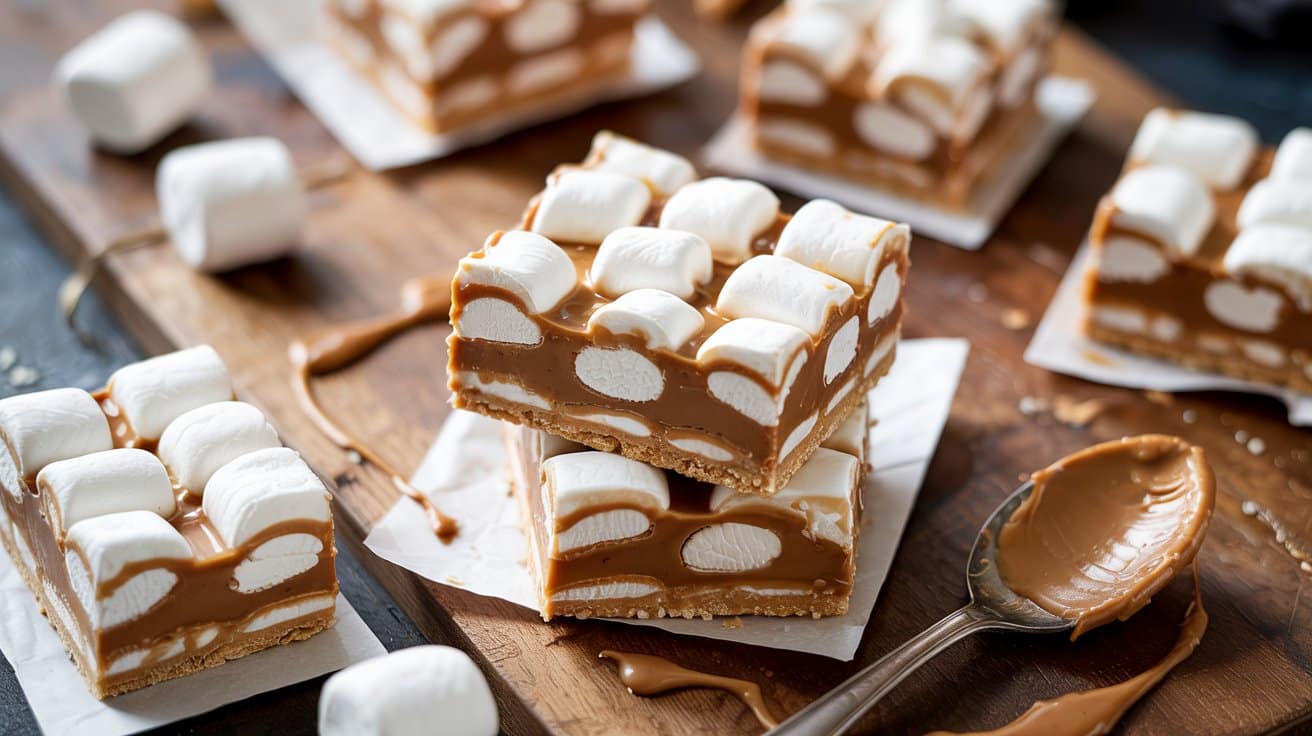
This nostalgic bar layers a fudgy peanut butter filling over a buttery graham base and a soft marshmallow cream topping. It comes together quickly and chills into neat squares that are great for snacks, lunchboxes, or casual dessert plates.
The contrast of rich peanut butter and pillowy marshmallow is comforting and familiar.
If substituting for dairy or experimenting with tropical flavors, check where to find coconut butter locally for a rich, plant-based swap.
Why This Recipe Works
The contrast of dense peanut butter and pillowy marshmallow makes every bite satisfying. The straightforward assembly keeps prep short and predictable.
- Buttery graham base - Provides a sturdy, slightly crunchy foundation that supports the soft layers above.
- Creamy peanut filling - Smooth peanut butter combined with powdered sugar creates a fudgy layer that sets firm enough to cut.
- Pillowy marshmallow topping - Marshmallow creme adds a glossy, tender finish that remains soft after chilling.
- Chill-and-cut finish - Refrigerating firms the bars for clean slices without baking the filling.
Ingredient Swap Ideas
Small swaps let you adjust flavor or dietary needs while keeping the same method. Each suggestion preserves texture and ease of assembly.
- Graham cracker crumbs - Use crushed vanilla wafers or digestive biscuits for a similar sweet, crunchy base.
- Creamy peanut butter - Swap almond or cashew butter for a milder nut flavor with comparable texture.
- Powdered sugar - Substitute superfine coconut sugar powdered in a blender for lower molasses notes that still thicken the filling.
- Marshmallow creme - Replace with 3 cups mini marshmallows melted with 2 tablespoons butter for a melt-and-toast marshmallow layer.
Ingredients
- 1 ½ cups graham cracker crumbs - from about 10 full sheets crushed.
- 6 tablespoons unsalted butter - melted.
- ¼ cup granulated sugar - for the crust.
- 1 cup creamy peanut butter - at room temperature.
- ½ cup unsalted butter - softened.
- 2 cups powdered sugar - sifted.
- 1 teaspoon vanilla extract - for flavor.
- ¼ teaspoon salt - balances sweetness.
- 7 ounces marshmallow creme - jarred.
Instructions
- Preheat the oven to 350°F and line an 8x8-inch pan with parchment, leaving an overhang for easy removal.
- Stir graham crumbs, granulated sugar, and melted butter until evenly combined, then press the mixture firmly into the pan.
- Bake the crust 8 to 10 minutes until set and slightly golden at the edges, then cool for 10 minutes.
- Beat peanut butter and softened butter until smooth, add powdered sugar, vanilla, and salt, and mix to a spreadable consistency; press this filling evenly over the cooled crust.
- Warm the marshmallow creme 10 to 15 seconds in the microwave to loosen, spread it over the peanut layer, chill at least 1 hour until firm, then lift from the pan using the parchment and cut into bars.
5. Raspberry Cream Bars

These bars pair a tangy raspberry layer with a smooth, slightly tangy cream filling on a buttery shortbread base. They cut clean after chilling and work well for afternoon treats, brunch spreads, or potlucks.
The balance of bright fruit and creamy filling makes them refreshing without being overly sweet.
For similarly creamy texture without dairy, try ideas in cream-free creamy dessert ideas for everyone that keep a silky mouthfeel.
Why This Recipe Works
Raspberry brightness balances a creamy layer and a crisp crust for satisfying contrast. The layers are simple to make and set firmly in the fridge for neat slices.
- Bright raspberry gelée - Cooked raspberries with lemon and a touch of cornstarch create a glossy, tart layer that holds its shape.
- Silky cream layer - Cream cheese and sour cream combine for a smooth, slightly tangy filling that goes with the raspberries.
- Buttery shortbread crust - A baked graham cracker crust gives structure and a crisp base for easy slicing.
- Chill-and-cut finish - Refrigerating the bars overnight lets the raspberry layer firm so you get clean, even squares.
Ingredient Swap Ideas
Swaps let you adapt to pantry limits or dietary preferences without changing the method. Choose options that keep the same textures and set times.
- Graham cracker crumbs - Use crushed digestive biscuits or shortbread cookies to keep a similar buttery base.
- Sour cream - Swap with plain Greek yogurt for tang and a slightly lighter texture.
- Cornstarch - Use 1 ½ teaspoons arrowroot powder mixed with cold water for a clear, glossy set.
- Fresh raspberries - Use frozen unsweetened raspberries, thawed and drained, when fresh berries are out of season.
Ingredients
- 1 ½ cups graham cracker crumbs - finely crushed.
- 6 tablespoons unsalted butter - melted.
- 8 ounces cream cheese - softened.
- ½ cup powdered sugar - sifted.
- ½ cup sour cream - at room temperature.
- 1 teaspoon vanilla extract -.
- 2 cups fresh raspberries - or thawed frozen.
- ⅓ cup granulated sugar - for the raspberry layer.
- 1 tablespoon lemon juice - fresh is best.
- 1 tablespoon cornstarch - mixed with 1 tablespoon cold water to slurry.
Instructions
- Preheat the oven to 350°F and press the graham crumbs mixed with melted butter into a 9x9-inch pan; bake 10 minutes until set and lightly golden.
- Beat the cream cheese with powdered sugar, sour cream, and vanilla until smooth, then spread evenly over the warm crust.
- Return the pan to the oven and bake 8-10 minutes until the cream layer is just set; cool to room temperature.
- Cook raspberries, granulated sugar, and lemon juice over medium heat until berries break down, about 5 minutes, then stir in the cornstarch slurry and simmer 1 minute until thickened.
- Cool the raspberry mixture slightly, spread over the cooled cream layer, then refrigerate at least 4 hours or overnight before slicing into bars.
6. No-Bake Vanilla Pudding Bars
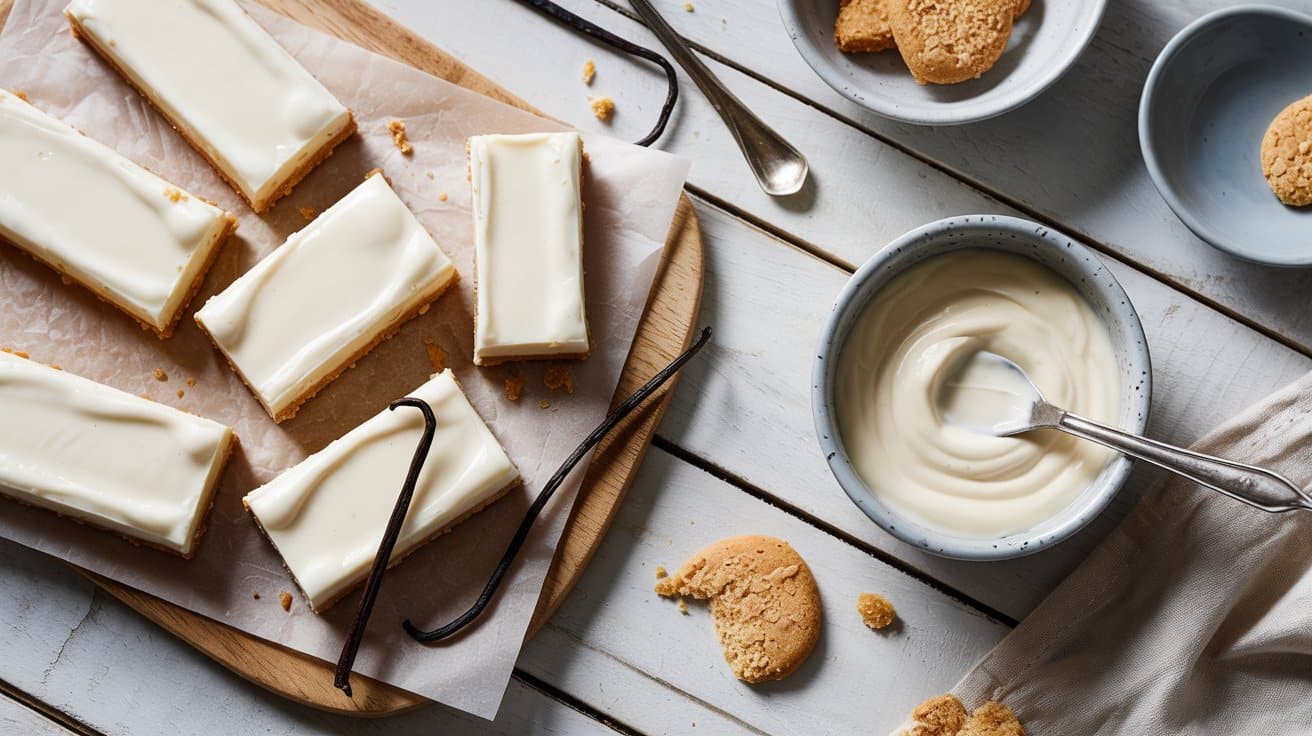
This chilled dessert layers a crisp crumb crust with a silky vanilla filling that holds its shape for easy slicing. It's quick to assemble and best served cold after dinner or at potlucks and casual gatherings.
These chilled pudding squares fit the same bill as other easy options - see pudding-style dessert recipes for effortless nights for more no-bake ideas.
Why This Recipe Works
This recipe combines a crunchy base with a light, stable filling that sets in the refrigerator. You can make it ahead and have a show-stopping dessert with minimal hands-on time.
- Creamy vanilla filling - Instant pudding mixed with cold milk and folded into whipped topping produces a smooth, scoopable layer that keeps its texture when chilled.
- Buttery graham crust - The pressed crumb base adds a crisp contrast and supports clean slices.
- Chill-and-serve method - No baking is required; the fridge does the work so you can prepare it in stages.
- Simple assembly - Few steps and common ingredients let you finish the bars in under 20 minutes of active time.
Ingredient Swap Ideas
Small swaps help tailor sweetness, texture, or dietary needs without changing the method. Use these alternatives to match what you have or prefer.
- Graham cracker crumbs - Use crushed vanilla wafers for a sweeter, slightly finer crust that still presses firmly.
- Unsalted butter - Substitute melted coconut oil for a dairy-free option that binds crumbs similarly.
- Vanilla instant pudding mix - Make a quick stovetop custard (milk, sugar, cornstarch, vanilla) and chill to get a fresh-pudding taste while keeping the same assembly.
- Whipped topping - Use whipped heavy cream stabilized with a little powdered sugar for a fresher flavor and similar lift.
Ingredients
- 2 cups graham cracker crumbs - finely crushed.
- 6 tablespoons unsalted butter - melted.
- 2 (3.4 oz) packages vanilla instant pudding mix - dry mix.
- 4 cups cold milk - for preparing the pudding.
- 8 ounces whipped topping - thawed.
- 1 teaspoon vanilla extract - for extra vanilla depth.
Instructions
- Mix crumbs and melted butter in a bowl until evenly moistened, then press into a 9x13-inch pan to form an even crust; chill 10 minutes.
- Whisk pudding mixes with cold milk for 2 minutes until beginning to thicken, then let rest 1-2 minutes to set.
- Stir vanilla extract into the whipped topping, then fold the prepared pudding into the whipped topping until smooth and uniform.
- Spread the filling over the chilled crust and smooth the top with a spatula.
- Refrigerate at least 2 hours until firm, then cut into bars and serve chilled.
7. Brown Butter Blondie Bars
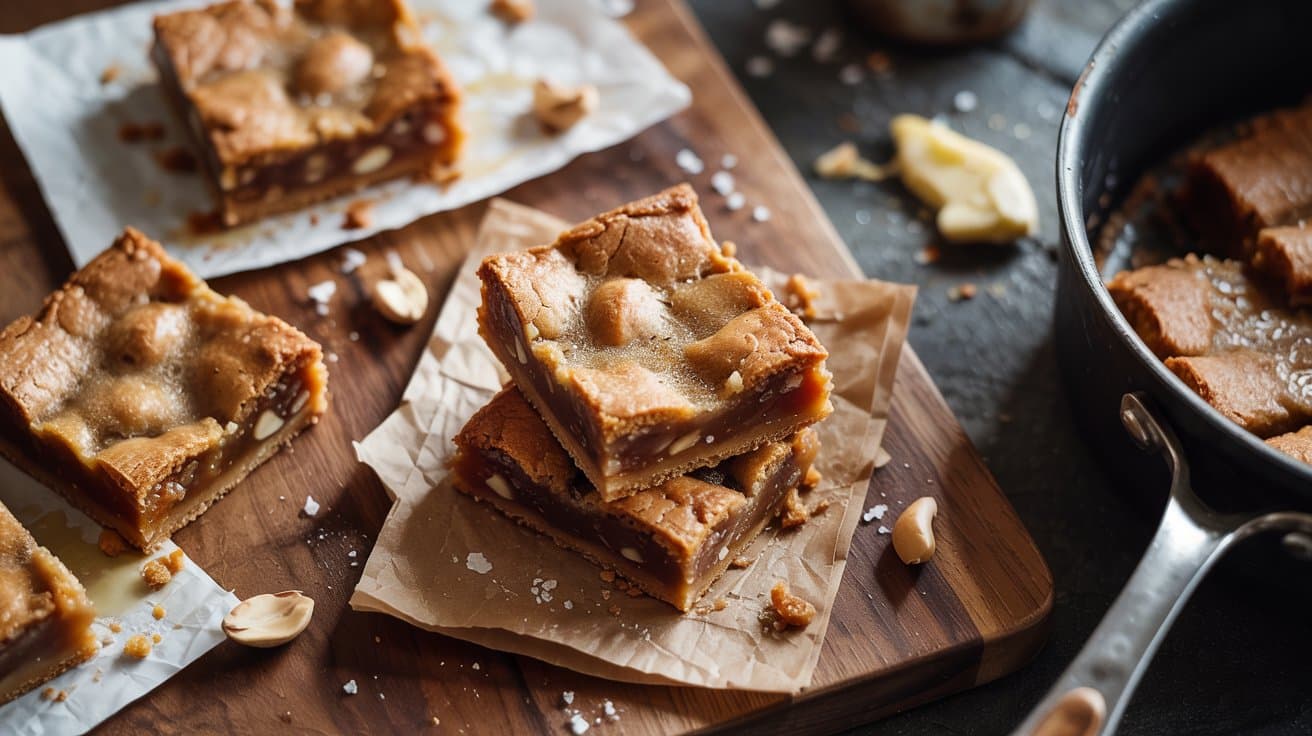
These blondie bars combine nutty browned butter with a chewy, caramel-like crumb that feels a little upscale while staying simple to make. They bake in a single pan and are great warm with coffee or cooled and cut into squares for packing.
The browned butter deepens the sweetness and makes the finished bars taste richer than their ingredient list suggests.
Why This Recipe Works
These bars deliver deep, toasty flavor and a fudgy texture without complicated steps. The method keeps the batter simple so the browned butter shines.
- Nutty brown butter base - Browning the butter adds toasted, caramel notes that make the whole bar taste richer.
- Chewy caramel crumb - Packed brown sugar and a short bake create a dense, chewy center that feels indulgent.
- Visible chocolate pockets - Chocolate chips melt just enough to give pockets of melty chocolate without weighing down the batter.
- One-pan prep and bake - Everything mixes in a few bowls and bakes in an 8x8 pan for easy cleanup.
Ingredient Swap Ideas
Swaps help you adjust for diet, texture, or pantry limits while keeping the core method the same.
- Unsalted butter - Use equal plant-based stick butter for a dairy-free version, since it browns and behaves similarly.
- Light brown sugar - Swap for dark brown sugar for a deeper molasses note that goes with the browned butter.
- All-purpose flour - Use a 1:1 gluten-free flour blend to make the bars gluten-free while maintaining structure.
- Semi-sweet chocolate chips - Substitute chopped dark or milk chocolate for different intensity and melting texture.
Ingredients
- 1 cup unsalted butter - browned.
- 1 ½ cups packed light brown sugar - firmly packed.
- 2 large eggs - at room temperature.
- 1 teaspoon vanilla extract -.
- 1 cup all-purpose flour - spooned and leveled.
- ½ teaspoon baking powder - for a slight lift.
- ¼ teaspoon fine salt - to balance sweetness.
- 1 cup semi-sweet chocolate chips - or chunks.
- ½ cup chopped walnuts - toasted if preferred.
Instructions
- Preheat the oven to 350°F and line an 8x8-inch pan with parchment, leaving an overhang for easy removal.
- Brown the butter in a light-colored saucepan over medium heat, swirling until the solids are amber and the aroma is toasty, about 4-6 minutes; transfer to a bowl and let cool 5 minutes.
- Whisk the cooled brown butter with brown sugar until combined, then add eggs one at a time, whisking until smooth; stir in vanilla.
- Fold in flour, baking powder, and salt until just mixed, taking care not to overmix.
- Stir in chocolate chips and walnuts, spread the batter into the prepared pan, and smooth the top.
- Bake 20-25 minutes until the edges are set and a toothpick inserted near the center comes out with a few moist crumbs; cool completely in the pan before lifting and cutting into squares.
8. Chocolate Mint Cheesecake Bars
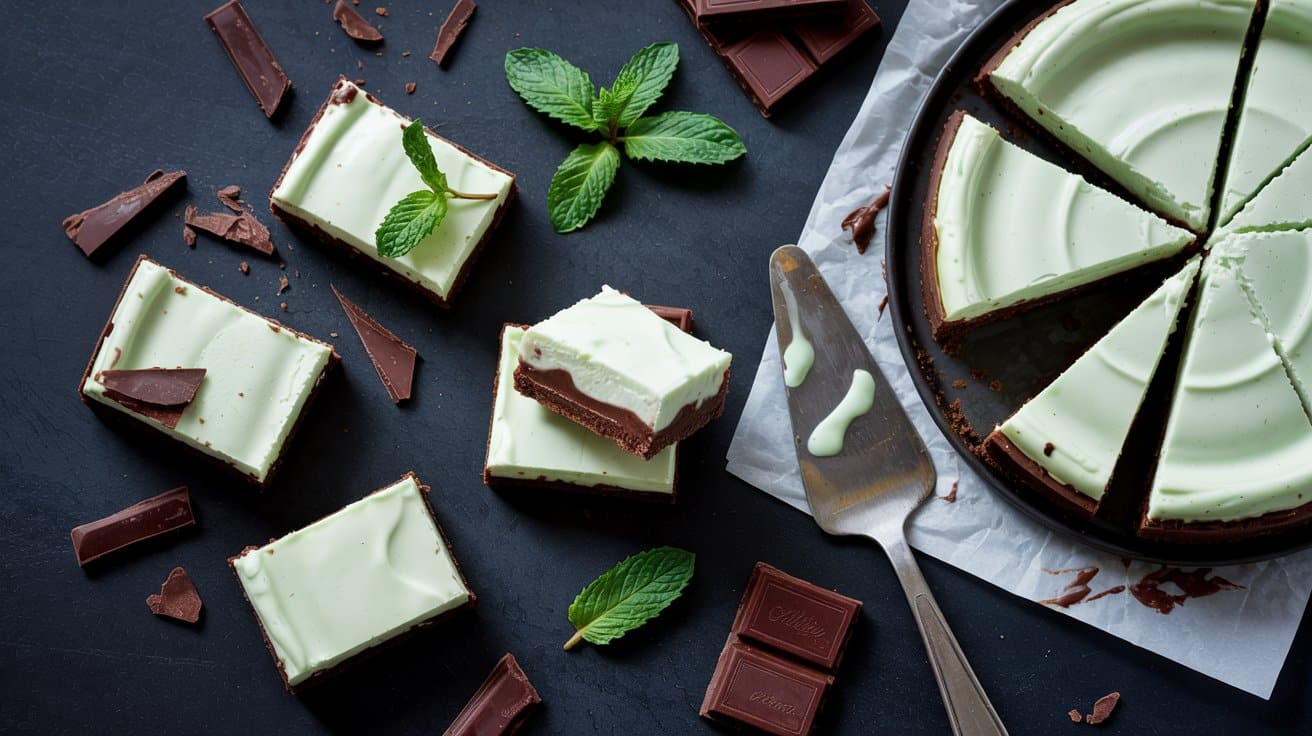
Rich chocolate and bright mint meet a smooth cheesecake layer for a refreshing dessert that still feels indulgent. We make a crisp chocolate cookie base, a mint-scented cream-cheese filling, and a glossy chocolate topping.
These bars are best served chilled and are ideal for holidays or potlucks.
Why This Recipe Works
These bars balance cool mint with dense, creamy cheesecake for clear contrasting textures. The layered structure makes them easy to slice and serve.
- Chocolate cookie foundation - A crisp, cocoa-rich crust supports the filling and adds deep chocolate notes.
- Mint-scented cream layer - A small amount of peppermint extract gives a bright, clean flavor without overpowering the cheesecake.
- Silky chocolate ganache - Warm cream melted with chocolate creates a glossy top that firms into a fudgy layer.
- Chill-and-slice format - Refrigeration firms the bars so you can cut neat squares for serving.
Ingredient Swap Ideas
Small swaps help adapt to dietary needs or pantry limits while keeping the recipe structure intact. Pick substitutions that mirror texture and moisture.
- Chocolate cookie crumbs - Use chocolate graham crackers or crushed chocolate wafers for a similar cocoa flavor and sturdy crust.
- Sour cream (½ cup) - Swap Greek yogurt for a tangy texture that keeps the filling creamy.
- Semi-sweet chocolate (1 cup) - Use dark chocolate (60-70%) for a less sweet, richer ganache that still sets well.
- Peppermint extract (1 tsp) - Use ½ teaspoon peppermint plus ½ teaspoon vanilla if you prefer a milder mint note.
Ingredients
- 1 ½ cups chocolate cookie crumbs - finely crushed.
- 6 tablespoons unsalted butter - melted.
- 16 ounces cream cheese - softened to room temperature.
- ⅔ cup granulated sugar - for the filling.
- 2 large eggs - room temperature.
- ½ cup sour cream - full-fat or Greek.
- 1 teaspoon peppermint extract - or to taste.
- ½ teaspoon vanilla extract - for balance.
- Pinch kosher salt - about ⅛ teaspoon.
- A few drops green food coloring - optional for color.
- 1 cup semi-sweet chocolate chips - for ganache.
- ⅓ cup heavy cream - heated for ganache.
- 1 tablespoon unsalted butter - optional for shine in ganache.
- 9x9-inch baking pan - lined with parchment for easy removal.
Instructions
- Preheat the oven to 325°F and press the cookie crumbs mixed with melted butter into the lined pan; bake 8 minutes, then cool slightly.
- Beat cream cheese and sugar until smooth, then add eggs one at a time and mix until combined.
- Stir in sour cream, peppermint, vanilla, salt, and optional food coloring until smooth, then pour over the warm crust.
- Bake at 325°F for 22-26 minutes, until the center is set but still slightly jiggly; cool to room temperature, then chill at least 3 hours.
- Warm heavy cream until it simmers, pour over chocolate chips, let sit 1 minute, then stir until smooth and add butter; cool briefly.
- Spread ganache over chilled bars, refrigerate 30 minutes to set, then lift from pan and cut into squares.
9. Pumpkin Spice Bars
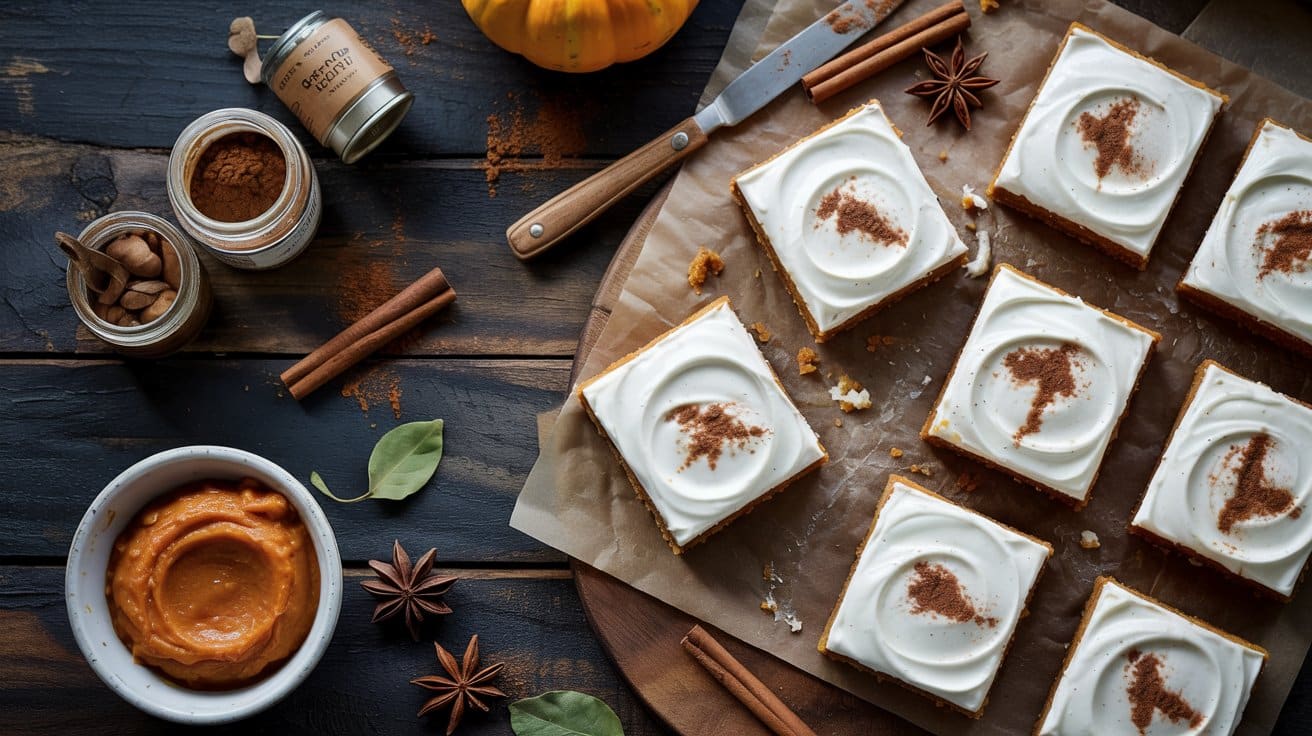
These soft, spiced bars are packed with pumpkin flavor and a tender crumb, ideal for fall baking. You can make them in one pan and finish with a simple cream cheese glaze for a tangy contrast.
They work well for school lunches, coffee breaks, or a weekend bake for friends.
Why This Recipe Works
These bars balance moist pumpkin cake with warm spices and a smooth glaze for a finishing touch. The method is straightforward so you get consistent results each time.
- Moist pumpkin base - Canned pumpkin and oil keep the batter tender and cake-like.
- Balanced warm spices - Cinnamon, ginger, nutmeg, and cloves give a cozy autumn profile without overpowering the pumpkin.
- Sheet-pan baking - A 9x13-inch pan bakes the bars evenly so the center cooks through while edges stay soft.
- Cream cheese glaze finish - The tangy glaze brightens the sweetness and spreads easily over cooled bars.
Ingredient Swap Ideas
Swaps let you adapt flavor or address pantry limits while keeping the same method and texture. Try these replacements to suit dietary needs or taste.
- All-purpose flour - Swap with whole wheat pastry flour for a nuttier taste and similar texture.
- Vegetable oil - Swap with melted unsalted butter for richer flavor and a slightly firmer crumb.
- Granulated sugar - Swap half with coconut sugar or maple syrup (reduce other liquid slightly) for deeper caramel notes.
- Cream cheese - Swap with Greek yogurt mixed with a little powdered sugar for a lighter, tangy topping.
Ingredients
- 1 ½ cups all-purpose flour - for structure.
- 1 cup granulated sugar - for sweetness.
- ½ cup packed brown sugar - for moisture and caramel notes.
- 1 teaspoon baking powder - for lift.
- ½ teaspoon baking soda - for browning and rise.
- ½ teaspoon salt - to balance sweetness.
- 2 teaspoons pumpkin pie spice - or blend of cinnamon, ginger, nutmeg, and cloves.
- 1 cup canned pumpkin puree - not pumpkin pie filling.
- 2 large eggs - at room temperature.
- ½ cup vegetable oil - or another neutral oil.
- 1 teaspoon vanilla extract - for aroma.
- 4 ounces cream cheese - softened for the glaze.
- ¼ cup unsalted butter - softened for the glaze.
- 1 cup powdered sugar - for the glaze.
Instructions
- Preheat your oven to 350°F and grease a 9x13-inch pan.
- Whisk together the flour, baking powder, baking soda, salt, and pumpkin pie spice in a bowl.
- In another bowl, beat the granulated sugar, brown sugar, oil, eggs, pumpkin puree, and vanilla until smooth, then fold in the dry ingredients until just combined.
- Spread the batter into the prepared pan and bake 25-30 minutes, until a toothpick inserted near the center comes out with moist crumbs; cool completely.
- Beat the cream cheese and butter until smooth, add the powdered sugar and vanilla, mix until creamy, spread over the cooled bars, chill 20 minutes, then slice and serve.
10. Nutella Swirled Brownies

These fudgy brownies combine intense chocolate and creamy hazelnut swirls for a rich, indulgent treat. You can mix the batter quickly and finish with a simple swirl before baking.
They are delicious at room temperature or warmed briefly and served with ice cream.
Why This Recipe Works
The melted-chocolate base creates a dense, fudgy crumb that holds the Nutella ribbons. The method is straightforward and forgiving for home baking.
- Melted-chocolate base - Using melted butter and chopped chocolate yields a glossy, fudgy texture that contrasts with the hazelnut ribbons.
- Silky Nutella ribbons - Warmed hazelnut spread threads through the batter and bakes into glossy streaks for pockets of creamy flavor.
- Single-bowl mixing - Most steps happen in one bowl, keeping the process quick and minimizing dishes.
- Clear doneness cues - Edges that set and a slightly jiggly center indicate fudgy brownies without overbaking.
Ingredient Swap Ideas
Small swaps help you adapt to pantry items or dietary needs while keeping the texture close to the original.
- Semisweet chocolate - Use 60-70% dark chocolate for deeper flavor that still melts smoothly with butter.
- Nutella - Substitute smooth peanut butter for a different nutty profile that swirls and bakes similarly.
- All-purpose flour - Replace with ¾ cup almond flour plus 1 tablespoon coconut flour for a lower-gluten option; expect a slightly denser crumb.
- Granulated sugar - Swap half the sugar for light brown sugar to add caramel notes and extra moisture.
Ingredients
- ½ cup (1 stick) unsalted butter - melted and cooled slightly.
- 4 ounces semisweet chocolate - chopped.
- 1 cup granulated sugar.
- 2 large eggs - room temperature.
- 1 teaspoon vanilla extract.
- ⅓ cup unsweetened cocoa powder - sifted.
- ½ cup all-purpose flour - spooned and leveled.
- ¼ teaspoon fine salt.
- ½ cup Nutella - warmed slightly to loosen.
- Parchment paper - for lining an 8-inch square pan.
Instructions
- Preheat the oven to 350°F and line an 8-inch square pan with parchment, leaving an overhang for easy removal.
- Melt the butter and chopped chocolate together in a heatproof bowl, stirring until smooth, then stir in the sugar and cool for 1-2 minutes.
- Whisk in the eggs one at a time, then add the vanilla; fold in the cocoa, flour, and salt until just combined.
- Spread the batter into the prepared pan, dollop warmed Nutella in spoonfuls across the top, and drag a knife through to create swirls.
- Bake 20-25 minutes until the edges are set and the center is slightly jiggly; cool completely in the pan on a rack before slicing for clean squares.
11. Coconut Flour Chocolate Chip Bars
Soft, chocolate-studded bars made with coconut flour give you a gluten-free treat that still feels indulgent. You get tender texture and melty chips in every bite, making these ideal for snacks, lunchboxes, or a simple dessert.
Why This Recipe Works
This recipe balances a drier flour with plenty of eggs and liquid so the bars stay soft. It uses simple pantry ingredients and a short bake time for reliable results.
- Moist, tender crumb - Coconut flour plus eggs create structure without drying the bars out.
- High chocolate ratio - Generous chips mean chocolate in every bite without extra mixing steps.
- Small-batch pan - An 8x8-inch pan yields thick bars that bake evenly and slice cleanly.
- Gluten-free single flour - Using only coconut flour keeps the recipe straightforward for gluten-free cooks.
Ingredient Swap Ideas
Swaps help you adapt to diet needs or use what you already have without changing the method. Each suggestion keeps batter consistency and flavor similar.
- Unsalted butter - Replace with coconut oil for a dairy-free option that keeps richness.
- Maple syrup - Swap with honey or agave for comparable sweetness and moisture.
- Coconut sugar - Use light brown sugar or granulated sugar to preserve caramel notes.
- Semi-sweet chocolate chips - Use dark chocolate chunks or dairy-free chips for a different sweetness profile.
Ingredients
- ½ cup coconut flour - sifted.
- ½ cup unsalted butter - melted and cooled.
- ½ cup coconut sugar - packed.
- 4 large eggs - room temperature.
- ⅓ cup maple syrup - for moisture and sweetness.
- 1 teaspoon vanilla extract - for flavor.
- 1 teaspoon baking powder - for light lift.
- ¼ teaspoon fine salt - to balance sweetness.
- ¾ cup semi-sweet chocolate chips - plus extra for topping.
Instructions
- Preheat the oven to 350°F and line an 8x8-inch pan with parchment, leaving an overhang for easy removal.
- Whisk the eggs, melted butter, maple syrup, and vanilla in a bowl until combined.
- Stir in the coconut flour, baking powder, and salt until mixed, then let the batter rest 2 minutes to thicken.
- Fold in the chocolate chips, spread the batter evenly in the prepared pan, and sprinkle extra chips on top.
- Bake 18-22 minutes until the edges are set and the center is slightly springy, then cool completely in the pan before slicing.
12. Caramel Apple Bars
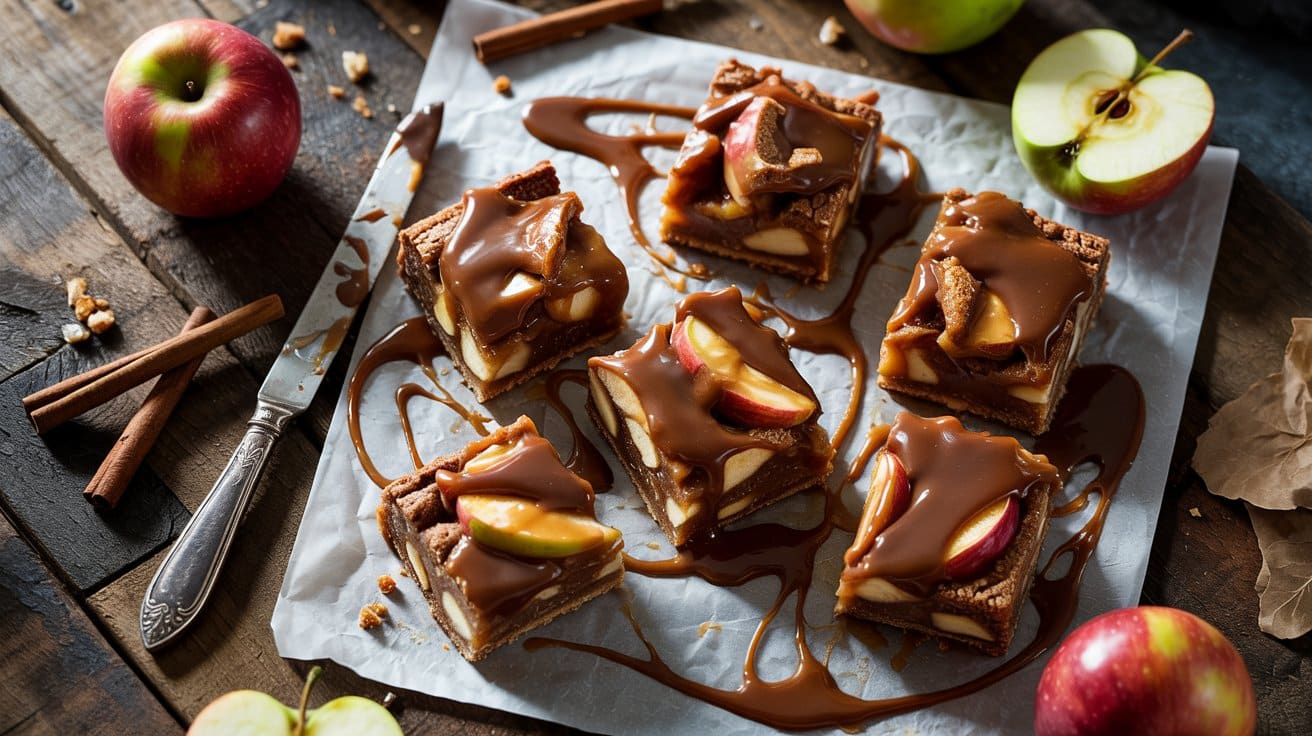
These bars combine tender spiced apples with a buttery crumb base and a warm caramel drizzle. You can make them ahead for potlucks, school snacks, or an after-dinner treat.
Why This Recipe Works
These bars balance a crisp crumb with soft apple filling for easy slicing and serving. The quick caramel ties the layers together for a satisfying finish.
- Buttery crumb base and topping - The same crumb mixture creates a sturdy bottom and a crisp, golden topping that holds the filling in neat squares.
- Tender, spiced apple filling - Lightly thickened apples keep structure without becoming mushy during baking.
- Pan-friendly format - Baked in a single 9x9 pan so you get even cooking and easy transport.
- Warm caramel drizzle - A simple stovetop caramel adds richness and keeps the bars from feeling dry.
Ingredient Swap Ideas
Small swaps help match pantry items or dietary needs without changing the method. Try these to adjust sweetness, texture, or convenience.
- All-purpose flour - Swap half for whole wheat pastry flour to add nutty flavor while keeping the crumb tender.
- Apples - Use Honeycrisp or Fuji for sweeter, firmer bites, or Granny Smith for brighter tartness.
- Heavy cream (for caramel) - Swap for full-fat coconut milk for a dairy-free caramel with a mild coconut note.
- Brown sugar (caramel) - Use store-bought caramel sauce instead of making stovetop caramel to save time and still get a silky finish.
Ingredients
- 1 ½ cups all-purpose flour - for crust and crumb topping.
- ¾ cup packed light brown sugar - for crust and topping.
- ¼ cup granulated sugar - for apple filling.
- ½ teaspoon kosher salt - for dough and caramel.
- 1 teaspoon ground cinnamon - for filling and topping.
- 12 tablespoons unsalted butter - cold and cubed for crumb.
- 3 medium apples - peeled, cored, and diced (about 3 cups).
- 2 tablespoons lemon juice - to prevent browning and brighten flavor.
- 1 tablespoon cornstarch - to thicken filling.
- ½ cup packed light brown sugar - for caramel.
- 4 tablespoons unsalted butter - for caramel.
- ¼ cup heavy cream - for caramel.
- ½ teaspoon vanilla extract - for caramel.
Instructions
- Preheat the oven to 350°F (175°C).
- Make the crumb: combine flour, ¾ cup brown sugar, salt, and cinnamon, then cut in 12 tablespoons cold butter until mixture forms coarse crumbs; press two-thirds of the crumbs firmly into a greased 9x9-inch pan.
- Bake the crust 12 minutes until set and lightly golden.
- Prepare the filling: toss diced apples with lemon juice, ¼ cup granulated sugar, 1 tablespoon cornstarch, and a pinch of cinnamon; spread evenly over the warm crust.
- Sprinkle the remaining crumb mixture over the apples and bake 25-30 minutes until the topping is golden and the filling is bubbling.
- Make the caramel: simmer ½ cup brown sugar, 4 tablespoons butter, and ¼ cup heavy cream for 2-3 minutes until slightly thickened, remove from heat and stir in salt and vanilla; cool briefly, then drizzle over cooled bars before cutting.
13. Maple Oatmeal Bars
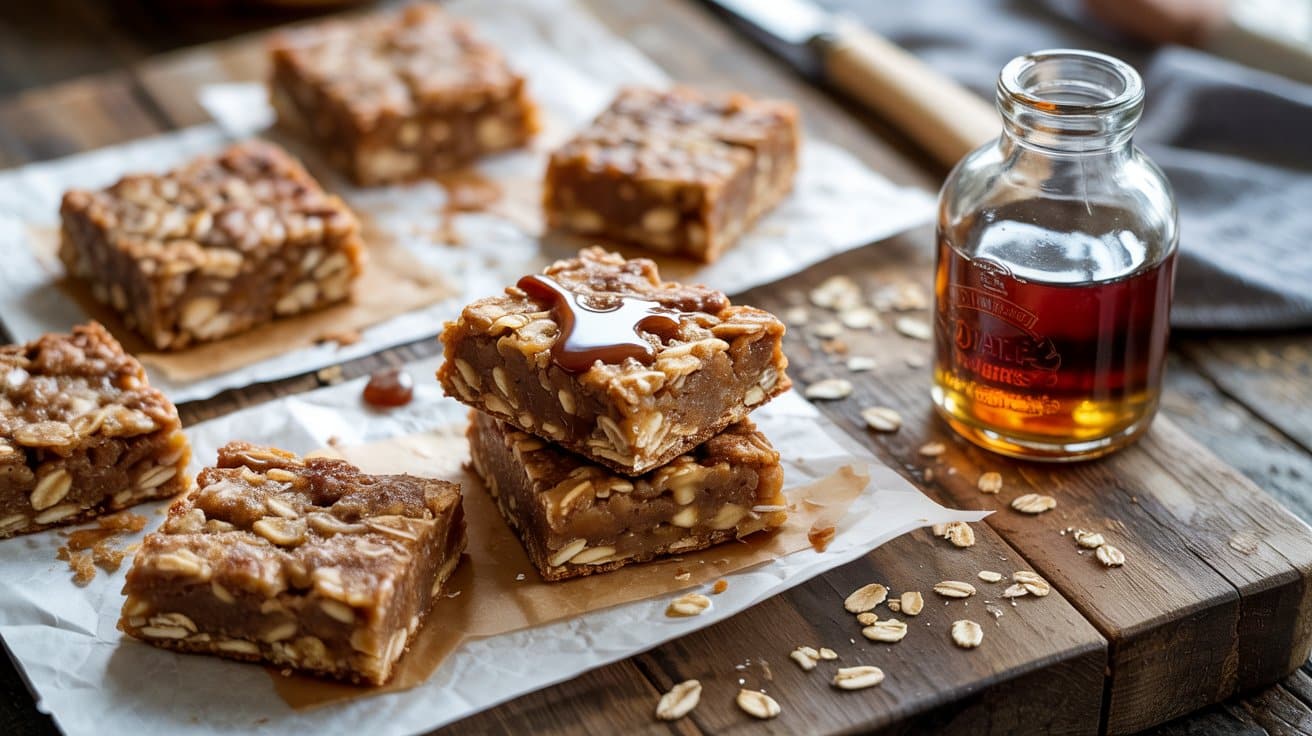
These maple-sweet oat bars are chewy, mildly sweet, and quietly satisfying. They use simple pantry staples and bake in about 25 minutes, making them a reliable snack or breakfast option served warm or packed for later.
Why This Recipe Works
These bars balance maple syrup with brown sugar for caramel notes and a chewy oat texture. The method is straightforward and yields sturdy bars that hold up for travel.
- Maple-forward caramel notes - Butter and maple syrup brown slightly in the oven, giving a deep, caramel-like flavor that anchors the bars.
- Chewy oat crumb structure - Old-fashioned oats mixed with a small amount of flour create a tender yet sturdy chew that holds its shape.
- Simple pantry assembly - The recipe uses common ingredients and one bowl for dry and one for wet, saving time and dishes.
- Make-ahead snack or breakfast - Bars firm as they cool and store well at room temperature for several days.
Ingredient Swap Ideas
Swaps help you adapt for diet needs or use what you have on hand. Each suggestion keeps the same method and similar texture.
- Butter - Use melted coconut oil in a 1:1 ratio for a dairy-free option; it maintains richness and helps the bars set.
- All-purpose flour - Swap for whole wheat pastry flour at a 1:1 ratio for nuttier flavor and slightly denser texture.
- Brown sugar - Use coconut sugar at a 1:1 ratio for a lower-glycemic alternative that still browns well.
- Egg - Replace with a flax egg (1 tablespoon ground flax + 3 tablespoon water, set 5 minutes) for a vegan binder that keeps the bars cohesive.
Ingredients
- 1 ½ cups rolled oats - old-fashioned.
- ¾ cup all-purpose flour - spooned and leveled.
- ½ teaspoon baking powder - for lift.
- ¼ teaspoon salt - balances sweetness.
- ½ cup unsalted butter - melted.
- ⅓ cup packed brown sugar - light or dark.
- ⅓ cup pure maple syrup - real maple for best flavor.
- 1 large egg - room temperature.
- 1 teaspoon vanilla extract - for depth.
Instructions
- Preheat your oven to 350°F and line an 8x8-inch pan with parchment, leaving an overhang for easy removal.
- Whisk oats, flour, baking powder, and salt in a bowl until combined.
- In a separate bowl, whisk melted butter, brown sugar, maple syrup, egg, and vanilla until smooth.
- Stir the wet mixture into the dry until just combined, then press the batter evenly into the prepared pan.
- Bake 20-25 minutes until the top is golden and the center is set; a toothpick or gentle press should show slight spring-back.
- Cool completely in the pan, lift out using the parchment overhang, then cut into bars. Store at room temperature in an airtight container for up to 4 days.
14. Strawberry Cheesecake Bars
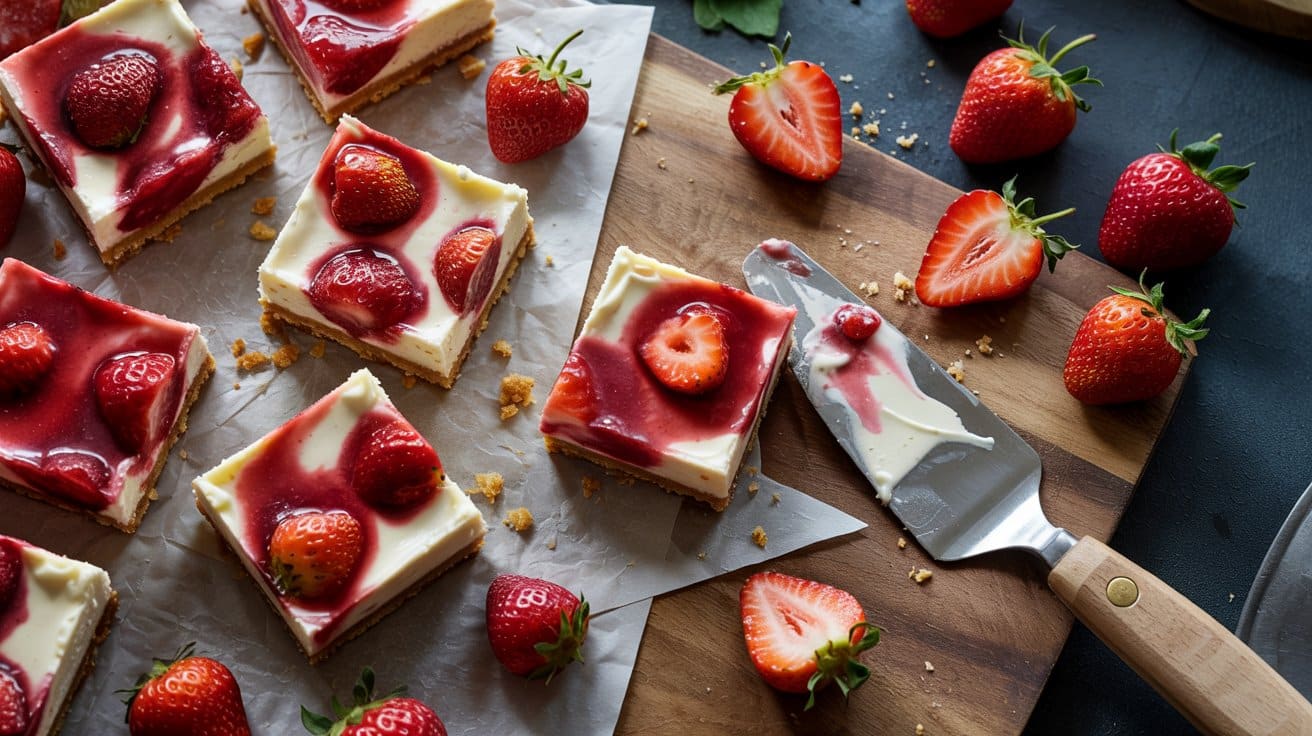
These bars pair a silky cheesecake layer with a bright strawberry topping for a fresh, lightly sweet dessert. They are straightforward to make and slice into neat squares for gatherings or an easy after-dinner treat.
Why This Recipe Works
These bars balance creamy richness with fresh fruit brightness. The structure holds for clean slicing and reliable make-ahead serving.
- Buttery graham crust - It provides a firm, slightly sweet base that supports the cheesecake without becoming soggy.
- Silky baked cheesecake center - The combination of cream cheese and sour cream yields a smooth, tangy filling that sets firmly but stays tender.
- Bright cooked strawberry glaze - A quick stovetop glaze concentrates strawberry flavor and spreads smoothly over the chilled cheesecake.
- Bar format for easy serving - Baking in a square pan creates uniform pieces that are simple to cut and plate.
Ingredient Swap Ideas
Small swaps help adapt to pantry items or dietary needs while keeping the same method and balance. Use these swaps to adjust texture, fat, or available ingredients.
- Graham cracker crumbs - Swap with finely crushed digestive biscuits or vanilla wafers for a similar crumb and sweetness.
- Sour cream - Swap with plain Greek yogurt for a tangy note and slightly lighter texture.
- Granulated sugar - Swap with coconut sugar 1:1 for a deeper caramel note that still caramelizes in the filling.
- Cornstarch - Swap with arrowroot or tapioca starch in equal amount to thicken the strawberry glaze without changing clarity.
Ingredients
- 1 ½ cups graham cracker crumbs - about 10 full crackers, finely crushed.
- 2 tablespoons granulated sugar - for the crust.
- 6 tablespoons unsalted butter - melted.
- 16 ounces cream cheese - softened (two 8-oz blocks).
- ⅔ cup granulated sugar - for the filling.
- 2 large eggs - room temperature.
- ½ cup sour cream - at room temperature.
- 1 teaspoon vanilla extract -.
- 1 teaspoon lemon zest - from 1 small lemon.
- ¼ teaspoon salt -.
- 1 cup fresh strawberries - chopped for topping.
- 2 tablespoons granulated sugar - for the strawberry glaze.
- 1 teaspoon cornstarch - dissolved in 1 tablespoon water.
Instructions
- Preheat the oven to 325°F and line a 9x9-inch pan with parchment, leaving an overhang for easy lifting.
- Mix graham crumbs, 2 tablespoons sugar, and melted butter, then press firmly into the pan and bake 8-10 minutes until set.
- Beat cream cheese and ⅔ cup sugar until smooth, add eggs one at a time, then stir in sour cream, vanilla, lemon zest, and salt; pour over the warm crust and bake 25-30 minutes until edges are set and the center slightly jiggles.
- Cool the pan on a wire rack for 1 hour, then refrigerate at least 2 hours to fully chill and firm.
- Simmer chopped strawberries, 2 tablespoons sugar, and cornstarch slurry over medium heat 3-5 minutes until thickened, cool slightly, spread over chilled bars, then refrigerate 30 minutes to set before slicing.
15. Flourless Chocolate Bars
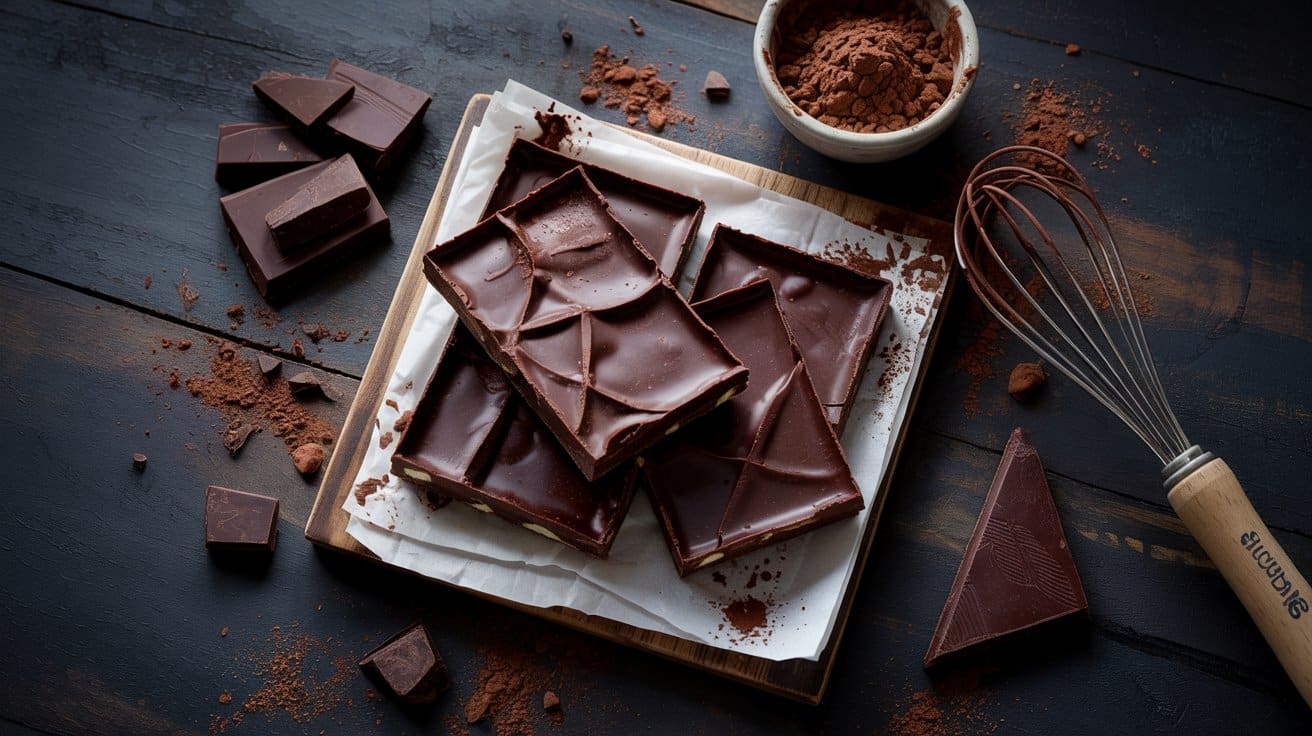
These bars turn simple pantry ingredients into a deeply chocolatey treat with a soft, fudgy texture. You can make them for an after-dinner dessert, a bake-sale staple, or a portable snack that travels well.
Expect intense cocoa flavor with a glossy top and a sliceable, tender center.
Why This Recipe Works
You get rich, dense bars that feel indulgent without any wheat flour. The method produces a shiny crust and a moist interior that keeps well.
- Ganache-like interior - Melted chocolate and butter create a silky base that yields a fudgy, almost ganache texture when baked.
- Stable lift from eggs - Whisked eggs and sugar provide structure so the bars hold their shape while staying soft.
- Intense chocolate profile - A mix of cocoa powder and chopped dark chocolate boosts depth and complexity.
- Crisp top finish - The batter sets with a thin, glossy top that contrasts the tender crumb beneath.
Ingredient Swap Ideas
Swaps help adapt the bars for dietary needs or flavor preferences without changing the method. Choose swaps that maintain fat and structure.
- Almond meal - Use finely ground hazelnuts for a nuttier note and similar texture.
- Unsalted butter - Substitute coconut oil measured 1:1 for a dairy-free option that still melts smoothly.
- Granulated sugar - Replace with coconut sugar in equal amounts for a deeper caramel tone.
- Dark chocolate (chopped) - Use chocolate chips of similar cacao percentage for convenience and consistent melting.
Ingredients
- 8 ounces dark chocolate (70% recommended) - chopped.
- 6 tablespoons unsalted butter - cut into pieces.
- ¾ cup granulated sugar -.
- 3 large eggs - at room temperature.
- ¼ cup unsweetened cocoa powder - sifted.
- ¾ cup almond meal - finely ground.
- 1 teaspoon vanilla extract -.
- ¼ teaspoon fine salt - plus extra for sprinkling if desired.
Instructions
- Preheat the oven to 350°F and line an 8x8-inch pan with parchment, leaving an overhang for easy removal.
- Melt the chopped chocolate and butter together in a heatproof bowl over simmering water or briefly in the microwave, stirring until smooth.
- Whisk the eggs and sugar until slightly thickened, about 1-2 minutes by hand or 30-45 seconds with a mixer.
- Stir the melted chocolate into the egg mixture, then fold in cocoa powder, almond meal, vanilla, and salt until just combined.
- Pour the batter into the prepared pan, smooth the top, and bake 20-25 minutes until the top is set and a toothpick comes out with moist crumbs.
- Cool completely in the pan, then lift out with the parchment and cut into bars; sprinkle with flaky salt if desired before serving.
16. Zucchini Chocolate Chip Bars
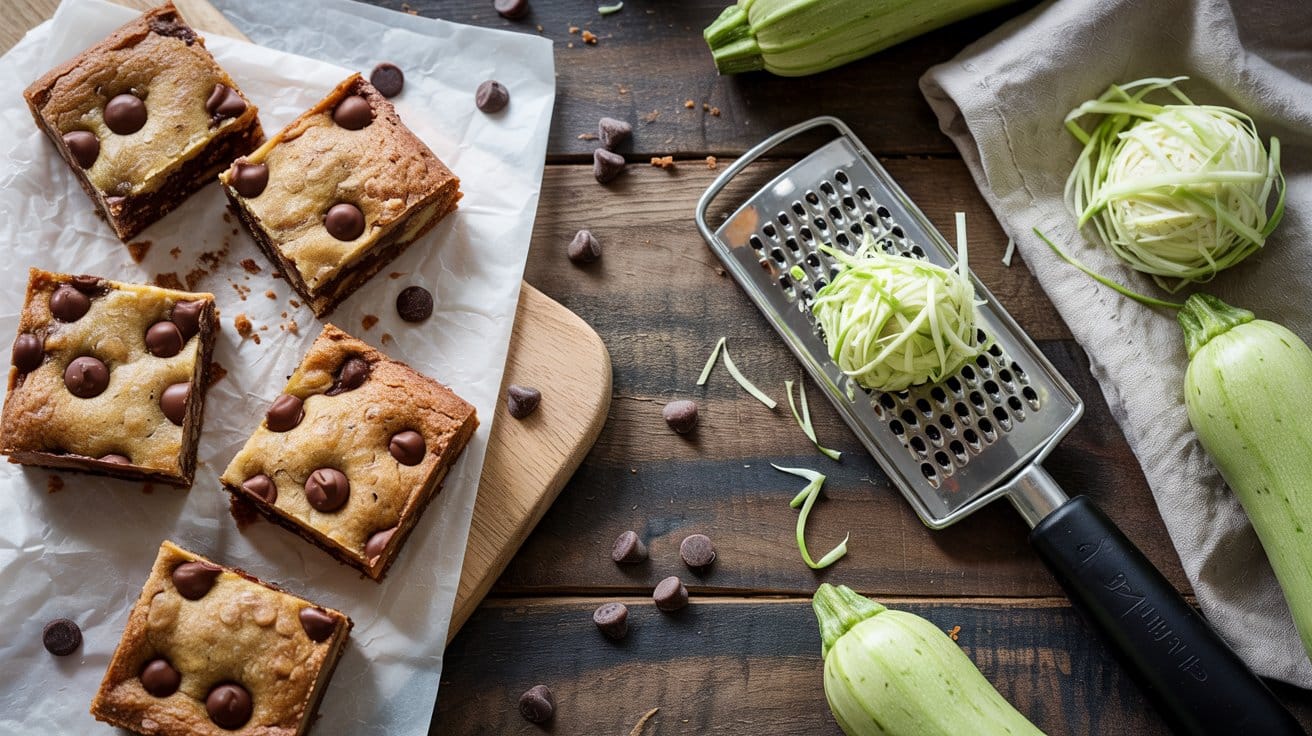
These bars are moist, slightly spiced, and studded with melty chocolate for a comforting treat. You can make them for an afternoon snack, a school lunchbox, or a casual dessert after dinner.
Why This Recipe Works
They stay tender from the zucchini and brown sugar, and the chocolate chips add rich pockets of sweetness. The method is straightforward and uses pantry basics so you can pull it together quickly.
- Moist shredded zucchini - Adds steam and keeps the crumb soft without a strong vegetable taste.
- Balanced spice note - A touch of cinnamon enhances the batter without overpowering the chocolate.
- Simple one-bowl wet mix - You combine wet ingredients quickly so the batter stays light.
- Bar-friendly bake - The 9x13 pan creates thin, easy-to-serve squares that crisp slightly at the edges.
Ingredient Swap Ideas
Simple swaps help you adjust to what you have or dietary needs without changing texture much. Use the following options to keep the result similar.
- All-purpose flour - Swap with 1:1 gluten-free baking blend for a gluten-free version that keeps structure.
- Vegetable oil - Substitute melted coconut oil for a subtle coconut note and similar moisture.
- Granulated sugar - Replace with coconut sugar in a 1:1 ratio to add a deeper caramel flavor.
- Semisweet chocolate chips - Use dark chocolate chips for a less sweet bar or milk chocolate for a sweeter treat.
Ingredients
- 2 cups all-purpose flour - for structure.
- 1 teaspoon baking soda - for leavening.
- ½ teaspoon baking powder - to lighten the crumb.
- ½ teaspoon salt - balances sweetness.
- 1 teaspoon ground cinnamon - warm spice.
- ½ cup granulated sugar - sweetens the batter.
- ½ cup packed brown sugar - adds moisture and depth.
- 2 large eggs - room temperature.
- ½ cup vegetable oil - neutral oil for moisture.
- 1 teaspoon vanilla extract - flavor.
- 1 ½ cups grated zucchini - squeezed dry.
- 1 cup semisweet chocolate chips - for melting pockets of chocolate.
Instructions
- Preheat the oven to 350°F and line a 9x13-inch pan with parchment, leaving an overhang for easy removal.
- Grate the zucchini, then wrap in a clean towel and squeeze out excess moisture until mostly dry.
- Whisk the dry ingredients (flour, baking soda, baking powder, salt, and cinnamon) in a medium bowl.
- In a large bowl, whisk eggs, granulated sugar, brown sugar, oil, and vanilla until smooth.
- Stir the squeezed zucchini into the wet mix, then fold the dry ingredients in until just combined and fold in chocolate chips.
- Spread the batter evenly in the prepared pan and bake 22-28 minutes until the edges are set and a toothpick comes out with a few moist crumbs; cool completely before cutting into bars.
17. Chewy S'mores Bars
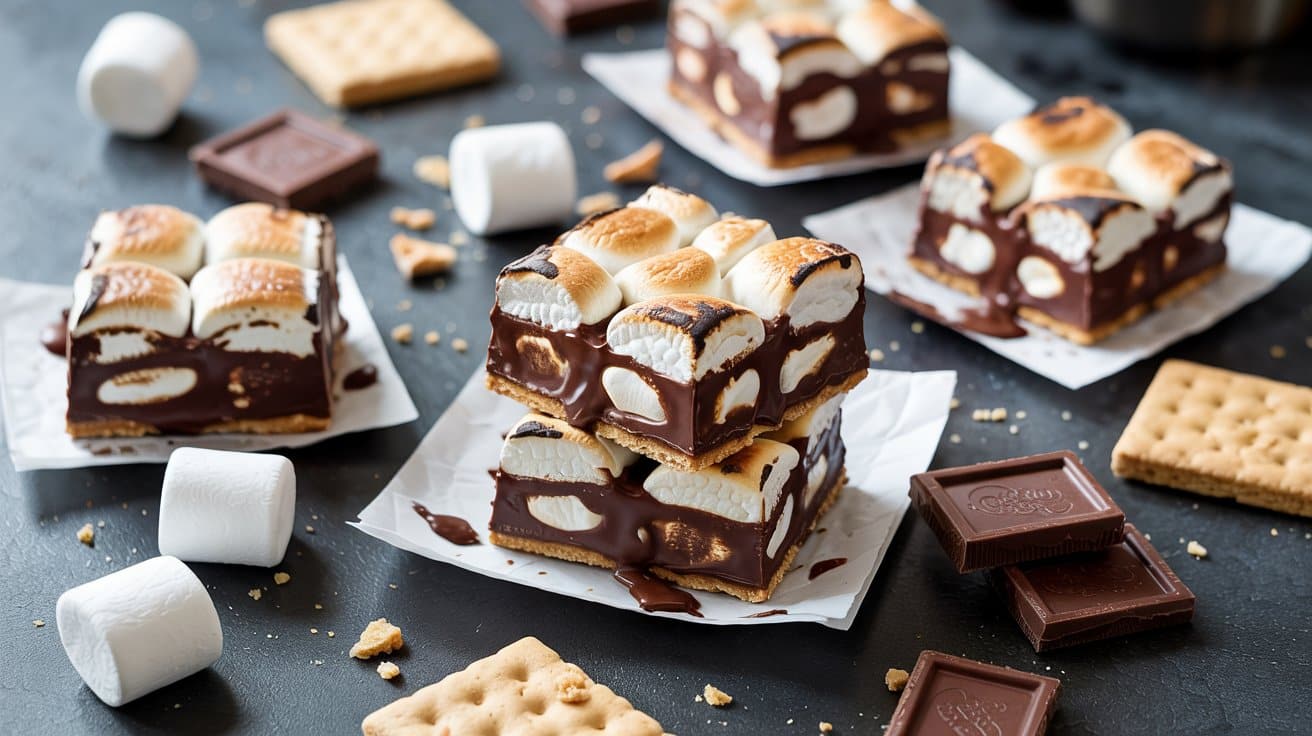
These bars turn the classic campfire s'more into a sticky, handheld treat you can bake any night. They combine a buttery graham-based dough with melted chocolate and gooey marshmallows for sweet, chewy bites.
Serve them warm for the best stretch and melty texture at casual gatherings or after-school snacks.
Why This Recipe Works
These bars give you the toasted-s'more experience without a campfire. The texture stays chewy while the chocolate melts and the marshmallows brown lightly on top.
- Graham-forward base - Crushed graham crackers mixed into the dough give each bar that signature crunchy-sweet backbone.
- Brown sugar chew - Packed brown sugar keeps the interior moist and tender for a true chewy bite.
- Molten chocolate pockets - Chocolate chips melt during baking into gooey pockets that contrast with the cracker notes.
- Toasted marshmallow finish - Mini marshmallows puff and brown quickly for a soft, caramelized topping.
Ingredient Swap Ideas
Swaps let you adapt to dietary needs or what you already have in the pantry while keeping similar texture and flavor.
- Graham cracker crumbs - Use digestive biscuit crumbs or crushed vanilla wafers for a similar sweet, crisp base.
- Unsalted butter - Substitute coconut oil for a dairy-free option; expect a slightly different aroma but similar chew.
- Semisweet chocolate chips - Use milk or chopped dark chocolate depending on how sweet or intense you prefer the bars.
- Mini marshmallows - Replace with larger marshmallows cut into pieces for bigger gooey pockets, though they may take a touch longer to brown.
Ingredients
- 2 cups graham cracker crumbs - from about 10 full sheets, finely crushed.
- 1 ½ cups all-purpose flour - for structure.
- 1 teaspoon baking powder - for light lift.
- ½ teaspoon salt - to balance sweetness.
- 1 cup (2 sticks) unsalted butter - melted and slightly cooled.
- 1 cup packed brown sugar - for chew and caramel notes.
- ½ cup granulated sugar - for sweetness and texture.
- 2 large eggs - at room temperature.
- 1 teaspoon vanilla extract - for aroma.
- 1 ½ cups semisweet chocolate chips - or chopped chocolate.
- 2 cups mini marshmallows - for topping; add more if you like extra goo.
Instructions
- Preheat the oven to 350°F (175°C) and line a 9x13-inch pan with parchment, leaving an overhang to lift the bars out.
- Whisk the graham crumbs, flour, baking powder, and salt in a bowl until evenly combined.
- Beat the melted butter with brown sugar and granulated sugar until smooth, then add eggs and vanilla and mix until glossy.
- Stir the dry ingredients into the wet just until combined, fold in 1 cup chocolate chips, and press the dough evenly into the prepared pan.
- Sprinkle the remaining chocolate chips and mini marshmallows over the top and bake 18-22 minutes, until edges are set and marshmallows are lightly browned; cool at least 15 minutes before slicing.
18. Almond Joy Dessert Bars
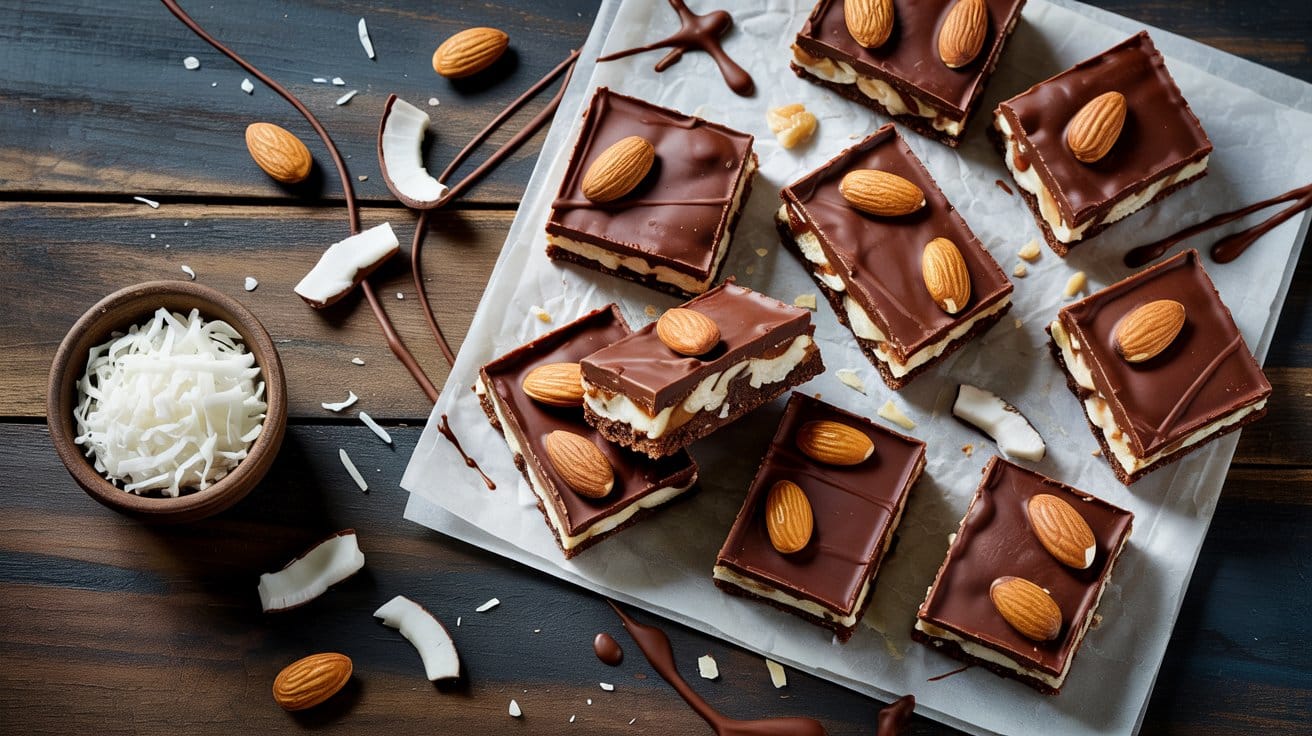
These bars layer a buttery crust, a chewy sweet coconut center, and a glossy chocolate top studded with almonds. They're straightforward to make and great for gatherings, potlucks, or an after-dinner treat.
The texture contrast and familiar candy-bar flavors make them a crowd-pleaser.
Why This Recipe Works
This version recreates the candy-bar profile in an easy pan-baked format. It balances a crisp base, a tender coconut core, and a clean chocolate finish.
- Buttery graham crust - It gives a sturdy, slightly crunchy base that holds the coconut layer without becoming soggy.
- Chewy condensed-coconut center - Sweetened condensed milk binds the shredded coconut into a tender, candy-like middle.
- Glossy chocolate topping - Melted chocolate seals the coconut and creates a smooth surface that snaps when sliced.
- Whole almond garnish - Placing almonds on top gives each bar the classic nutty bite and a polished look.
Ingredient Swap Ideas
Simple swaps help you adapt to dietary needs or pantry limits while keeping the classic profile. Use the following to adjust texture or make the bars dairy-free.
- Graham cracker crumbs - Use vanilla wafer or shortbread cookie crumbs for a sweeter, similarly crisp base.
- Sweetened condensed milk - Use a 14 oz can of sweetened condensed coconut milk for a dairy-free option that keeps the same binding sweetness.
- Semisweet chocolate - Swap for dark or milk chocolate bars to change sweetness and richness without altering the topping method.
- Unsalted butter - Substitute coconut oil or plant-based butter for a dairy-free crust that still presses and bakes well.
Ingredients
- 1 ½ cups graham cracker crumbs - finely crushed.
- ¼ cup granulated sugar - for the crust.
- 6 tablespoons unsalted butter - melted.
- 3 cups sweetened shredded coconut - packed.
- 1 (14 oz) can sweetened condensed milk - room temperature.
- 1 teaspoon vanilla extract - for flavor.
- ⅛ teaspoon fine salt - balances sweetness.
- 8 ounces semisweet chocolate - chips or chopped.
- 12-16 whole almonds - roasted if available.
Instructions
- Preheat the oven to 350°F and grease a 9x13-inch pan. Mix graham crumbs, sugar, and melted butter, then press firmly into the pan to form an even crust.
- Bake the crust 8-10 minutes until set and starting to brown at the edges, then remove and let cool slightly.
- Stir shredded coconut, sweetened condensed milk, vanilla, and salt in a bowl until combined, then spread the mixture evenly over the warm crust.
- Bake 20-25 minutes until the coconut is golden at the edges and set in the center; cool to room temperature in the pan about 30 minutes.
- Melt chocolate with a small spoonful of butter or coconut oil in 20-30 second microwave bursts stirring between each, or use a double boiler, then spread over the cooled coconut and press almonds into the chocolate. Chill at least 1 hour until set, then slice into bars.
Frequently Asked Questions
Many Soft, Tender Dessert Bars Everyone Will Love recipes work well for meal prep because they hold up in the refrigerator for several days. Choose options that reheat without losing texture or flavor.
Many work well made ahead. Prepare the components in advance and store them separately.
Combine just before serving to maintain the best texture and freshness.
Most cooked dishes keep well in the refrigerator for 3 to 4 days in airtight containers. Separate components that soften when stored together - such as crispy toppings or fresh herbs - for best results.
Are there quick versions that take under 30 minutes?
Yes.
Many variations in this category can be adapted to under 30 minutes by using pre-cut vegetables, rotisserie protein, or canned ingredients that skip long cooking steps.
For single-serve cravings try small-batch desserts for solo treats. For pairing desserts with Mexican food, see desserts to serve with tacos.

Andrew Gray is a passionate food writer and recipe creator who built Gusto Meadow to celebrate delicious, approachable cooking. With years of experience in restaurants and catering, he brings a grounded, real-world understanding of flavors, technique, and what truly works in a home kitchen.
At Gusto Meadow, Andrew focuses on fresh, seasonal ingredients and simple methods that anyone can follow. His goal is to make cooking feel fun, doable, and rewarding — whether you’re preparing a quick weeknight dinner or exploring something new.