Family-style dinners are the kind we reach for on busy weeknights and slow Sunday afternoons. We want meals that please kids and adults without a lot of fuss.
These recipes keep flavors familiar while adding small twists that keep everyone interested.
We include quick one-pan pastas, hearty sheet-pan suppers, cozy casseroles, and simple salads that pair well with leftovers. Each recipe offers easy swaps for picky eaters and clear timing notes so we can plan around activities.
We also add a few snacky sides that make it simple to feed a crowd.
These dishes cut down time at the stove and leave us with fewer dishes to wash. Most work well for leftovers, and many let us prep parts ahead so evenings feel calmer.
We keep instructions straightforward so the whole family can actually enjoy dinner.
1. Banana Oatmeal Cookies
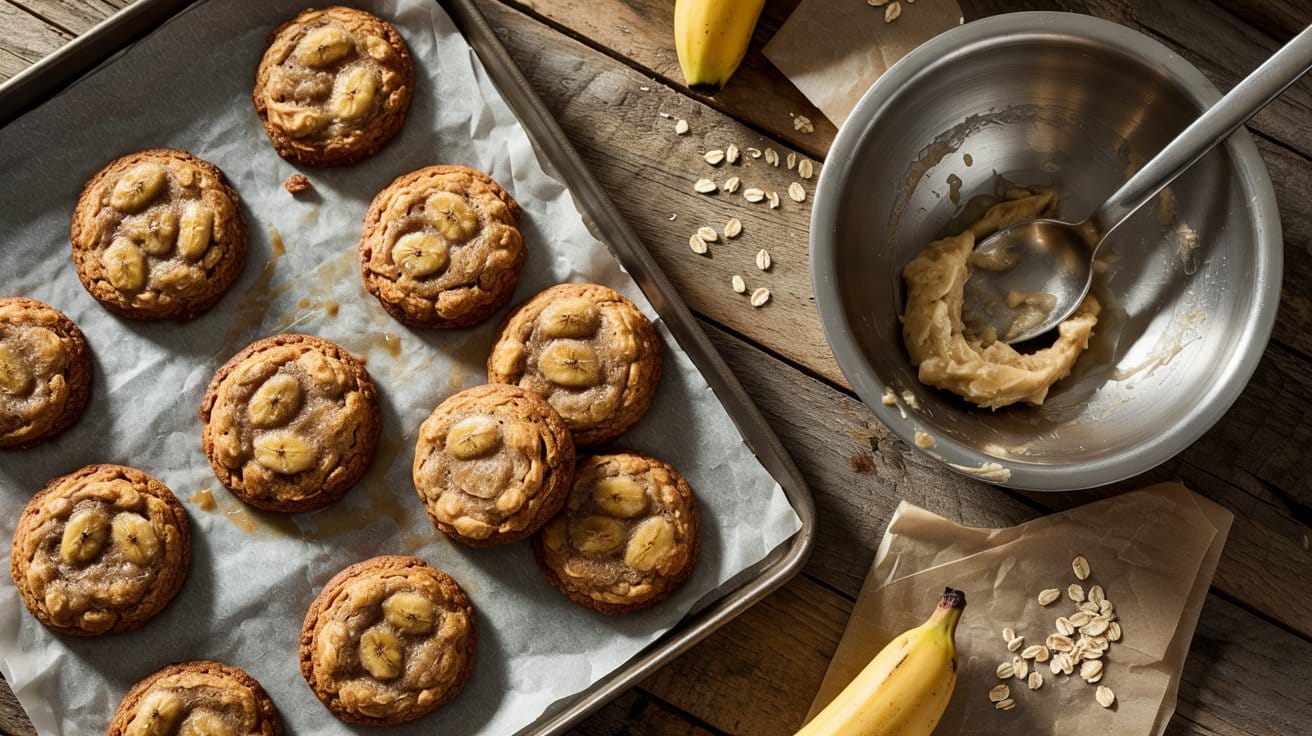
Soft, chewy cookies made with mashed ripe fruit and whole oats for natural sweetness and good texture. They come together quickly and work well for breakfast-on-the-go, lunchbox treats, or an afternoon snack with tea or coffee.
Why This Recipe Works
You get natural sweetness and moisture from the mashed bananas. The oats give structure and a filling chew.
- Banana-sweetened base - Mashed bananas provide most of the sweetness and keep the cookies moist.
- Oat structure - Rolled oats hold the cookies together without needing much flour.
- Simple binder - One egg keeps the dough cohesive while keeping the ingredient list short.
- Quick bake time - Short oven time gives a tender center and lightly set edges for an appealing texture.
Ingredient Swap Ideas
Small swaps let you adapt for diet needs or pantry limits while keeping the same method and texture.
- Rolled oats - Use quick oats for a softer, slightly cake-like cookie texture.
- Large egg - Use 3 tablespoons mashed avocado or ¼ cup unsweetened applesauce to bind for an egg-free option.
- Vanilla extract - Swap with almond extract at half the amount for a nuttier aroma.
- Dark chocolate chips - Replace with chopped nuts or raisins for chew and crunchy contrast.
Ingredients
- 2 ripe bananas - mashed.
- 1 ½ cups rolled oats - old-fashioned or quick oats.
- 1 large egg - lightly beaten.
- ½ teaspoon baking powder - for light lift.
- ½ teaspoon ground cinnamon - or to taste.
- ¼ teaspoon salt - to balance sweetness.
- ½ teaspoon vanilla extract - for aroma.
- ¼ cup dark chocolate chips - or chopped nuts/raisins.
Instructions
- Preheat the oven to 350°F and line a baking sheet with parchment paper.
- Mash the bananas in a mixing bowl until mostly smooth, then stir in the egg and vanilla until combined.
- Add oats, baking powder, cinnamon, and salt, and stir until the mixture holds together.
- Fold in the chocolate chips or chosen add-in.
- Drop tablespoon-sized portions onto the prepared sheet, flatten slightly, and bake 12-15 minutes until edges are set and tops are lightly golden.
- Cool on the sheet 5 minutes, then transfer to a rack to cool completely before storing.
2. Berry Chia Pudding
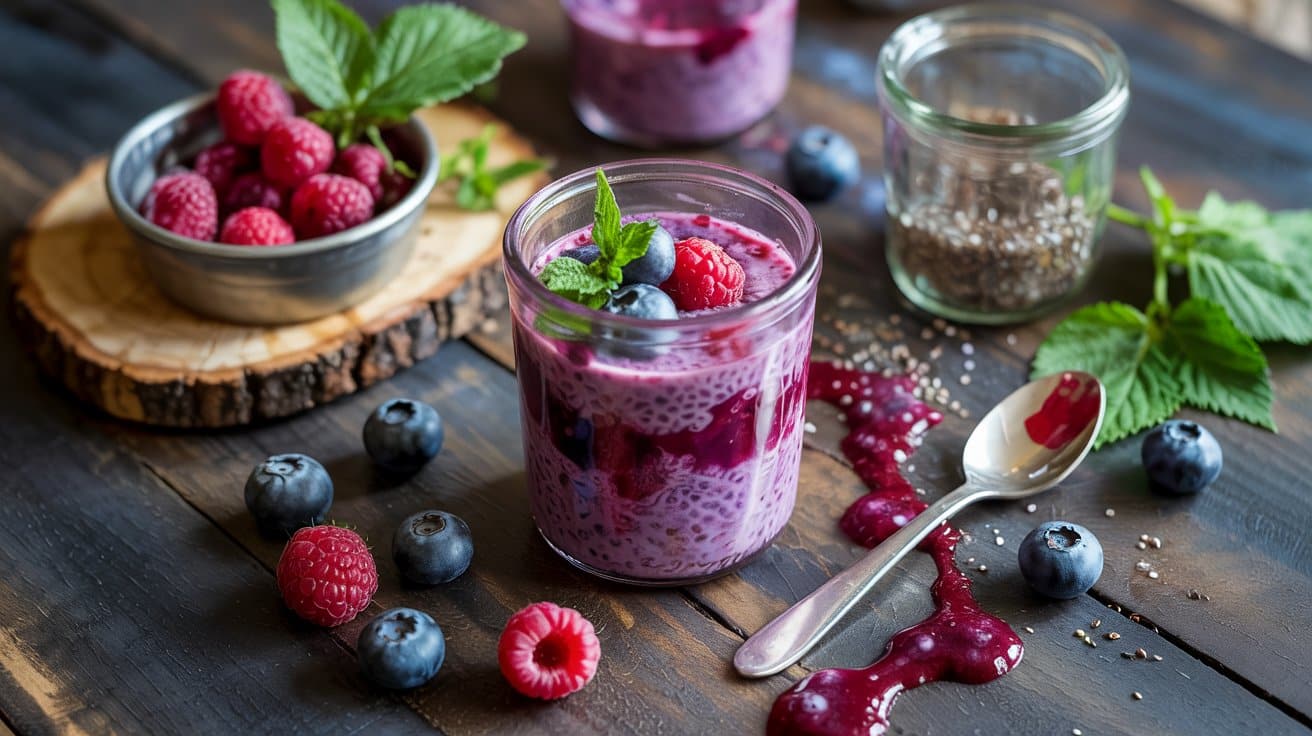
It's easy to make ahead and works well for breakfast, a snack, or a light dessert - or explore pudding-style dessert ideas for easy prep for more make-ahead options.
The berry puree gives the pudding fresh fruit flavor and a pretty color that's appealing on the table.
Why This Recipe Works
The recipe balances fruity brightness with a silky, spoonable texture. Minimal hands-on time makes it practical for busy mornings or make-ahead snacks.
- Silky berry base - Blending the berries with milk creates a smooth, bright layer that mixes evenly with the chia gel.
- Thick, spoonable set - Chia seeds absorb liquid and produce a custard-like consistency after chilling.
- Make-ahead convenience - It chills and firms in the fridge so you can prepare servings in advance.
- Customizable sweetness - You control the sugar level by adjusting the maple syrup or using fruit-only sweetness.
Ingredient Swap Ideas
Swaps let you adjust flavor, texture, or diet without changing the method. Use the suggestions below to tailor the pudding to your pantry or preferences.
- Milk - Use almond, oat, soy, or dairy milk to match your desired creaminess and flavor while keeping the same liquid ratio.
- Mixed berries - Substitute all strawberries or frozen berry medley for a similar tart-sweet result and color.
- Maple syrup - Swap with honey or a neutral agave syrup for comparable sweetness and easy mixing.
- Chia seeds - Use white or black chia seeds interchangeably; both absorb liquid and form the same gel texture.
Ingredients
- 1 cup mixed berries - fresh or frozen.
- 1 cup milk - dairy or plant-based, at room temperature.
- ¼ cup chia seeds - white or black.
- 2 tablespoons maple syrup - or honey or agave to taste.
- ½ teaspoon vanilla extract - optional for extra flavor.
Instructions
- Blend the berries, milk, maple syrup, and vanilla until smooth, about 20-30 seconds.
- Pour the berry mixture into a bowl or jar and whisk in the chia seeds until evenly distributed.
- Let sit at room temperature for 5 minutes, then whisk again to prevent clumps.
- Cover and refrigerate for at least 4 hours, or overnight, until thick and spoonable.
- Stir gently before serving and add fresh berries or nuts on top if desired.
3. No-Sugar Fruit Sorbet

You can make a bright, icy dessert using only ripe fruit and a splash of lemon. The sorbet highlights natural sweetness and is best served on warm afternoons or as a light finish after a heavy meal.
Kitchen oddities pop up even in dessert chat; read a clear egg classification explained clearly for a surprising food-group deep dive.
Why This Recipe Works
It uses whole fruit to provide sweetness without added sugar. You get a refreshing, simple dessert with minimal hands-on time.
- Pure fruit base - Ripe fruit provides natural sugars and aroma so the sorbet tastes boldly fruity.
- Bright lemon lift - A little lemon juice sharpens the fruit flavors and prevents flatness.
- Frosted texture from frozen fruit - Freezing the fruit first creates a smooth, scoopable texture without syrups.
- Short hands-on time - You only need a few minutes of blending after the fruit is frozen.
Ingredient Swap Ideas
Swaps let you match what you have on hand or adjust the flavor without changing the method. Use these to adapt the recipe for different fruits or dietary preferences.
- Ripe fruit - Use frozen fruit instead of fresh and skip the initial freeze; it blends into a creamy sorbet faster.
- Lemon juice - Swap lime juice for a slightly different citrus brightness that pairs well with berries and tropical fruit.
- Water - Use coconut water for a subtle natural sweetness and extra tropical character.
- Pinch of salt - Use ¼ teaspoon vanilla extract for aromatic balance if you prefer no salt.
Ingredients
- 4 cups ripe fruit - chopped and frozen if possible.
- 2 tablespoons lemon juice - freshly squeezed.
- 2 tablespoons water - add only if needed for blending.
- Pinch of salt - to brighten flavors.
Instructions
- Chop fruit into even pieces and freeze on a single layer until solid, at least 4 hours or overnight.
- Put frozen fruit, lemon juice, and pinch of salt into a high-speed blender or food processor.
- Pulse or blend until the fruit breaks down, scraping the sides as needed, about 1-2 minutes.
- Add 1 teaspoon water at a time if the mixture will not blend, stopping when it reaches a soft-serve consistency.
- Serve immediately for a soft sorbet or freeze 30-60 minutes to firm, then scoop and serve chilled.
4. Apple Nachos with Nut Butter

This is a quick, fresh snack that pairs crisp fruit with a creamy nut butter drizzle for an addictive contrast of textures - and for richer options, see nut-and-chocolate dessert ideas to indulge.
Why This Recipe Works
This combination highlights crisp apples and a smooth nut butter for immediate appeal. The assembly is simple, so you can finish it in minutes.
- Thin, crisp apple slices - Slicing thin keeps the bites crisp and lets the nut butter coat each piece evenly.
- Warm, pourable nut butter - Lightly warming the spread thins it for even drizzling without changing the taste.
- Crunchy nut topping - Chopped nuts add texture and a toasty note that contrasts the apple.
- Bright citrus touch - A splash of lemon prevents browning and brightens the overall taste.
Ingredient Swap Ideas
Swaps help you adapt to what's on hand or meet dietary needs while keeping the same structure. Use these to change texture or flavor without extra steps.
- Apples - Use pears for a softer bite; they hold up well with nut butter and add mild sweetness.
- Almond butter - Substitute peanut butter for a familiar, bold flavor that still spreads and drizzles.
- Pecans - Swap with chopped almonds or walnuts for similar crunch and toasted notes.
- Lemon juice - Use a light splash of orange juice for milder acidity and a fruity aroma.
Ingredients
- 3 large apples - thinly sliced.
- ½ cup almond butter - room temperature for easy drizzling.
- ⅓ cup chopped pecans - toasted if preferred.
- 1 tablespoon lemon juice - to prevent browning.
Instructions
- Core and thinly slice the apples into rounds or wedges so each piece is about ⅛ inch thick.
- Toss the slices with the lemon juice in a bowl to keep them from browning.
- Arrange the apple slices on a large platter in a single layer or slightly overlapping.
- Warm the almond butter in a small bowl for 10-20 seconds in the microwave, then stir until pourable.
- Drizzle the nut butter over the apples and sprinkle the chopped pecans on top, then serve immediately.
5. Peach Yogurt Parfaits
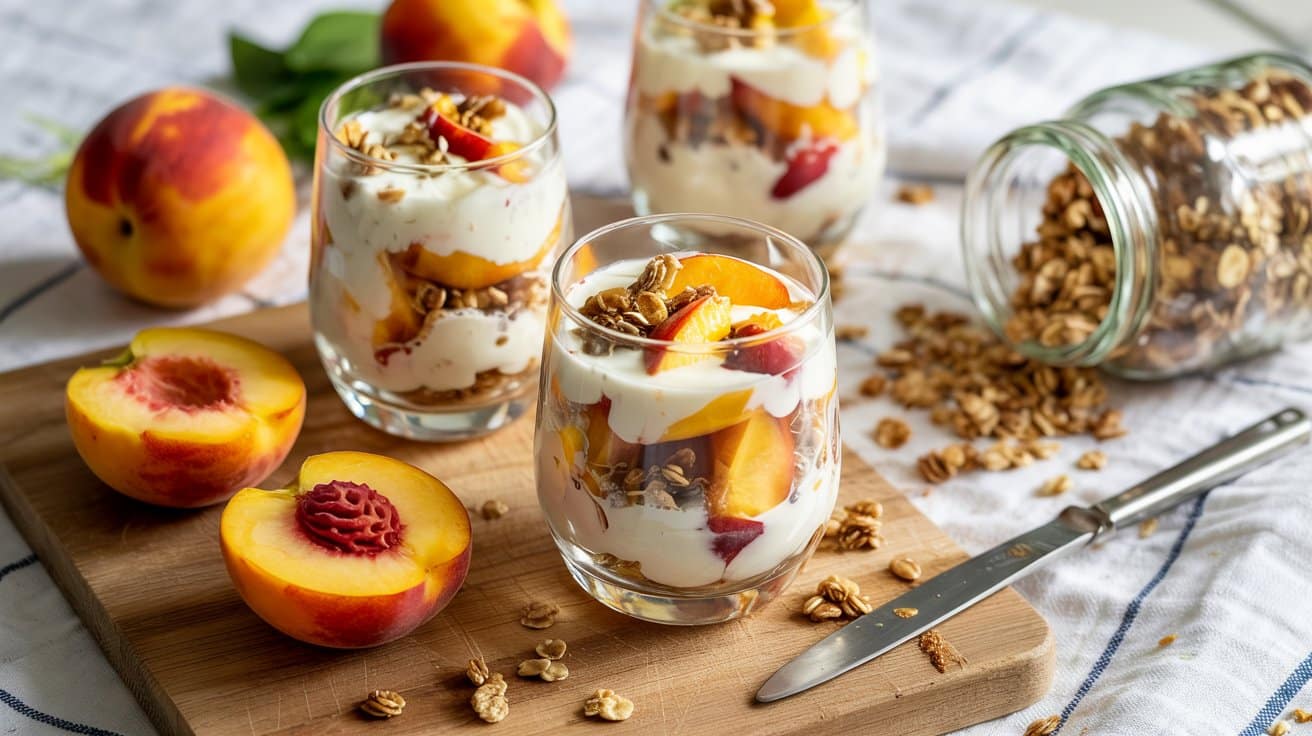
This layered mix of creamy yogurt, ripe peaches, and crunchy granola comes together quickly for a fresh, satisfying treat. You can build it for breakfast, a midday snack, or a light dessert after a warm day.
The contrast of sweet peaches and tangy yogurt makes each spoonful bright and refreshing.
Why This Recipe Works
Fresh fruit and creamy yogurt balance sweet and tangy notes. Quick assembly fits busy mornings or last-minute entertaining.
- Macerated peach slices - The fruit softens and releases syrup that blends with the yogurt for natural sweetness.
- Creamy yogurt base - Thick yogurt provides structure so layers hold and flavors remain distinct.
- Toasted granola crunch - Granola adds texture that contrasts the soft fruit and smooth yogurt.
- Make-ahead flexibility - You can prep peaches and yogurt ahead, then finish with granola before serving.
Ingredient Swap Ideas
Swaps help you adapt for diet needs or to change the flavor without altering steps.
- Plain Greek yogurt - Use coconut yogurt for a dairy-free option that keeps a similar creamy mouthfeel.
- Granola - Swap for toasted rolled oats and chopped nuts if you want lower sugar and more control over texture.
- Honey - Replace with maple syrup for a vegan-friendly sweetener with a similar consistency.
- Fresh peaches - Use thawed frozen peach slices when fresh fruit is out of season; they still macerate well.
Ingredients
- 4 ripe peaches - sliced; about 1 ½ to 2 pounds.
- 2 cups plain Greek yogurt - full-fat or 2% for creaminess.
- 2 tablespoons honey - divided; plus more to taste.
- 1 teaspoon vanilla extract - for added aroma.
- 1 ½ cups granola - toasted or your preferred variety.
- 1 tablespoon lemon juice - to brighten peaches and reduce browning.
Instructions
- Slice the peaches and toss them with lemon juice and 1 tablespoon honey. Let sit 10 minutes so juices begin to release.
- Stir the yogurt with the remaining 1 tablespoon honey and vanilla extract until smooth.
- Spoon a layer of yogurt in four serving glasses. Top with peaches and a sprinkle of granola, then repeat layers, finishing with granola.
- You can serve immediately or chill up to 2 hours; add any extra granola just before eating to keep it crunchy.
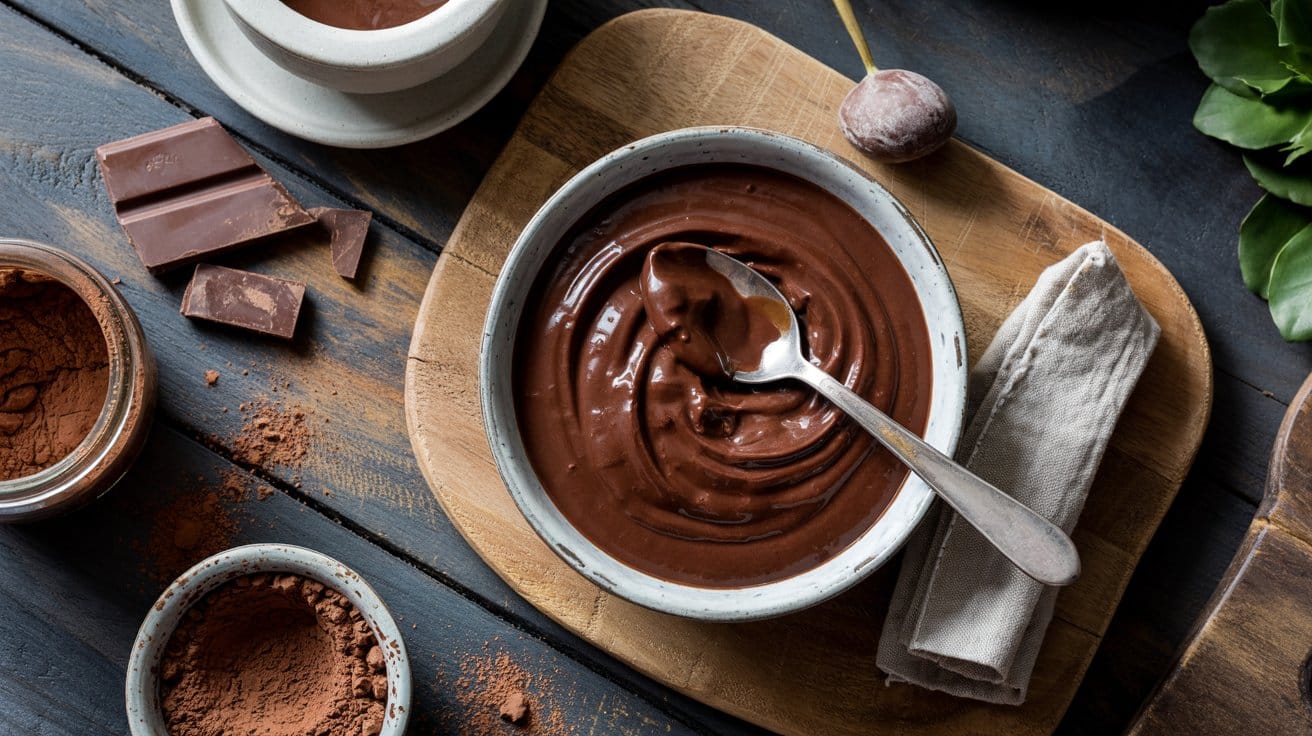
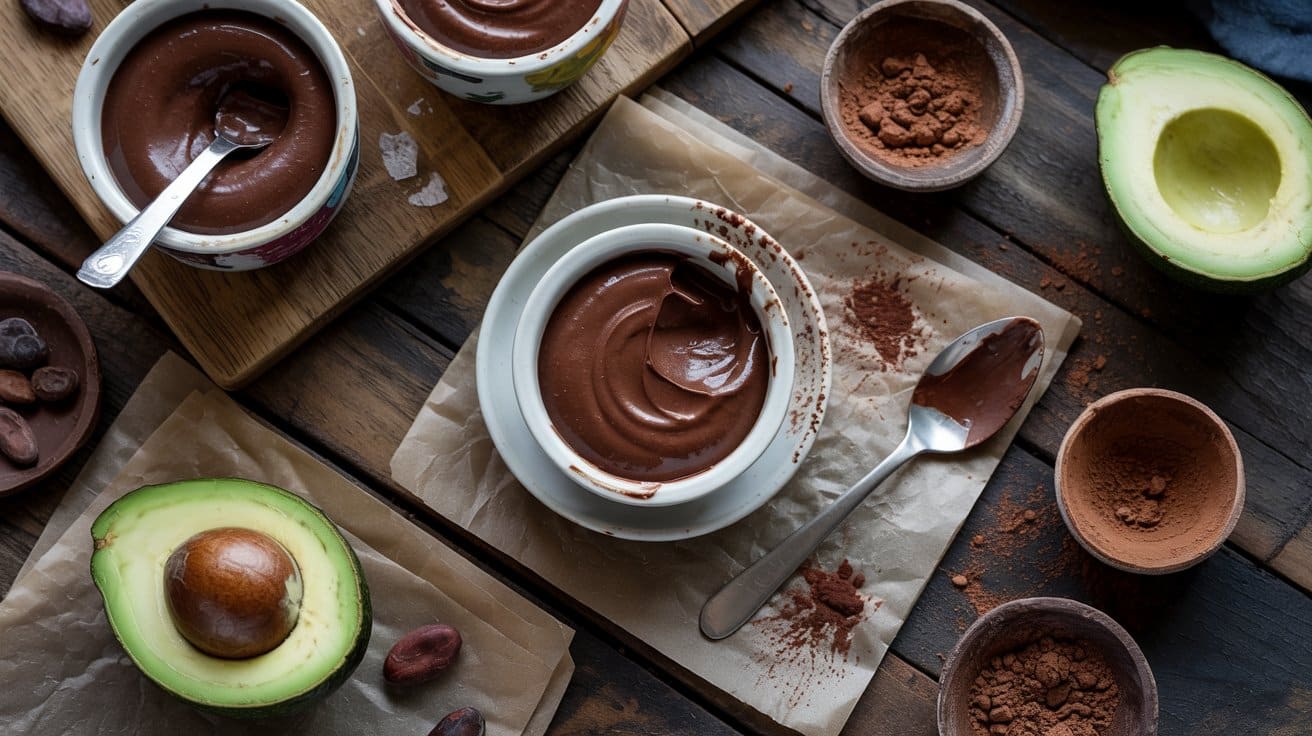
6. Chocolate Avocado Mousse
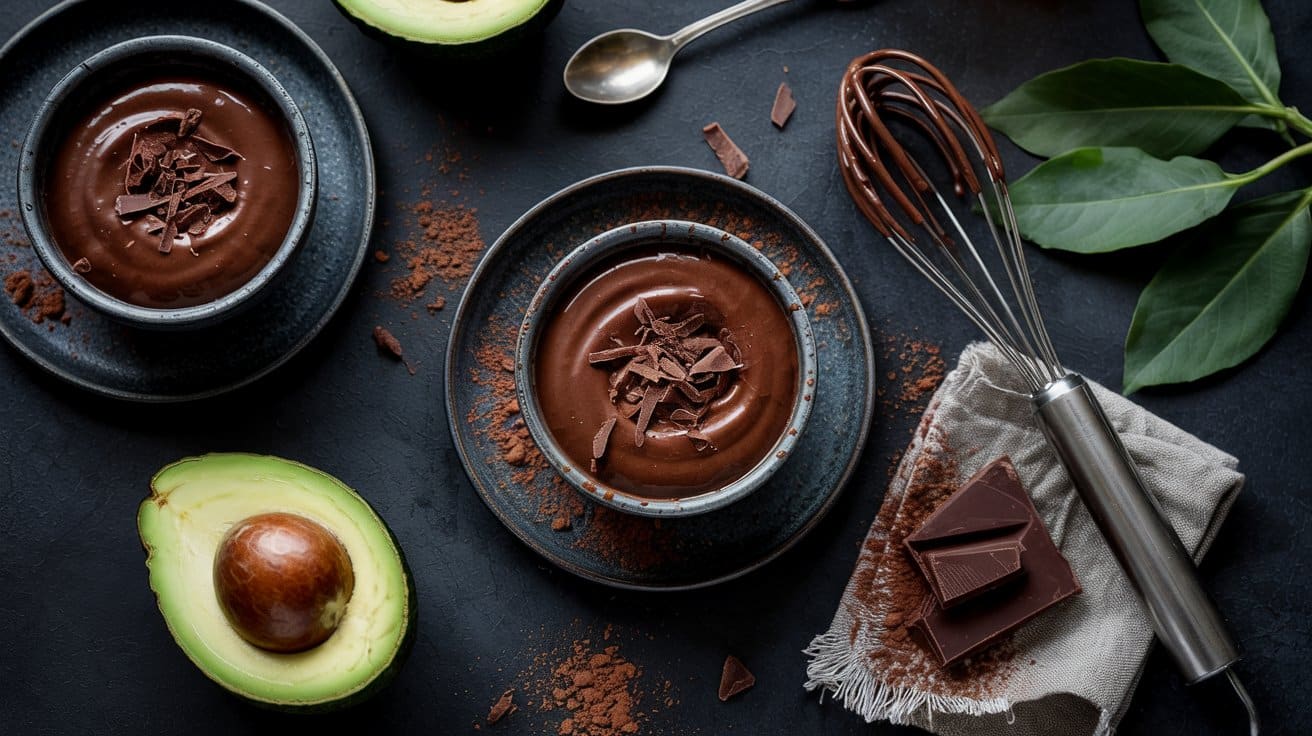
This silky mousse blends ripe avocados with cocoa for a rich, chocolatey dessert that keeps things simple. It's quick to make and works well chilled as an after-dinner treat or a healthy snack.
Why This Recipe Works
The texture is smooth and indulgent while staying naturally sweet. The ingredients are minimal and blend quickly for reliable results.
- Silky avocado base - Ripe avocados create a creamy, velvety texture that replaces heavy cream without sacrificing richness.
- Deep cocoa richness - Unsweetened cocoa provides chocolate depth without added sugar, so the chocolate character stays clean.
- Date-sweetened balance - Medjool dates add natural caramel notes and body, which keeps the mousse sweet without refined sugar.
- Fast blender method - Everything gets pureed in one appliance, so you get consistent texture and a quick finish.
Ingredient Swap Ideas
Swaps let you match diet needs or what you have on hand while keeping the same method and flavor direction.
- Medjool dates - Use 3 tablespoons pure maple syrup for faster blending and a milder, more fluid sweetness.
- Unsweetened cocoa powder - Use 2 ounces melted dark chocolate for a richer mouthfeel and deeper chocolate flavor.
- Unsweetened almond milk - Substitute canned coconut milk for a creamier, slightly tropical note.
- Ripe avocados - Swap with 12 ounces silken tofu for a lower-fat, plant-based option that still blends into a smooth mousse.
Ingredients
- 2 ripe avocados - halved, pitted, and scooped.
- 4 Medjool dates (about ¼ cup) - pitted.
- ½ cup unsweetened cocoa powder - sifted if lumpy.
- 1 teaspoon pure vanilla extract -.
- Pinch fine salt -.
- 2-4 tablespoons unsweetened almond milk - to thin, as needed.
Instructions
- Place the avocados, pitted dates, cocoa powder, vanilla, and salt in your food processor or blender.
- Blend until smooth and creamy, scraping down the sides once or twice, about 45-60 seconds.
- While blending, add 2 tablespoons almond milk, then add up to 2 more tablespoons to reach your preferred texture.
- Taste the mousse and blend in an extra date or a bit more vanilla if you want a sweeter result.
- Spoon the mousse into small bowls or glasses.
- Chill the mousse for 20-30 minutes to firm up before you serve.
7. Frozen Yogurt Bark with Berries
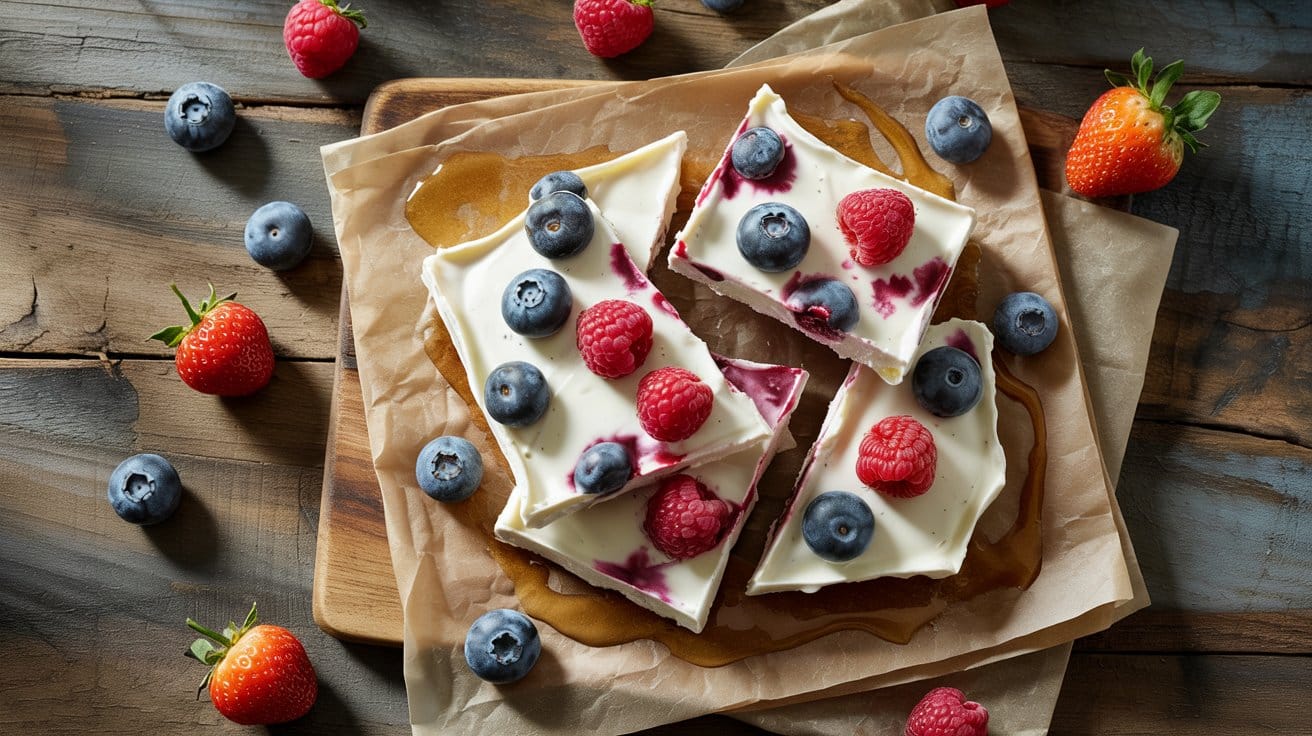
Bright, tangy yogurt freezes into crisp, snackable sheets studded with juicy berries. You can make a batch in minutes and pull pieces from the freezer for a cooling after-school snack or a light dessert after dinner.
Why This Recipe Works
This recipe turns simple ingredients into a make-ahead, portioned frozen treat. It needs minimal prep and keeps well in the freezer.
- Tangy creamy base - Greek yogurt freezes into a smooth sheet that keeps a pleasant tang and creamy mouthfeel.
- Juicy berry pockets - Berries stay bright and release small bursts of juice that contrast the yogurt texture.
- Flexible topping canvas - The plain base accepts a range of add-ins so you can adjust crunch or sweetness before freezing.
- Portable frozen portions - Bark breaks into pieces you can store individually for quick snacks or party platters.
Ingredient Swap Ideas
Swaps help you adjust sweetness, dietary needs, or texture without changing the method. Use the following to suit your pantry and preferences.
- Plain Greek yogurt - Use plain regular yogurt for a milder, less tangy result; it still freezes into firm bark.
- Honey - Swap with maple syrup for a plant-based sweetener and similar sweetness distribution.
- Vanilla extract - Use a teaspoon of lemon zest for a brighter, citrusy note that pairs well with berries.
- Mixed berries - Substitute chopped peaches or nectarines for a sweeter, softer fruit texture that freezes well.
Ingredients
- 2 cups plain Greek yogurt - full-fat or low-fat.
- 2 tablespoons honey - or maple syrup for sweetness.
- 1 teaspoon vanilla extract - for flavor.
- 2 cups mixed berries - fresh or thawed frozen; halve large berries.
Instructions
- Stir the yogurt, honey, and vanilla together in a bowl until smooth and evenly sweetened.
- Line a baking sheet with parchment and spread the yogurt mixture into an even ¼-inch layer.
- Scatter the mixed berries over the yogurt, pressing them lightly so they make good contact.
- Freeze until solid, about 2 hours, or longer if your freezer is very cold.
- Break the frozen sheet into pieces and store in an airtight container in the freezer for up to 2 weeks.
8. Fruit Salad with Honey Lime Dressing
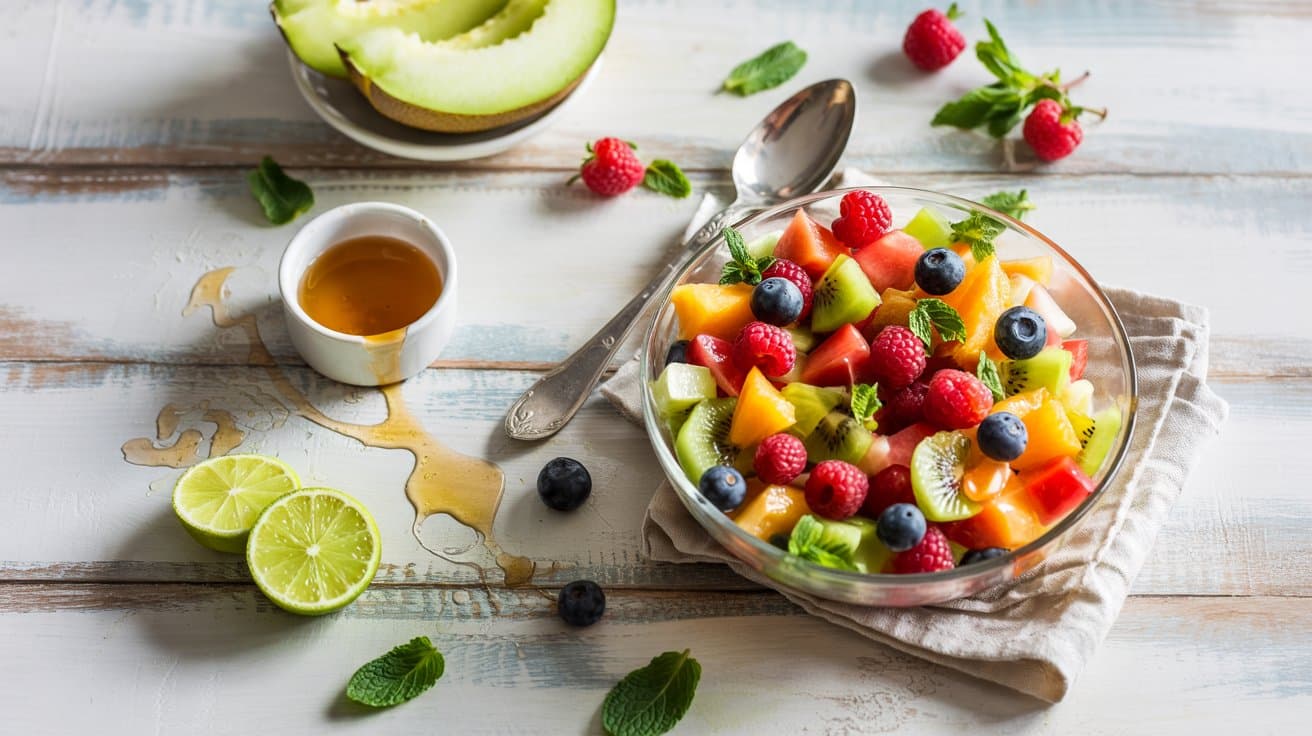
You can make it in about 15 minutes and serve it for brunch, potlucks, or a light dessert - or pair it with savory sides from potato-salad variations beyond mayo when needed.
The dressing adds a glossy, tangy note that lifts natural sweetness.
Why This Recipe Works
The dressing highlights each fruit without soaking it, so colors and textures stay bright. The recipe comes together quickly with no cooking required.
- Honey-lime glaze - A simple mix of honey and lime brightens fruit and prevents early browning.
- Tropical-and-berry contrast - Combining tropical fruit with berries gives varied textures and natural sweetness.
- No-cook, quick assembly - You can chop and toss everything in about 15 minutes for fast serving.
- Chill-and-serve friendly - Brief refrigeration lets flavors marry and makes the salad easy to prepare ahead of time.
Ingredient Swap Ideas
Swaps help you use what's available or meet dietary needs while keeping the same bright profile. Each suggestion preserves the dressing method and overall balance.
- Mango - Swap with ripe peach slices for a similar soft texture and sweet aroma.
- Pineapple - Swap with canned pineapple chunks in juice, drained, for less prep and steady sweetness.
- Honey - Swap with pure maple syrup for a vegan-friendly option that still blends smoothly with lime.
- Lime juice - Swap with lemon juice for comparable acidity if limes aren't on hand.
Ingredients
- 2 cups strawberries - hulled and halved.
- 1 cup blueberries - rinsed and drained.
- 1 mango - peeled and diced.
- 1 cup pineapple - diced.
- 1 cup green grapes - halved.
- 2 kiwis - peeled and sliced.
- 2 tablespoons honey - for the dressing.
- 2 tablespoons lime juice - freshly squeezed.
- 2 tablespoons fresh mint - chopped.
- Pinch of salt - to taste.
Instructions
- Place all prepared fruit in a large bowl and toss gently to combine.
- Whisk honey, lime juice, and a pinch of salt in a small bowl until smooth.
- Pour the dressing over the fruit and toss lightly to coat, about 10-15 seconds.
- Refrigerate 20-30 minutes to chill and let flavors marry.
- Sprinkle with chopped mint and serve chilled within 1-2 hours for best texture.
9. Coconut Macaroons Using Dates
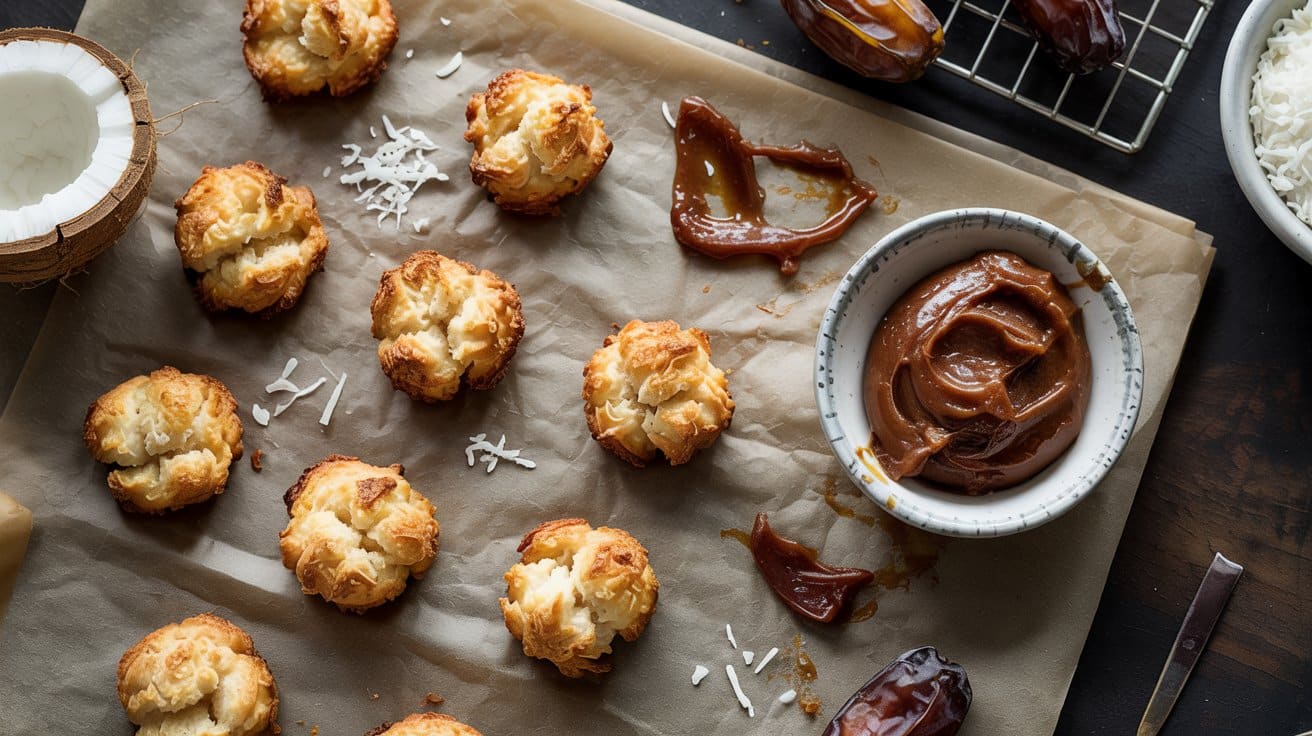
They bake quickly and are great for a casual dessert, snack box, or bring-to-work treat - see where to find coconut butter locally if a recipe calls for it.
Why This Recipe Works
These macaroons are naturally sweet and hold together well without added sugar. The texture stays chewy on the inside with lightly golden edges.
- Naturally caramel sweetness - Medjool dates create rich, deep sweetness that goes with the coconut rather than masking it.
- Stable egg-white binder - Whipped egg whites give the macaroons structure so they set without becoming dry.
- Chewy center, crisp edges - Moderate oven temperature cooks the outside first so the interior remains tender.
- No refined sugar required - Dates provide sweetness and moisture, reducing the need for extra syrups or condensed milk.
Ingredient Swap Ideas
Simple swaps let you adjust texture, diet, or pantry limits without changing the method.
- Medjool dates - Use ½ cup date paste or ¾ cup chopped soft dates soaked in warm water for 10 minutes if Medjools are unavailable; the paste blends more smoothly.
- Egg whites - Replace with ½ cup aquafaba (chickpea liquid) whipped to soft peaks for a vegan version; it mimics egg-white structure.
- Unsweetened shredded coconut - Swap for sweetened shredded coconut for a sweeter result, and reduce date amount slightly to avoid over-sweetness.
- Vanilla extract - Use ½ teaspoon almond extract for a nuttier aroma that goes with the coconut and dates.
Ingredients
- 3 cups unsweetened shredded coconut - packed.
- ¾ cup pitted Medjool dates - chopped and soaked.
- 2 tablespoons warm water - for processing dates.
- 2 large egg whites - room temperature.
- 1 teaspoon vanilla extract -.
- ¼ teaspoon fine salt -.
Instructions
- Preheat your oven to 325°F and line a baking sheet with parchment paper.
- Process the soaked dates with the warm water in a food processor until a smooth paste forms, about 1 minute.
- Whisk the egg whites with the salt until foamy and slightly glossy, about 1 to 2 minutes by hand or 30-60 seconds with a mixer.
- Stir the vanilla into the date paste, then gently fold the date mixture into the egg whites until combined.
- Fold in the shredded coconut until evenly coated, then drop rounded tablespoons onto the prepared sheet about 1 inch apart.
- Bake 18-22 minutes until edges are golden and tops feel set, then cool on the sheet 10 minutes before transferring to a rack to cool completely.
10. Lemon Blueberry Energy Bites
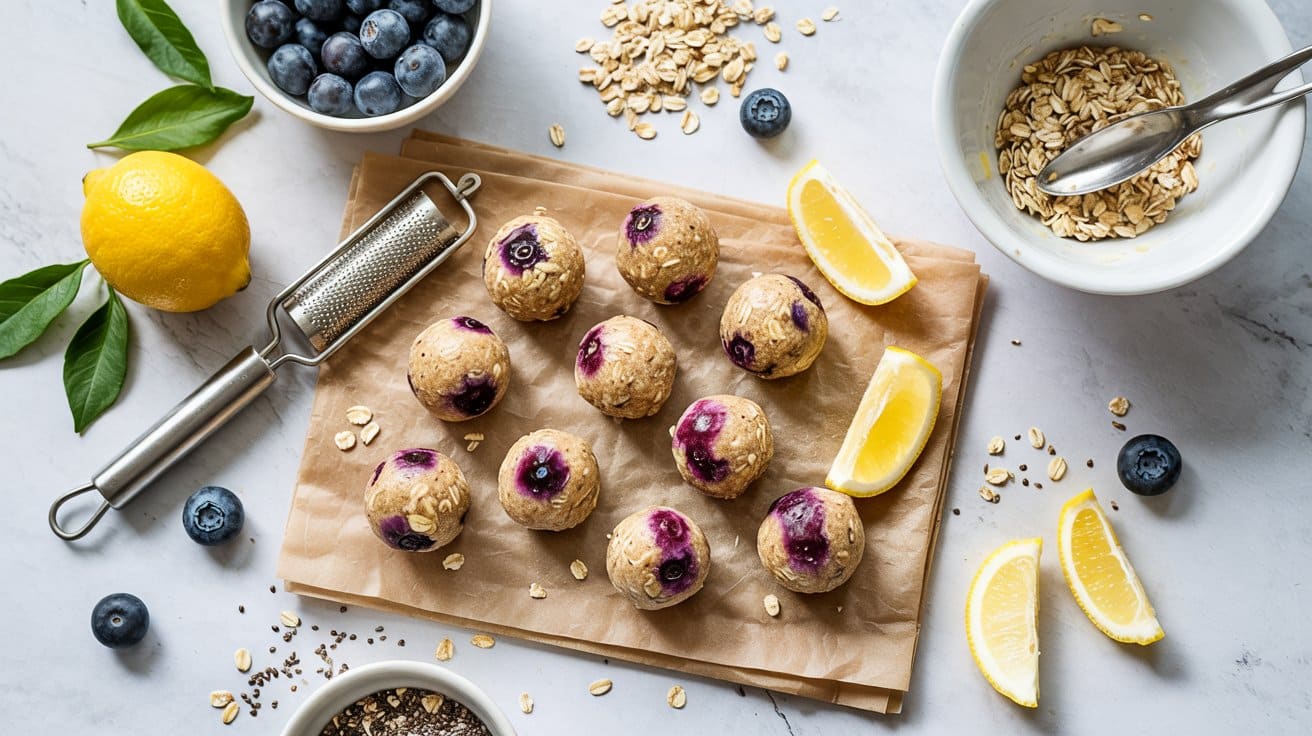
These no-bake bites combine bright lemon with sweet dried blueberries for a refreshing snack you can grab any time - learn about the benefits of boiling lemon peels when using whole-citrus techniques.
Why This Recipe Works
The citrus keeps the bites tasting light while the nut butter binds everything together. The mix of oats and chia gives chew and structure so the bites hold their shape.
- Zesty lemon brightness - Fresh lemon zest and a bit of juice cut sweetness and keep each bite tasting lively.
- Chewy blueberry pockets - Dried blueberries add concentrated berry flavor without extra moisture that would change texture.
- No-bake, firm texture - Nut butter and honey create a sticky matrix that firms up after chilling for easy rolling.
- Portable, shelf-stable snack - These hold up in the fridge or an insulated snack bag for several days.
Ingredient Swap Ideas
Small swaps let you match dietary needs or pantry stock while keeping the same method and texture. Use these alternatives without changing the mixing and chilling steps.
- Almond butter - Swap with peanut butter for a more assertive nut flavor; it still binds well.
- Honey - Use maple syrup to make the recipe vegan; expect a slightly looser mix that firms with extra chilling.
- Dried blueberries - Replace with freeze-dried blueberries for a crunchier texture and stronger berry note.
- Chia seeds - Swap with ground flaxseed for similar binding and a nutty undertone.
Ingredients
- 1 ½ cups rolled oats - old-fashioned.
- ½ cup natural almond butter - smooth.
- ⅓ cup honey - or maple syrup for a vegan option.
- ⅓ cup dried blueberries - chopped if large.
- 2 tablespoons chia seeds - for texture and binding.
- 2 teaspoons lemon zest - finely grated.
- 1 tablespoon fresh lemon juice - strained if desired.
- ¼ teaspoon fine sea salt - balances sweetness.
- ½ teaspoon vanilla extract - optional.
Instructions
- Combine oats, chia seeds, dried blueberries, lemon zest, and salt in a large bowl and stir to distribute evenly.
- Add almond butter, honey, lemon juice, and vanilla; mix until a sticky, uniform dough forms, about 1 to 2 minutes.
- Chill the mixture in the refrigerator for 15 to 20 minutes to firm slightly and make rolling easier.
- Scoop about 1 tablespoon of mixture and roll into 1-inch balls with your hands, placing them on a lined tray.
- Refrigerate the finished bites for at least 30 minutes to set before serving.
11. Raspberry Banana Smoothie Bowl
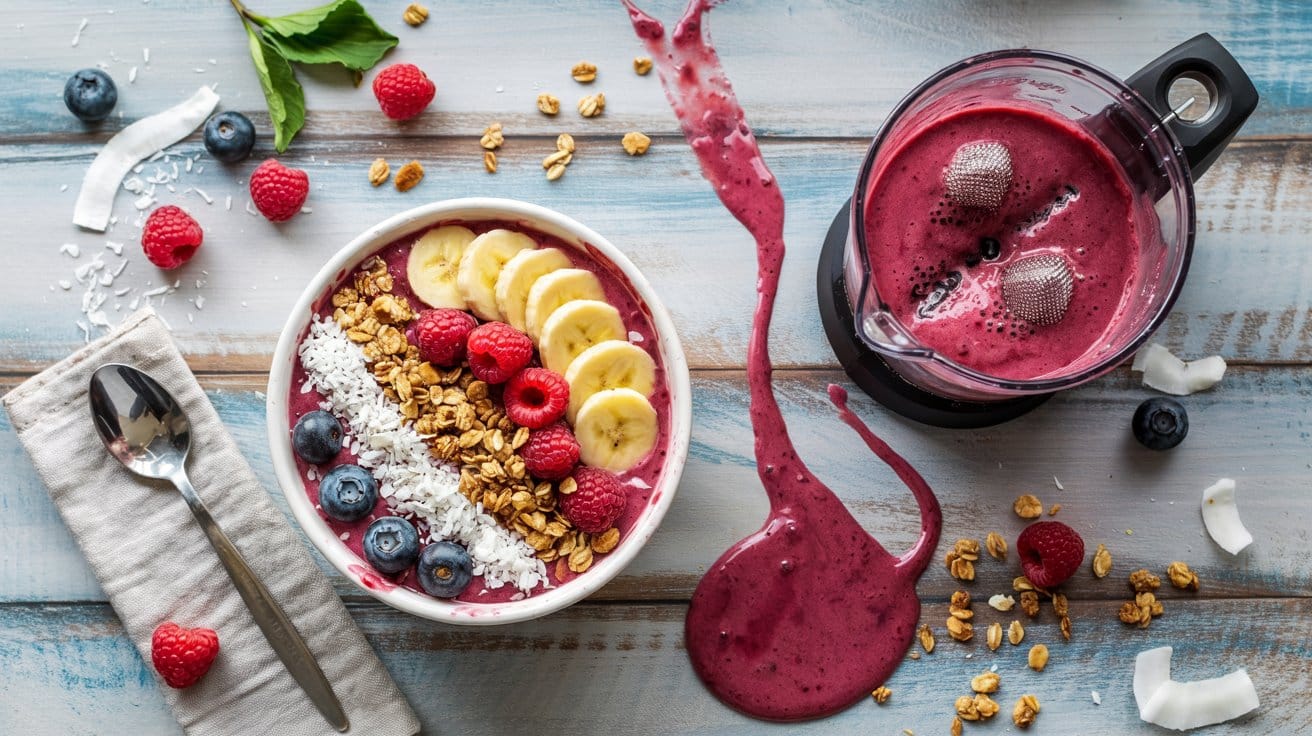
Bright raspberries and creamy banana blend into a thick, spoonable bowl that's great for a quick breakfast or a light dessert - swap ingredients for keto smoothie bowl options without heavy sugar when cutting carbs.
We can make it in minutes and adjust toppings to suit the morning or a post-workout snack.
Why This Recipe Works
This bowl balances tart berry notes with creamy banana for a refreshing, satisfying start. The frozen fruit and yogurt create a thick texture that holds toppings without running.
- Spoonable thick texture - Frozen banana and frozen raspberries produce a dense base so toppings stay on top.
- Tart-and-sweet balance - Raspberries add brightness while banana brings natural sweetness for a pleasant contrast.
- Flexible protein base - Greek yogurt or a plant-based alternative keeps the bowl filling and creamy.
- Toppings stay crisp - Granola and seeds add crunch that contrasts the smooth base for a complete bite.
Ingredient Swap Ideas
Swaps help you match dietary needs or use what's already in your freezer. Each option preserves the thick, spoonable texture and bright flavor.
- Frozen raspberries - Use frozen strawberries for a milder berry note that still blends thickly.
- Frozen banana - Substitute with ½ cup frozen mango for a tropical sweetness that keeps the base creamy.
- Plain Greek yogurt - Use plain plant-based yogurt to make the bowl dairy-free while maintaining creaminess.
- Honey or maple syrup - Omit or use a very ripe banana for extra sweetness without added sweetener.
Ingredients
- 1 cup frozen raspberries - for the base.
- 1 frozen medium banana - peeled.
- ½ cup plain Greek yogurt - or plant-based yogurt.
- ⅓ cup milk - dairy or plant-based; adjust for thickness.
- 1 tablespoon honey or maple syrup - optional for added sweetness.
- ¼ cup granola - for topping.
- 1 tablespoon chia seeds - for texture and nutrition.
- ¼ cup fresh raspberries - for topping; optional.
- ½ small banana - sliced for topping.
Instructions
- Add frozen raspberries, frozen banana, Greek yogurt, and milk to a blender.
- Blend on high until smooth and thick, about 30-60 seconds, stopping to scrape the sides once if needed.
- Taste and add honey or maple syrup if you want more sweetness, then blend briefly to combine.
- Spoon the smoothie into a bowl to a thick consistency that holds toppings.
- Top with granola, chia seeds, fresh raspberries, and banana slices, then serve immediately.
12. Grilled Pineapple with Cinnamon
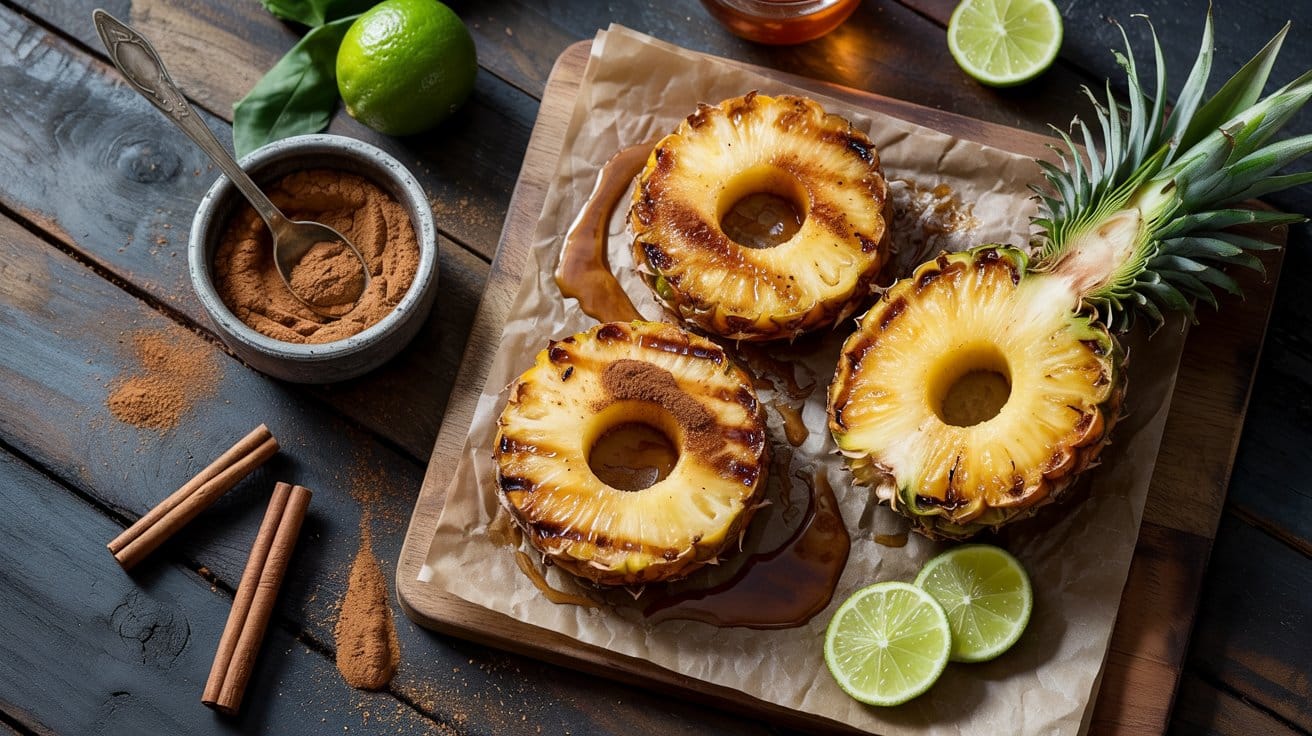
Grilled pineapple gets a warm cinnamon-sugar glaze that shows the fruit's natural sweetness and adds toasty caramel notes. You can finish it with a squeeze of lime or a scoop of vanilla ice cream for a simple, crowd-pleasing dessert after a casual meal.
Why This Recipe Works
Grilling concentrates the pineapple's sugars and adds smoky char for depth. The cinnamon-brown sugar glaze caramelizes quickly for a sticky, warm finish.
- Caramelized natural sugars - Heat draws out and browns the pineapple's sugars for rich, sweet flavor that tastes more complex than raw fruit.
- Warm cinnamon glaze - The cinnamon and brown sugar melt into a glossy coating that clings to the pineapple while grilling.
- Quick high-heat cook - Slices caramelize in minutes, so you get a dessert with minimal active time.
- Flexible serving style - Serve alone, with a scoop of ice cream, or alongside grilled meats for a bright contrast.
Ingredient Swap Ideas
Swaps let you adjust sweetness, dairy needs, or pantry limits without changing the grilling method.
- Brown sugar - Use coconut sugar for a similar caramel note and lower moisture content.
- Melted butter - Use neutral oil like avocado or light olive oil if you need a dairy-free option.
- Ground cinnamon - Use a pinch of ground cardamom or pumpkin pie spice for a different warm-spice profile.
- Vanilla ice cream - Substitute plain Greek yogurt or coconut yogurt for a tangy or dairy-free finish.
Ingredients
- 1 ripe pineapple - peeled, cored, and cut into ½-inch rings or wedges.
- 2 tablespoons brown sugar - packed.
- 1 teaspoon ground cinnamon - for seasoning.
- 1 tablespoon melted butter - or neutral oil.
- 1 tablespoon lime juice - freshly squeezed.
- 2 scoops vanilla ice cream - for serving.
Instructions
- Preheat your grill to medium-high (about 400-450°F) and oil the grates lightly so fruit won't stick.
- Whisk brown sugar, cinnamon, melted butter, and lime juice in a small bowl until combined.
- Brush both sides of the pineapple slices with the glaze.
- Grill pineapple 2-3 minutes per side, until charred in spots and glaze is caramelized; brush once more while grilling if needed.
- Remove from the grill and serve warm with vanilla ice cream or yogurt.
13. Strawberry Shortcake with Coconut Cream
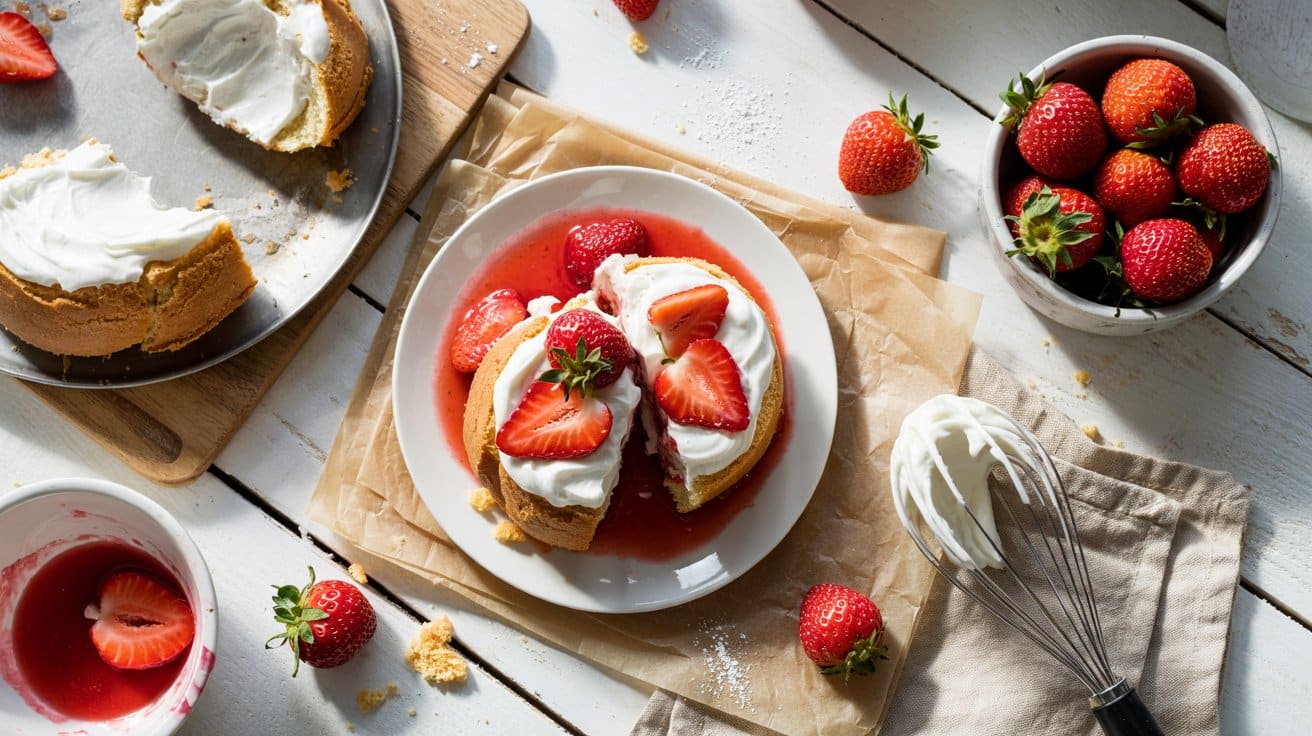
Bright strawberries sit on warm, tender biscuits topped with a silky coconut whipped cream made from chilled full‑fat coconut milk - for more alternatives, review cream-free creamy dessert ideas.
Why This Recipe Works
This version uses chilled coconut cream for a dairy-free whipped topping that holds shape. The biscuit-style shortcakes soak up strawberry juices while staying tender.
- Dairy-free whipped cream - Chilled coconut cream whips into a stable, silky topping that goes with the berries.
- Tender butter shortcakes - Cold butter cut into the dough creates flaky layers and a soft crumb.
- Quick maceration - A short rest with sugar and lemon draws out berry juices for a juicy filling.
- Make-ahead components - Chilling coconut milk and macerating fruit in advance speeds final assembly.
Ingredient Swap Ideas
Swaps help you adapt for diet needs or pantry limits while keeping the same method and flavor.
- Full-fat coconut milk - Swap with canned coconut cream or a thicker coconut milk for firmer whipped cream that holds peaks.
- Buttermilk - Replace with ¾ cup milk plus 1 tablespoon lemon juice, rested 5 minutes, to mimic acidity and tenderize the dough.
- All-purpose flour - Use a 1:1 gluten-free flour blend for a gluten-free version; texture will be slightly denser.
- Granulated sugar (for macerating) - Use maple syrup or honey to sweeten strawberries and draw juices; the flavor will be warmer.
Ingredients
- 1 pound strawberries - hulled and sliced.
- 2 tablespoons granulated sugar - for macerating.
- 1 teaspoon fresh lemon juice -.
- 2 cups all-purpose flour -.
- ¼ cup granulated sugar -.
- 1 tablespoon baking powder -.
- ½ teaspoon salt -.
- 6 tablespoons cold unsalted butter - cut into small pieces.
- ¾ cup buttermilk - plus extra for brushing.
- 1 can (13.5 oz) full-fat coconut milk - chilled overnight; use the firm cream layer.
- 2 tablespoons powdered sugar -.
- ½ teaspoon vanilla extract -.
Instructions
- Toss the strawberries with 2 tablespoons sugar and lemon juice, then set aside to macerate 15-20 minutes.
- Preheat the oven to 425°F and line a baking sheet with parchment paper.
- Whisk flour, ¼ cup sugar, baking powder, and salt in a bowl, then cut in the cold butter until the mixture resembles coarse crumbs.
- Stir in the buttermilk until just combined, pat the dough to 1‑inch thickness, cut into six rounds, place on the sheet, and bake 12-15 minutes until golden.
- Scoop the firm cream from the chilled coconut can into a bowl and whisk with powdered sugar and vanilla until soft peaks form, about 2-3 minutes with a mixer.
- Split warm shortcakes, spoon macerated strawberries and their juices over the bottoms, add a generous dollop of coconut whipped cream, and serve immediately.
14. Mango Coconut Chia Pudding
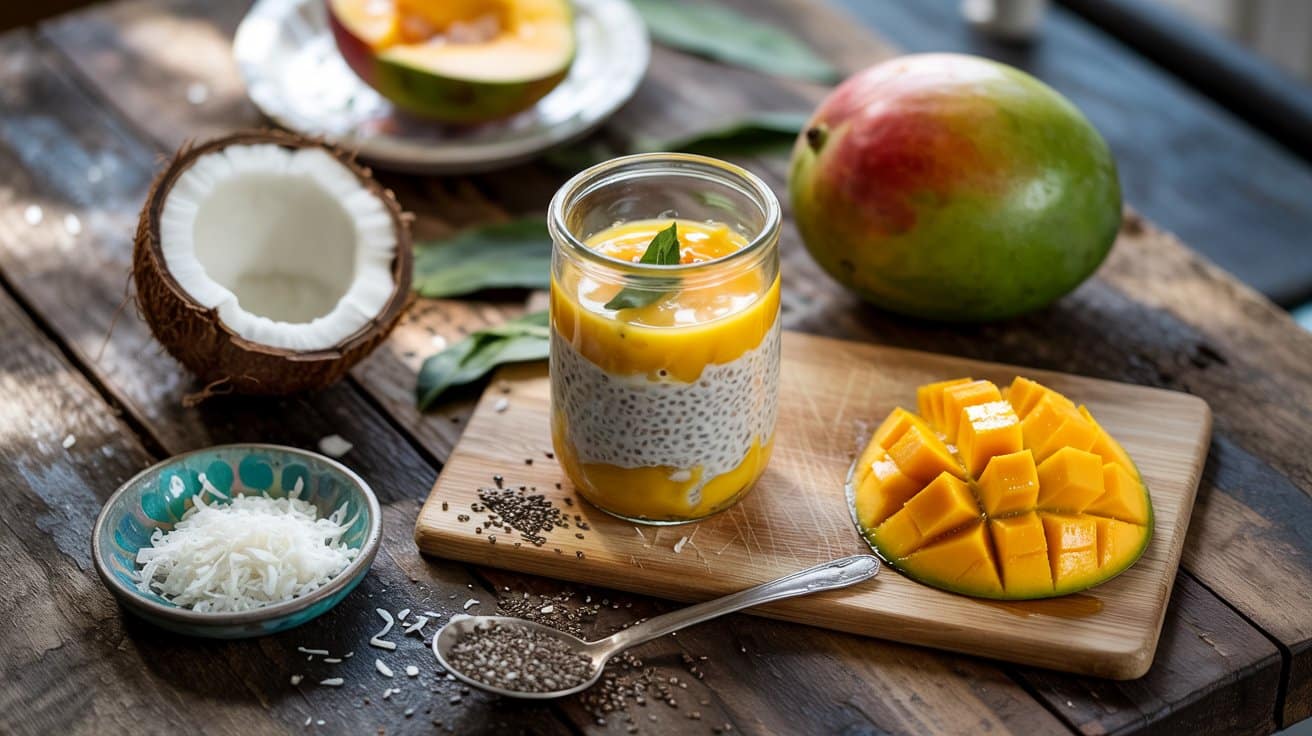
This layered chia pudding pairs ripe mango with creamy coconut milk for a bright, tropical breakfast or light dessert. It's simple to make ahead and keeps well for quick mornings or a chilled finish to a warm-day meal.
Why This Recipe Works
The texture balances creamy coconut and gelled chia for a satisfying mouthfeel. The fresh mango adds natural sweetness and brightness.
- Silky coconut base - Full-fat coconut milk gives a rich, smooth mouthfeel that supports the chia seeds as they thicken.
- Fresh mango brightness - Ripe mango puree adds natural sugar and bright flavor without masking the coconut.
- Make-ahead chilling - The pudding sets in the fridge so you can prepare it hours or a day ahead for stress-free serving.
- Layered presentation - Alternating pudding and mango puree creates an attractive, spoonable dessert that tastes as good as it looks.
Ingredient Swap Ideas
Swaps help you adapt to what you have and to dietary needs without changing the steps or texture too much. Use these to keep the same creamy, fruity result.
- Coconut milk - Use light coconut milk or canned almond milk plus ½ teaspoon coconut extract for lower fat while keeping the coconut flavor.
- Mango - Use frozen mango chunks thawed and blended for year-round fruit that gives the same sweetness and texture.
- Maple syrup - Use honey or agave nectar in equal amounts for comparable sweetness and mouthfeel.
- Chia seeds - Use white or black chia interchangeably; grind half the seeds if you prefer a slightly creamier texture.
Ingredients
- 1 14-oz can full-fat coconut milk - shaken for smoothness.
- 1 cup ripe mango puree - blended from about 1 large mango or thawed frozen mango.
- 3 tablespoons chia seeds - white or black.
- 2 tablespoons maple syrup - or adjust to taste.
- ½ teaspoon vanilla extract - for depth of flavor.
- Pinch salt - to balance sweetness.
- Juice of ½ lime - about 1 tablespoon for brightness.
Instructions
- Blend mango until smooth and measure 1 cup of puree; reserve about 2 tablespoons if you want a brighter topping.
- Whisk coconut milk, maple syrup, vanilla, lime juice, and a pinch of salt in a bowl until combined.
- Stir in chia seeds and whisk 30-60 seconds to break up clumps.
- Let sit 5 minutes, whisk again, then cover and refrigerate at least 2 hours or overnight until thickened.
- Stir pudding to loosen, then layer pudding and mango puree in serving glasses and top with the reserved puree.
- Serve chilled and stir before eating; keep airtight in the refrigerator up to 4 days.
15. Fruit and Nut Energy Bars
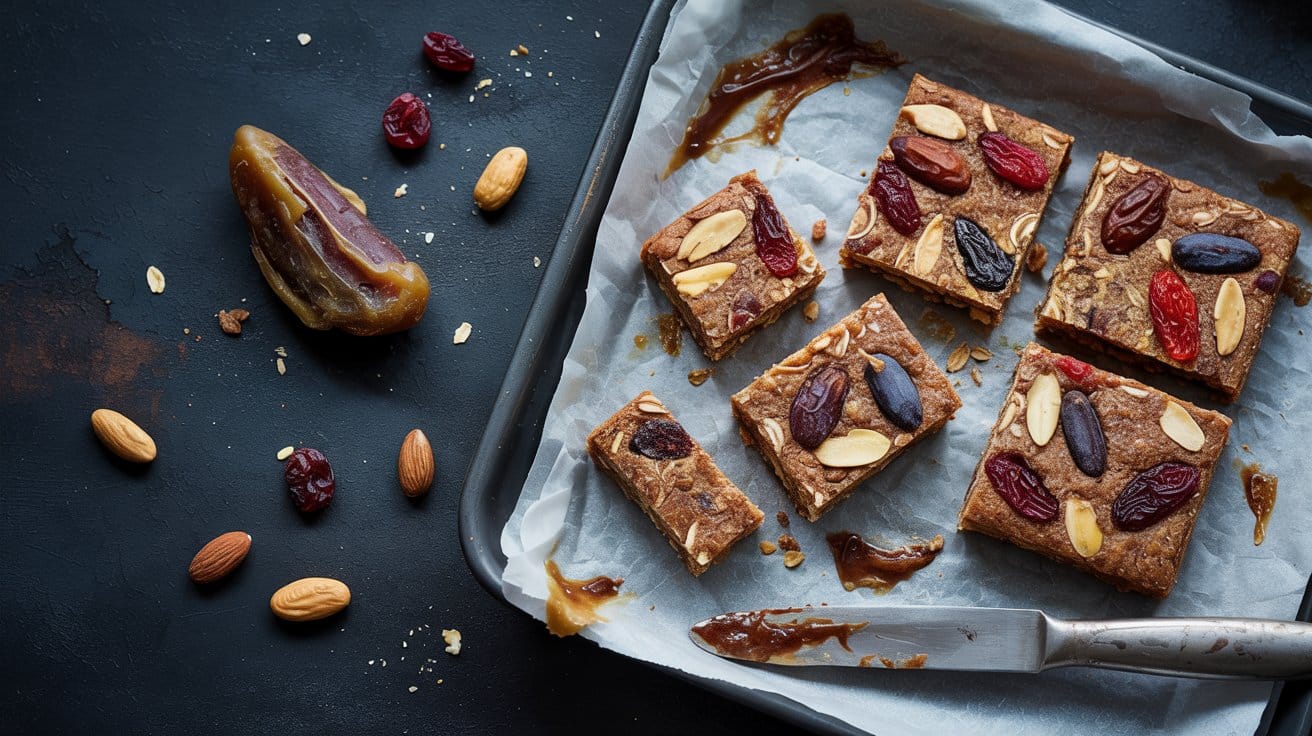
These bars combine chewy dried fruit, crunchy nuts, and oats for a satisfying snack you can grab on busy mornings or pack for hikes. The flavor is sweet with a warm hint of cinnamon, and they hold together best after chilling so you can slice clean bars.
They store well in the fridge and travel nicely for lunchboxes or post-workout fuel.
Why This Recipe Works
These bars use a sticky fruit paste and warm nut syrup to bind dry ingredients into a compact, sliceable bar. The mix of textures keeps each bite interesting and filling.
- Date-and-apricot binder - Blended dried fruit creates a naturally sweet, sticky base that holds the bars together without refined sugar.
- Toasted nut crunch - Chopped mixed nuts give a contrasting crunch that prevents the bars from feeling mushy.
- Oat structure - Rolled oats absorb moisture and provide chewiness so the bars slice cleanly after chilling.
- Fridge-set firmness - Chilling firms the mixture so you can cut neat bars and they keep shape during transport.
Ingredient Swap Ideas
Swaps help adapt these bars for allergies, dietary preferences, or pantry limits while keeping the method the same.
- Dates - Use dried figs or prunes for a similar sticky texture and comparable sweetness.
- Almond butter - Swap peanut butter for a more familiar nut flavor and the same binding quality.
- Honey - Replace with maple syrup to make the bars vegan-friendly while keeping moisture and sweetness.
- Mixed nuts - Use a seed mix (sunflower and pumpkin seeds) for a nut-free version that still adds crunch.
Ingredients
- 2 cups rolled oats - old-fashioned oats for texture.
- 1 cup mixed nuts - chopped (almonds, walnuts, cashews).
- 1 ½ cups pitted Medjool dates - packed.
- ½ cup dried apricots - chopped.
- ⅓ cup honey - or maple syrup for vegan option.
- ½ cup almond butter - natural, smooth or slightly chunky.
- 2 tablespoons coconut oil - melted.
- 1 teaspoon vanilla extract - for flavor.
- ½ teaspoon ground cinnamon - optional but recommended.
- ¼ teaspoon fine sea salt - balances sweetness.
Instructions
- Line an 8x8-inch pan with parchment and lightly grease the paper so bars release easily.
- Pulse dates and apricots in a food processor until a sticky paste forms, about 45-60 seconds; add 1 teaspoon warm water if mixture seems dry.
- Warm almond butter, honey, and coconut oil in a small saucepan over low heat until smooth, about 1-2 minutes, then stir in vanilla and salt.
- In a large bowl combine oats and chopped nuts, then add the fruit paste and warm syrup; mix until evenly combined and sticky.
- Press the mixture firmly into the prepared pan using a spatula or the bottom of a measuring cup, chill in the refrigerator for at least 1 hour until firm, then lift out and cut into 12 bars.
16. Cantaloupe Sorbet
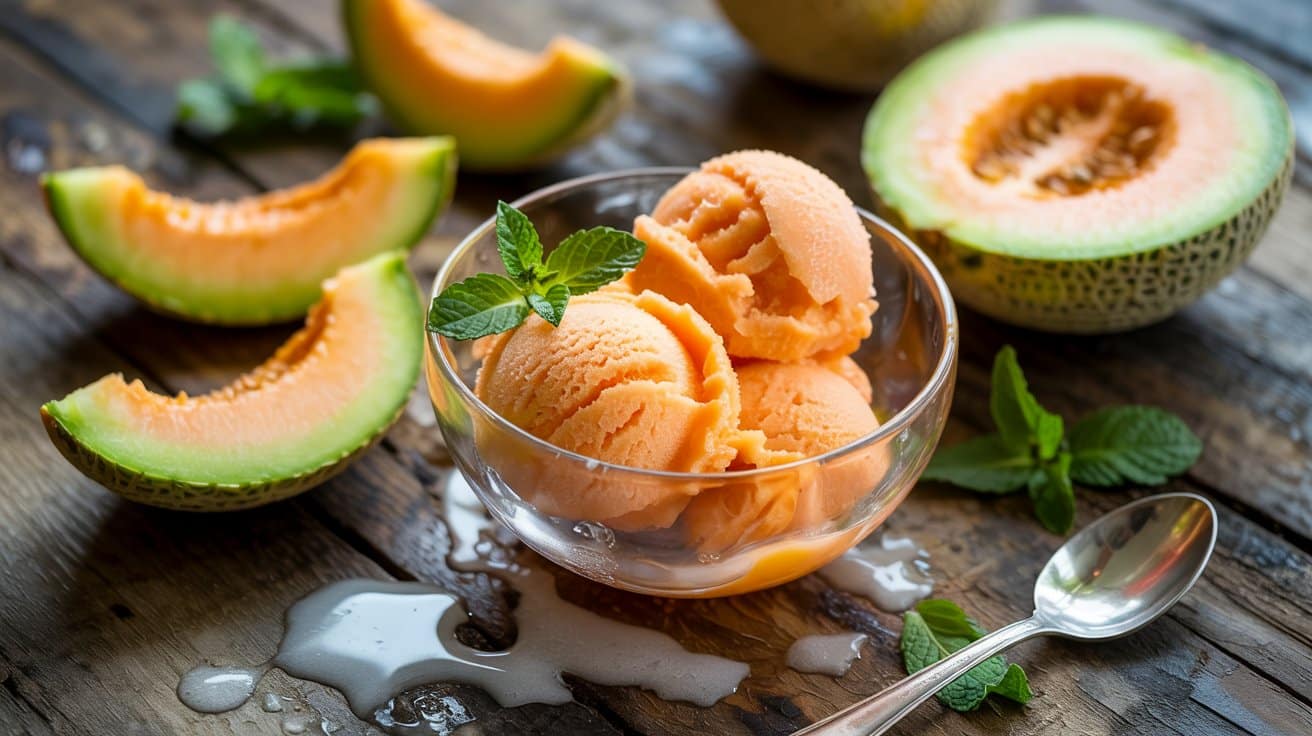
This refreshing melon sorbet highlights ripe cantaloupe in a bright, icy dessert that comes together with a short ingredient list. It's light, fruity, and ideal for warm evenings or after a rich meal.
The clean sweetness and a touch of lemon keep the flavor lively and refreshing.
Why This Recipe Works
Fresh fruit gives a clean and natural flavor boost. Minimal ingredients keep preparation quick and predictable.
- Bright melon-forward flavor - Fresh cantaloupe purée preserves the fruit's natural sweetness so the melon is the star of each spoonful.
- Balanced citrus lift - Lemon juice brightens the sorbet and prevents the sweetness from tasting flat.
- Smooth freezing texture - A simple syrup base keeps ice crystals small for a silky mouthfeel.
- Flexible chilling schedule - You can chill the base ahead of time and finish freezing the sorbet when you are ready to serve.
Ingredient Swap Ideas
Swaps help adapt the sorbet for dietary needs, pantry limits, or a flavor twist. Each option keeps the same method and similar freezing behavior.
- Granulated sugar - Use honey or agave syrup (use slightly less) to add a floral sweetness while maintaining the syrup texture.
- Lemon juice - Replace with lime juice for a sharper, more aromatic tang that pairs well with melon.
- Water - Use coconut water for the simple syrup to add subtle tropical notes and extra minerals.
- Cantaloupe - Mix with honeydew or ripe cantaloupe plus honeydew for a more complex melon profile while keeping the same consistency.
Ingredients
- 4 cups cantaloupe - seeded and cubed (about 1 medium melon).
- ¾ cup granulated sugar - for simple syrup.
- ½ cup water - for simple syrup.
- 2 tablespoons lemon juice - freshly squeezed.
Instructions
- Make the simple syrup by combining sugar and water in a small saucepan and heating until the sugar dissolves; cool to room temperature, about 20 minutes.
- Blend cantaloupe, cooled simple syrup, and lemon juice until smooth, about 30-60 seconds; strain through a fine-mesh sieve if you want an extra-smooth texture.
- Chill the purée in the refrigerator until completely cold, about 1 hour.
- Churn the cold mixture in an ice cream maker according to the manufacturer's directions until it reaches a soft-serve consistency, about 20-30 minutes.
- Transfer to a freezer-safe container and freeze until firm, about 2-4 hours; if you do not have an ice cream maker, freeze in a shallow pan and stir vigorously every 30 minutes until scoopable, about 3 hours.
17. Berry Smoothie Popsicles
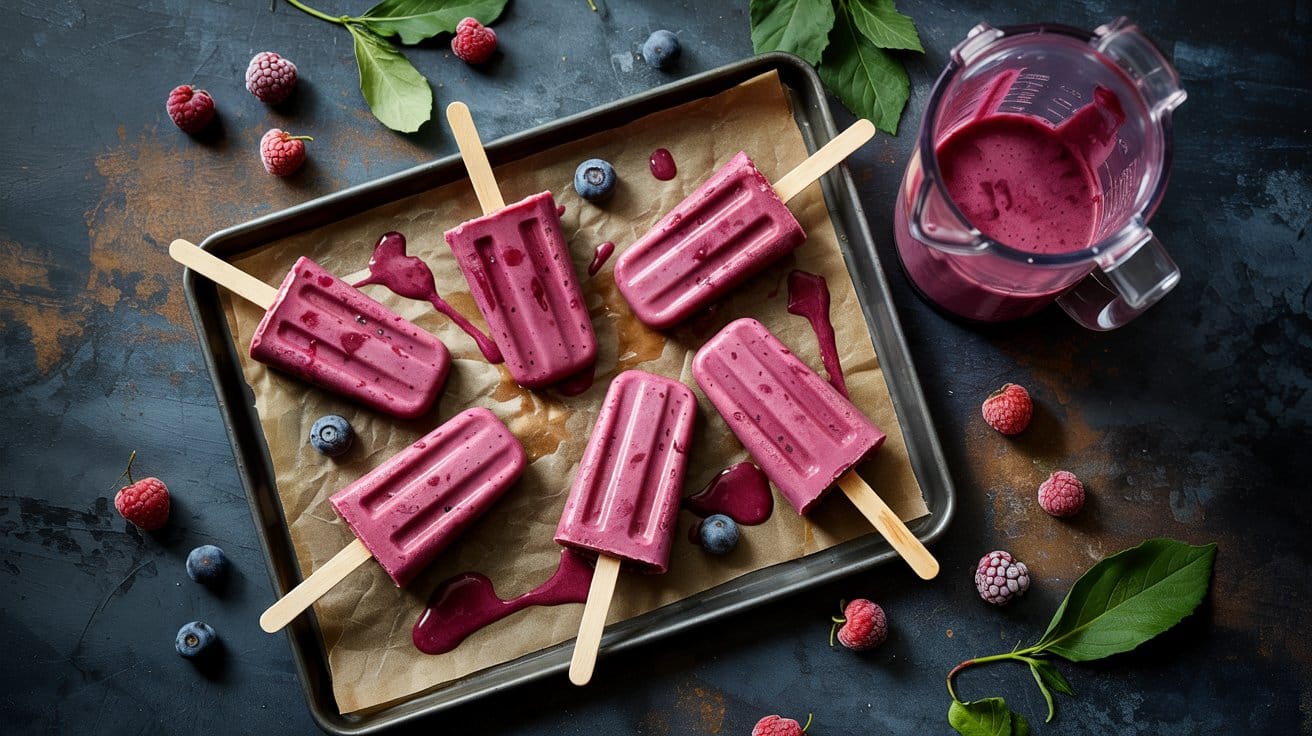
These creamy fruit pops combine whole berries, banana, and yogurt for a bright, refreshing treat. You can blend them in minutes and freeze for an easy snack or a cool dessert on warm afternoons.
Why This Recipe Works
These pops deliver real fruit flavor with a creamy texture that freezes well. The method is quick and reliable for make-ahead snacks.
- Bright berry base - Frozen or fresh berries concentrate fruity flavor and give vivid color to each pop.
- Creamy banana binder - Ripe banana smooths the mixture and adds natural sweetness without extra processed sugar.
- Tangy yogurt balance - Plain Greek yogurt keeps the texture creamy while adding protein for a more satisfying snack.
- Simple blend-and-freeze method - You only need a blender and molds, then freeze for at least four hours for solid pops.
Ingredient Swap Ideas
Swaps help match dietary needs or change texture while keeping the same blender-and-freeze method. Try these practical swaps to adjust flavor or make the recipe dairy-free.
- Greek yogurt - Use unsweetened coconut yogurt for dairy-free creaminess that still stabilizes the mixture.
- Milk - Replace with almond or oat milk to keep a smooth, pourable consistency for filling molds.
- Honey or maple syrup - Use one pitted Medjool date blended in for natural sweetness with a similar body.
- Mixed berries - Substitute frozen peaches or mango for a stone-fruit profile that freezes similarly.
Ingredients
- 2 cups mixed berries - frozen or fresh.
- 1 banana - ripe.
- ½ cup plain Greek yogurt - for creaminess.
- ¾ cup milk - dairy or plant-based.
- 1-2 tablespoons honey or maple syrup - adjust to taste.
- 1 teaspoon lemon juice - to brighten flavor.
- ½ teaspoon vanilla extract - optional for a rounded flavor.
Instructions
- Add berries, banana, yogurt, milk, honey or maple syrup, lemon juice, and vanilla to a blender.
- Blend until smooth, about 30-60 seconds, and taste; add more sweetener if needed.
- Pour the mixture into popsicle molds, leaving a little headspace, and tap molds to release air bubbles.
- Insert sticks and freeze until firm, at least 4 hours or overnight.
- To unmold, run the outside of molds under warm water for 20-30 seconds and gently pull each popsicle free.
18. Baked Apples with Cinnamon
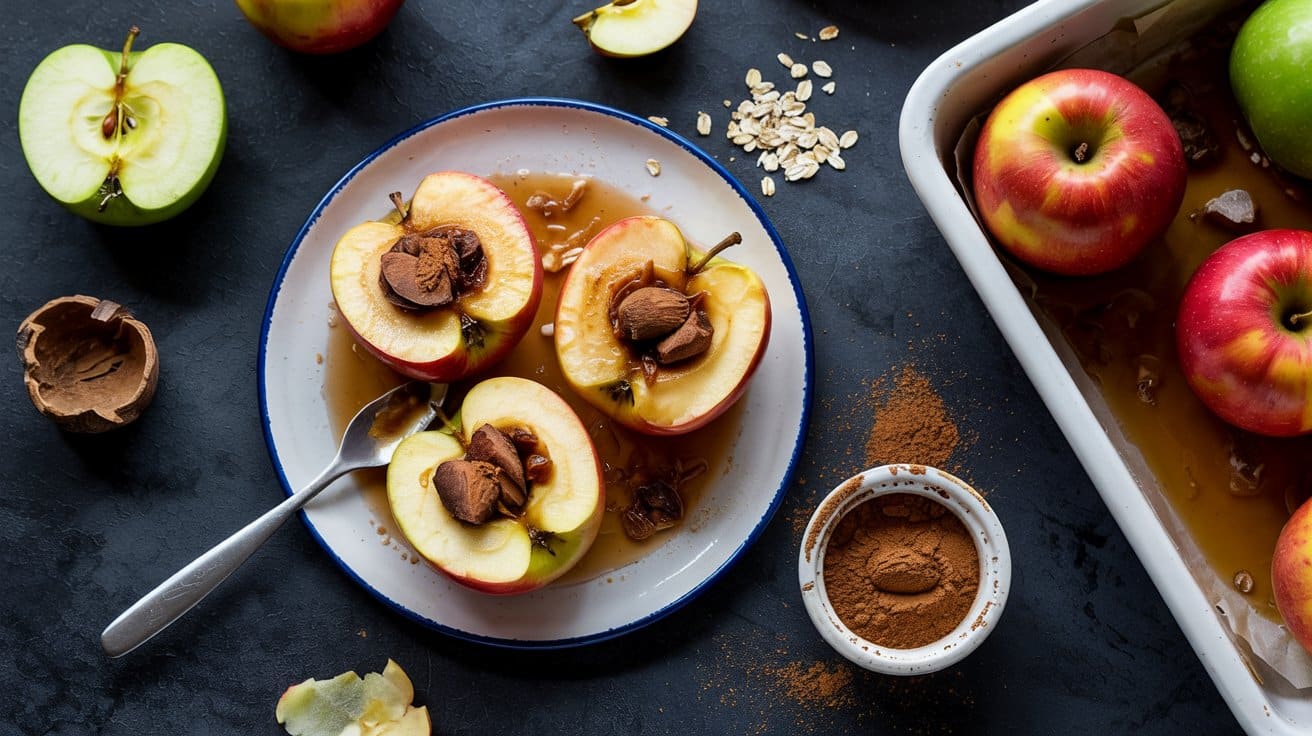
Whole apples become tender and syrupy when baked with brown sugar and warm cinnamon. This simple dessert takes little prep and fills the oven with a cozy aroma.
It's best served warm after a weekday meal or as a light treat on a cool evening.
Why This Recipe Works
Soft fruit meets a sticky spice glaze in a straightforward way. The oven does the work while you finish other tasks.
- Intact-apple presentation - Each apple holds a sweet filling so you can serve an attractive single-portion dessert.
- Caramelized cinnamon glaze - Brown sugar and cinnamon melt into a syrup that coats the apples during baking.
- Controlled tenderness - Baking at moderate heat gives tender flesh without turning the apples to mush.
- Small-batch friendly - The recipe scales easily and fits a standard baking dish for minimal cleanup.
Ingredient Swap Ideas
Swaps let you tailor sweetness, texture, or dietary needs without changing the method.
- Apples - Use firm pears (Bosc) for a softer, buttery texture that bakes similarly to apples.
- Brown sugar - Replace with maple syrup for a deeper, more complex sweetness that caramelizes well.
- Unsalted butter - Swap with a neutral oil or vegan butter for a dairy-free version that still browns.
- Walnuts - Use chopped almonds or pecans for a different crunch and nutty profile that holds up in the oven.
Ingredients
- 4 large apples - cored; choose firm varieties like Fuji or Honeycrisp.
- ¼ cup packed brown sugar - for the filling and glaze.
- 1 teaspoon ground cinnamon - divided if preferred.
- ¼ cup chopped walnuts - optional for filling and texture.
- 2 tablespoon unsalted butter - cut into small pieces.
- ¼ cup water - for the baking dish to create steam.
- ⅛ teaspoon kosher salt - to balance the sweetness.
Instructions
- Preheat the oven to 350°F and arrange apples in a small baking dish so they sit upright.
- Stir brown sugar, cinnamon, chopped walnuts, and salt in a bowl until combined, then spoon the mixture into the cored centers of each apple.
- Place a small piece of butter on top of each filled apple and pour the water into the bottom of the baking dish.
- Cover the dish loosely with foil and bake 25 minutes, then remove foil and bake an additional 10 minutes until apples are tender when pierced with a knife.
- Let the apples rest 5 minutes, spoon the pan juices over them, and serve warm.
19. Chilled Melon Soup
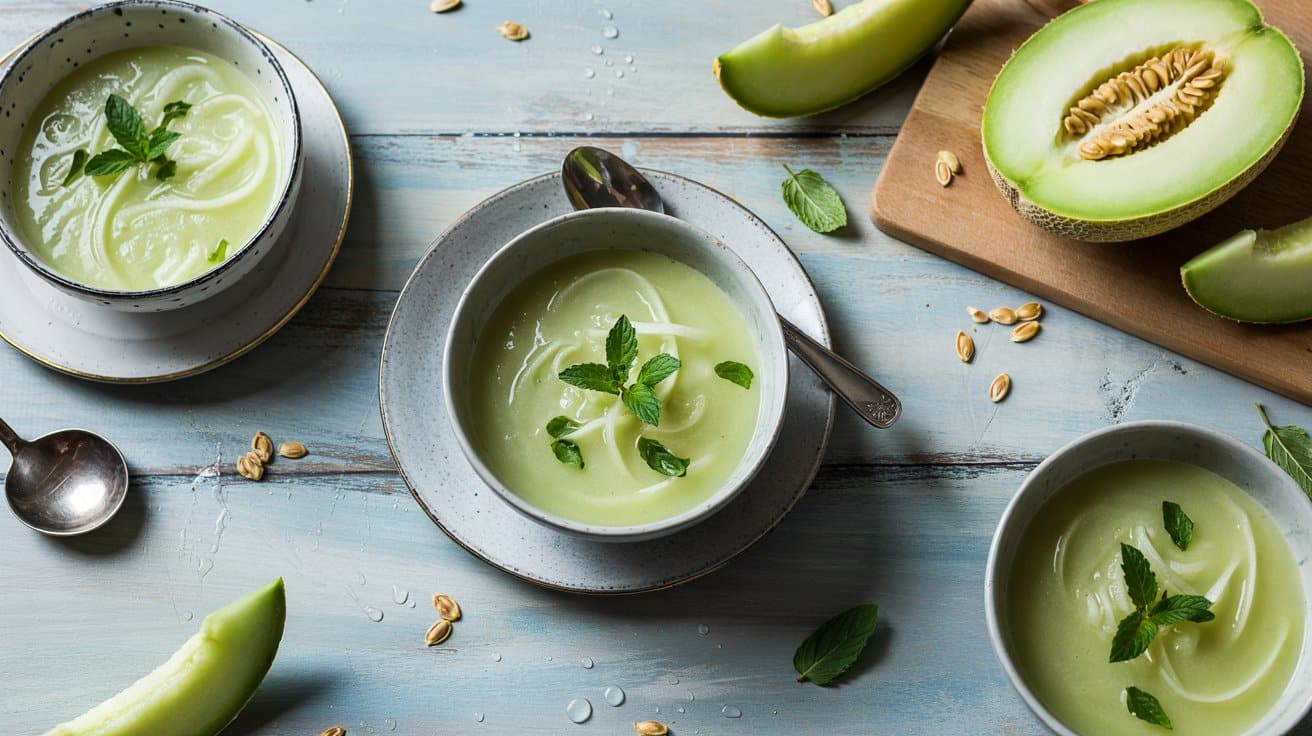
This cool, fruity soup comes together quickly from ripe melon, a splash of citrus, and a touch of yogurt for creaminess. It tastes bright, lightly sweet, and is best served well chilled as a starter or a light summer lunch.
Why This Recipe Works
This recipe shows the melon's natural sweetness while keeping the finish bright and refreshing. The texture is velvety without heavy dairy, so it feels light on warm days.
- Luscious melon base - Pureed melon creates a naturally sweet, smooth body for the soup.
- Citrus brightens sweetness - Lime juice cuts sweetness and brings a lively finish to the bowl.
- Creamy yogurt balance - Yogurt adds gentle tang and body without overpowering the fruit.
- Minty herbal lift - Fresh mint adds a cooling note that goes with the fruit and citrus.
Ingredient Swap Ideas
Swaps let you adapt for diet, availability, or flavor preference while keeping the soup simple and fresh.
- Melon - Use watermelon for a juicier, sweeter base that still blends to a smooth texture.
- Plain yogurt - Swap with coconut milk for a dairy-free, slightly tropical finish.
- Honey - Replace with agave syrup for a vegan option that keeps the same sweetness level.
- Cucumber - Substitute with a peeled green apple for a crisp, subtly tart element that blends well.
Ingredients
- 4 cups melon - cubed (cantaloupe, honeydew, or mixed).
- ½ cup plain yogurt - chilled; Greek or regular.
- ¼ cup cucumber - peeled and chopped.
- 2 tablespoons fresh lime juice - about 1 lime.
- 1 tablespoon honey - or agave syrup.
- 6 fresh mint leaves - plus extra for garnish.
- ¼ teaspoon salt - adjust to taste.
- ⅛ teaspoon black pepper - freshly ground.
Instructions
- Add the melon, cucumber, yogurt, lime juice, honey, mint, salt, and pepper to a blender.
- Blend until very smooth, about 45-60 seconds, stopping once to scrape down the sides.
- Taste the soup and add more honey or lime juice a teaspoon at a time until you like the balance.
- Chill the soup in the refrigerator for at least 1 hour to firm up and let flavors meld.
- Pour into bowls, garnish with mint leaves, and serve cold within 24 hours.
20. Pear and Almond Crumble
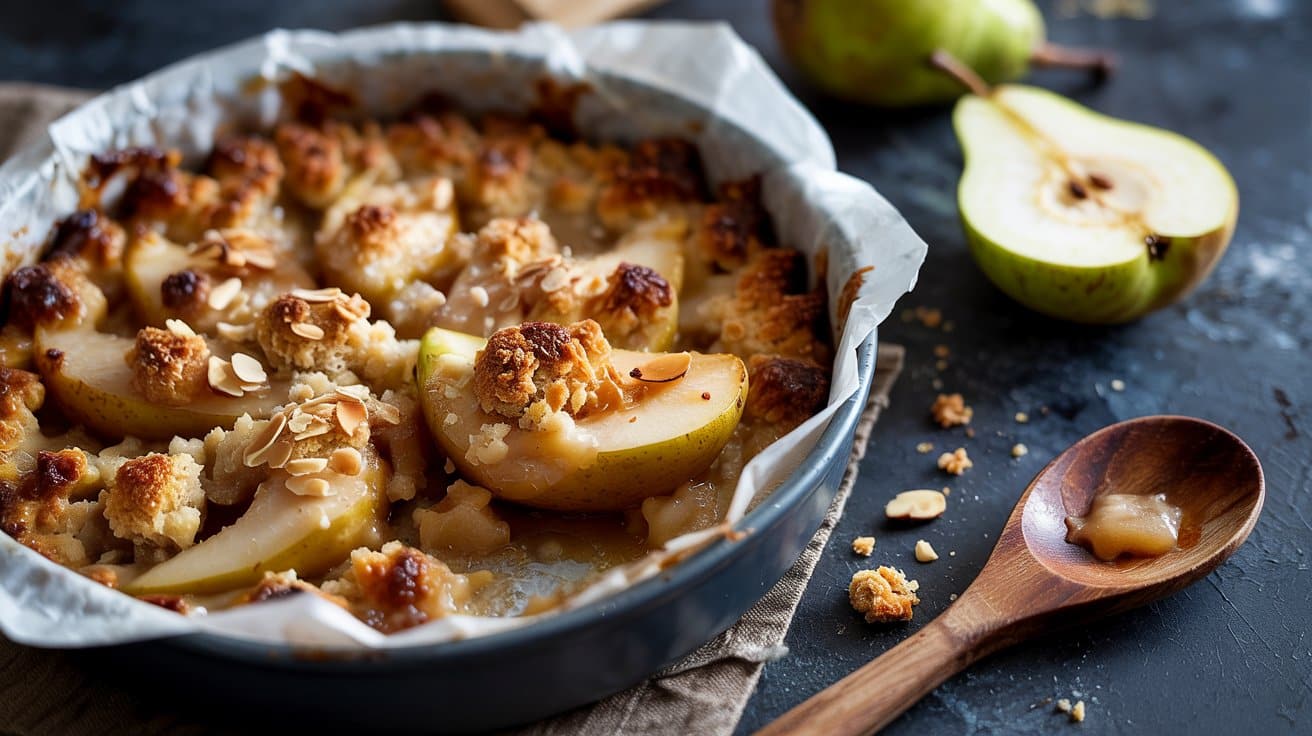
This crumble pairs tender baked pears with a nutty almond topping for a simple, comforting dessert. It's easy to prepare and best served warm with a scoop of vanilla ice cream or a dollop of whipped cream.
The topping stays crisp while the fruit becomes syrupy and fragrant.
Why This Recipe Works
This recipe balances soft fruit and crunchy nutty topping for clear textural contrast. It uses almond flour and sliced almonds to intensify the almond flavor without weighing the topping down.
- Tender pear filling - Pears bake until soft but still hold shape, so the filling is saucy without collapsing.
- Almond-forward topping - Almond flour and sliced almonds add nutty crunch that toasts in the oven for deeper flavor.
- Simple thickener - A small amount of cornstarch gives the filling a glossy, sliceable texture so it does not run.
- Make-ahead crumble topping - You can mix the topping and store it in the fridge for up to 24 hours to save time before baking.
Ingredient Swap Ideas
Swaps make this recipe fit pantry limits or dietary needs while preserving the method and taste.
- Pears - Use firm apples such as Honeycrisp or Gala for a slightly tangier filling that holds up in baking.
- Almond flour - Substitute finely ground hazelnuts to keep the nutty profile while altering the flavor.
- Rolled oats - Replace with ½ cup crushed cornflakes for a lighter, crispier topping texture.
- Butter - Use cold solid coconut oil in equal measure for a dairy-free topping that still browns well.
Ingredients
- 3 pounds pears - peeled, cored and sliced (about 6 medium).
- ⅓ cup granulated sugar - for the filling.
- 2 tablespoons brown sugar - packed, for the filling.
- 1 tablespoon lemon juice - to brighten the fruit.
- 2 teaspoons cornstarch - to thicken the filling.
- 1 teaspoon vanilla extract - for aroma.
- ½ teaspoon ground cinnamon - for warm spice.
- ¼ teaspoon salt - divided between filling and topping.
- 1 cup almond flour - for the topping.
- ½ cup rolled oats - old-fashioned.
- ⅓ cup sliced almonds - for extra crunch.
- ⅓ cup brown sugar - packed, for the topping.
- 6 tablespoons cold unsalted butter - cut into small cubes.
Instructions
- Preheat the oven to 375°F and butter a 9-inch baking dish.
- Toss the sliced pears with granulated sugar, 2 tablespoons brown sugar, lemon juice, cornstarch, vanilla, ¼ teaspoon cinnamon, and ⅛ teaspoon salt, then spread the mixture in the prepared dish.
- Combine almond flour, rolled oats, sliced almonds, ⅓ cup brown sugar, remaining ¼ teaspoon cinnamon, and ⅛ teaspoon salt in a bowl, then cut in the cold butter with a pastry cutter or your fingers until pea-sized crumbs form.
- Scatter the topping evenly over the pears and press lightly to compact.
- Bake for 35-40 minutes until the topping is golden and the filling bubbles at the edges, then cool 10-15 minutes before serving warm.
21. Yogurt and Fruit Smoothie
This quick yogurt-and-fruit shake is creamy, bright, and ready in minutes. It balances protein from yogurt with the natural sweetness of fruit, making it great for breakfast, a snack, or a post-workout pick-me-up.
Why This Recipe Works
This recipe is fast to assemble and forgiving with ingredients. You can tailor texture and sweetness in seconds.
- Creamy protein base - Plain yogurt gives the smoothie body and keeps you full longer.
- Fruit-forward sweetness - Fresh or frozen fruit supplies natural sugars and a fresh taste.
- Simple blender method - Everything goes in the blender for one-step mixing and no fuss.
- Texture you control - Add milk for a pourable drink or ice for a thicker, spoonable shake.
Ingredient Swap Ideas
Swaps make this recipe work for different diets and pantry items. Use them to adjust texture, calories, or allergies.
- Plain Greek yogurt - Use plain regular yogurt for a milder texture or dairy-free yogurt for a vegan option, keeping the creamy base.
- Mixed fruit - Swap berries for peaches or mango for a sweeter, tropical profile that still blends smoothly.
- ½ cup milk - Replace with almond, oat, or soy milk to change calories and creaminess while maintaining liquid balance.
- 1 tablespoon honey - Substitute maple syrup or agave for a vegan sweetener that dissolves easily.
Ingredients
- 1 cup plain Greek yogurt - whole-milk or low-fat.
- 1 cup mixed fruit - fresh or frozen; berries, banana, mango, or peaches work well.
- ½ cup milk - dairy or plant-based.
- 1 tablespoon honey - optional; adjust to taste.
- 1 cup ice - use less for a thinner drink or skip if using frozen fruit.
Instructions
- Add yogurt, fruit, milk, and honey to the blender.
- Top with ice and secure the lid.
- Blend on high until smooth, about 20-45 seconds depending on blender power.
- Taste and adjust thickness with more milk or add a little more sweetener, then pour and serve immediately.
22. Frozen Banana Bites
These frozen banana bites are a simple, satisfying snack that pairs sweet banana with creamy nut butter and a crisp chocolate shell. You get a contrast of textures and just enough sweetness, making them ideal for afternoon snacks, lunchboxes, or a light dessert after dinner.
Why This Recipe Works
These bites freeze firm while keeping a creamy center, so they hold up well and are easy to eat. The chocolate and topping add texture and make them feel special without extra fuss.
- Creamy frozen center - The banana and nut butter set up firm in the freezer while staying soft enough to bite through.
- Snap-ready chocolate shell - Melted chocolate thinned with a little oil hardens into a thin, crisp coating for contrast.
- Quick assembly and freeze - You can assemble dozens in under 20 minutes and freeze them for later.
- Custom topping crunch - Chopped nuts or coconut adhere to the chocolate and add a crunchy finish.
Ingredient Swap Ideas
Swaps help adapt the snack for allergies, sweetness preference, or pantry staples while keeping the same freezing and coating method.
- Peanut butter - Swap with almond butter or sunflower seed butter for a different flavor or a nut-free option.
- Dark chocolate chips - Swap with milk chocolate or white chocolate chips for a sweeter, milder coating.
- Coconut oil - Swap with a neutral vegetable oil or butter to thin the chocolate and help it set firm.
- Chopped almonds - Swap with shredded coconut or crushed graham crackers for varied texture and taste.
Ingredients
- 3 medium bananas - firm, ripe but not overly soft.
- ½ cup creamy peanut butter - room temperature.
- 1 cup dark chocolate chips - for coating.
- 1 tablespoon coconut oil - to thin the chocolate.
- 2 tablespoons chopped almonds - for topping.
- 1 baking sheet - lined with parchment paper.
Instructions
- Line the baking sheet with parchment and slice the bananas into ½-inch rounds, arranging them in a single layer.
- Spoon about ½ teaspoon of peanut butter onto half of the banana rounds, then top each with another round to make small sandwiches.
- Freeze the sandwiches on the sheet until firm, about 30 minutes.
- Melt the chocolate chips with the coconut oil in 20-30 second microwave bursts, stirring until smooth.
- Dip each frozen sandwich into the chocolate to coat, place back on the parchment, sprinkle with chopped almonds, and freeze until the chocolate is set, about 1 hour.
23. Fruit Pizza with Cream Cheese
A colorful, shareable dessert built on a sweet cookie crust and a creamy, tangy topping. It's easy to assemble and works well for brunches, potlucks, or summer gatherings.
The fresh fruit adds bright flavor and texture, and a light glaze keeps everything glossy and in place.
Why This Recipe Works
You get an impressive-looking dessert without complicated steps. The components can be prepped ahead and assembled quickly.
- Sweet, sturdy cookie base - The sugar-cookie crust bakes into a firm surface that holds toppings without becoming soggy.
- Closely balanced cream layer - The cream cheese and powdered sugar mixture spreads smoothly and adds mild tang to contrast the fruit.
- Versatile fruit topping - You can combine berries, kiwi, and stone fruit for varied color and texture.
- Quick glaze finish - A thin apricot jam glaze seals the fruit and gives a glossy, appetizing look.
Ingredient Swap Ideas
Swaps help you adjust sweetness, texture, or dietary needs without changing the method.
18 melt-free desserts for hot days offers cool options for warm weather, and 16 small-batch desserts for solo treats suits single-serve cravings.
- All-purpose flour - Use whole-wheat pastry flour for a nuttier crust with similar structure.
- Granulated sugar - Replace with coconut sugar for a less-refined flavor while keeping browning.
- Cream cheese - Use Neufchâtel or reduced-fat cream cheese for lower fat while keeping the tang.
- Apricot jam - Use warmed honey or peach preserves for a similar glaze and shine.
Ingredients
- 1 ½ cups all-purpose flour - for the crust.
- ½ cup granulated sugar - for the crust.
- ½ teaspoon baking powder -.
- ¼ teaspoon salt -.
- ½ cup (1 stick) unsalted butter - softened.
- 1 large egg - room temperature.
- 1 teaspoon vanilla extract - divided.
- 8 ounces cream cheese - softened.
- ⅓ cup powdered sugar -.
- ½ cup sour cream - to loosen the topping.
- 3 cups assorted fresh fruit - sliced or halved; strawberries, kiwi, blueberries recommended.
- 2 tablespoons apricot jam - warmed for glaze.
Instructions
- Preheat the oven to 350°F. Cream the butter and granulated sugar, add the egg and ½ teaspoon vanilla, then stir in the flour, baking powder, and salt to form a dough; press evenly into a greased 12-inch pizza pan or round baking sheet.
- Bake the crust 12-15 minutes, until the edges are lightly golden; let it cool completely on a wire rack.
- Beat the cream cheese with powdered sugar, sour cream, and the remaining ½ teaspoon vanilla until smooth; chill 10-15 minutes to firm slightly.
- Spread the cream cheese mixture evenly over the cooled crust to the edges.
- Arrange the prepared fruit on top in rows or a decorative pattern, pressing lightly so the pieces adhere.
- Warm the apricot jam with 1 teaspoon water until thin, brush over the fruit for shine, then chill the pizza 30 minutes before slicing and serving.
Frequently Asked Questions
Consider your skill level and the time you have available. A good recipe fits your kitchen setup and gives you enough guidance to succeed on the first try.
Preparation time varies widely. Simple versions take under 30 minutes, while more involved recipes may need an hour or longer for marinating, baking, or slow cooking.
Recipes with fewer than 10 ingredients and no special equipment are the most accessible. Look for those that describe steps clearly and allow some flexibility in timing and technique.
Start by adjusting salt and acid. If a dish tastes flat, a pinch of salt or squeeze of citrus often fixes it.
Too rich? Add something bright.
Too sharp? A small amount of fat or sweetness balances it.

Andrew Gray is a passionate food writer and recipe creator who built Gusto Meadow to celebrate delicious, approachable cooking. With years of experience in restaurants and catering, he brings a grounded, real-world understanding of flavors, technique, and what truly works in a home kitchen.
At Gusto Meadow, Andrew focuses on fresh, seasonal ingredients and simple methods that anyone can follow. His goal is to make cooking feel fun, doable, and rewarding — whether you’re preparing a quick weeknight dinner or exploring something new.